Tips for Using Sparking Fire-Starters
Sparking fire-starters are a mainstay of wilderness survival kits. They are rugged, waterproof, and have the potential to light thousands of fires. They aren't terribly expensive and you can find one of just about any size or form-factor from keychain-sized models to large, purpose-built versions. For all their virtues, lighting a fire with them can be tougher than you might think. Today I will offer a few hard-won tips for using sparking fire-starters.
This article contains affiliate links.
Forget the Tiny Included Striker
Unless you have no choice, forget the tiny, flimsy striker that came with your ferro rod. Use your knife instead. This one took me a long time to learn. My exoTAC nanoSTRIKER keychain ferro rod is a great example of this. I have carried one of these tools in my pocket since roughly 2010. I'm on my second one because I damaged the first. This is a great tool and I've started plenty of fires with it. Unfortunately the provided striker is very, very small - both in the striking surface, and the area for you to hold on to while striking. It is very difficult to hang on to and it is hard to get the leverage to get a good shower of sparks. It works...but barely.

I don't know why this only occurred to me recently, but: use a better striker! Use the back of your knife blade rather than the tiny little nub or the flimsy tool that comes with your ferro rod. If they provide you with a really nice striker, cool. But if they don't, provide your own. I have spent a lot of time struggling with that tiny little striker when all-the-while I had a knife in my pocket. I felt like an idiot when I recently realized this. Hopefully I can save you some trouble. Don't throw that little included sparker out, though. It may come in handy if you don't have a knife, whether forgotten, lost, or left behind for air travel.
There are a few other things to look for in a knife if striking a ferro rod is something you want your knife to do. Let's take a look.
Choose a Good Knife
Sure, you can coax a spark out of your ferro rod with just about any knife. With the right knife you can surprise even yourself with the spray of sparks you can throw. Many bushcraft knives have the following features:
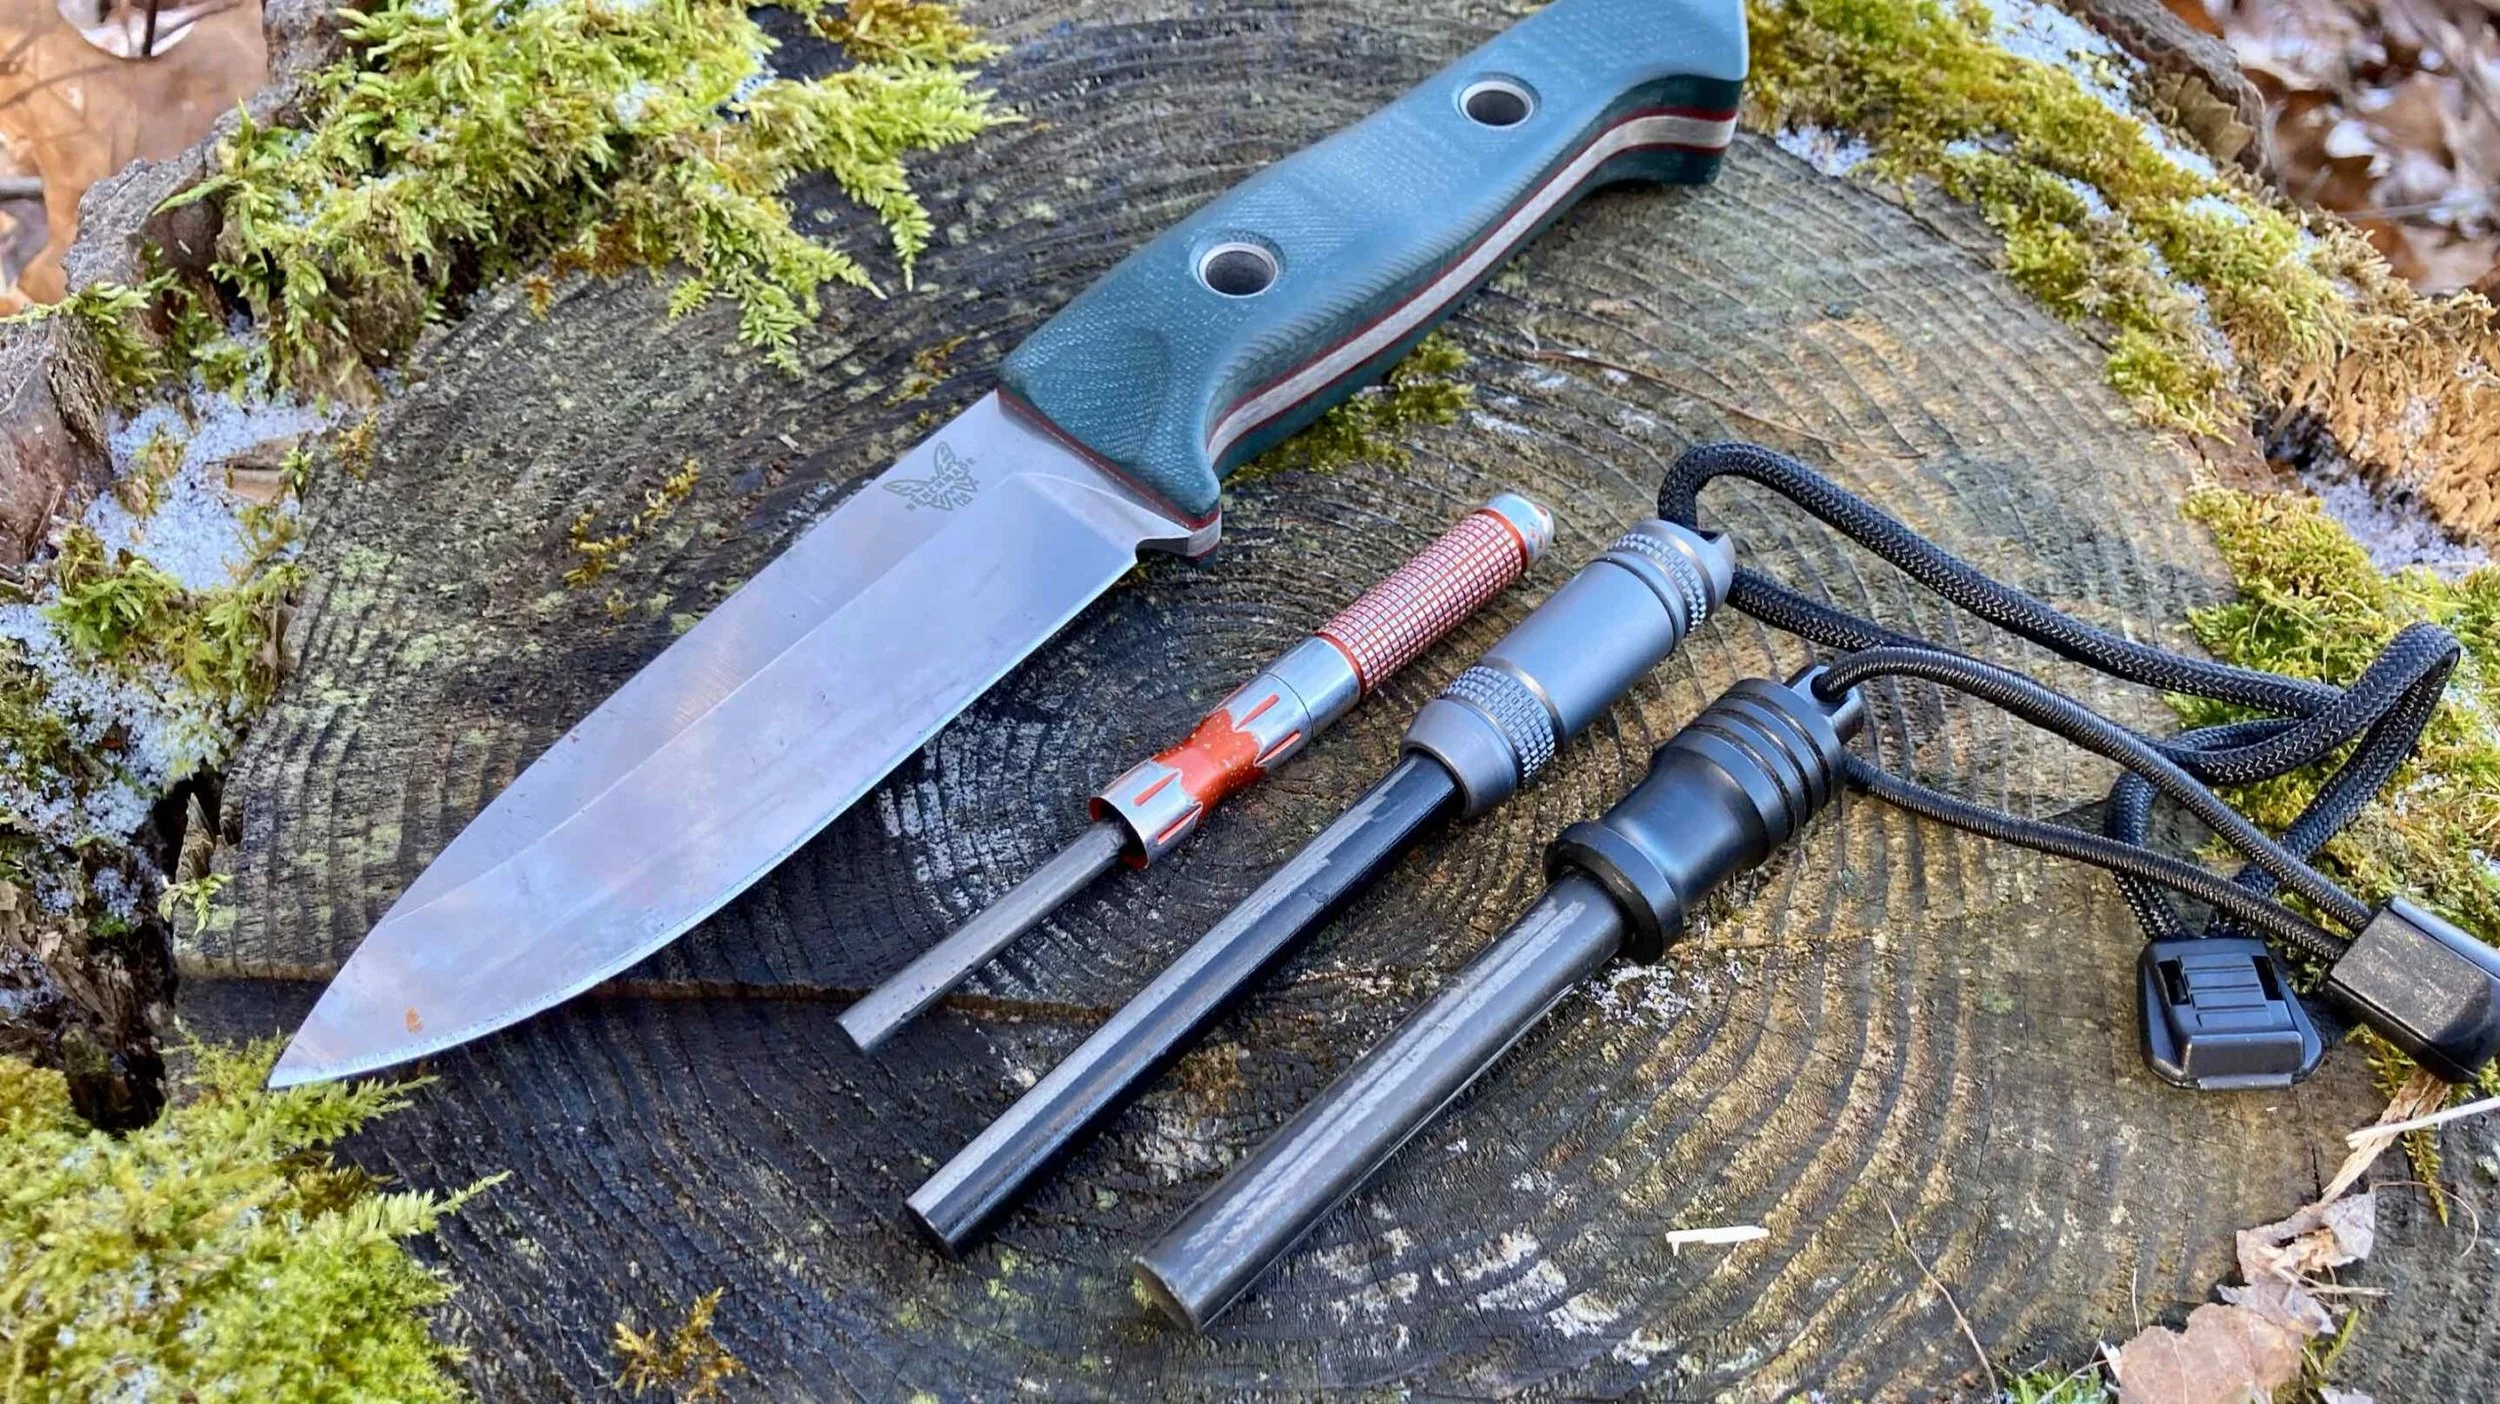
Sharp edges. No, I'm not talking about the cutting edge. Just so it's said, don't use your cutting edge to spark your ferro rod if at all possible. I'm taking about the edges on the spine of the blade. The sharper the area addressing the ferro rod is, the better it will work. It will simply create more friction and "cut" into the rod better. The photo below shows the Benchmade 162 "Bushcrafter" - an awesome example of what I'm talking about.

Uncoated blade. A coated blade will get some sparks out of a ferro rod. But an uncoated blade will do a better job with less effort. The coating is a barrier to the metal-to-metal contact necessary to generate sparks. If your knife has a blade with a coating on it, no worries. you can carefully use a bit of sandpaper to remove a small section of coating from the spine of the blade to enable more reliable sparking.

Speaking of coatings...you'll also want to remove the coating from your ferro rod itself. Most ferro rods come from the factory with a protective coating. You'll have to scrape through this with your striker, and it shouldn't take more than a couple strokes to clean up one side of the ferro rod. If you've let your rod sit for a few months since use it will develop its own kind of coating: oxidization. Again, you'll have to scrape a bit of this off to expose the rod itself.
If you don't have a knife (or it doesn't work for some reason) other things will work. Two things I have found to work fantastically well are trauma shears and multi-tool files. Trauma shears have a finely serrated side that works extremely well. Multi-tool files are square-edged and do an exceptionally good job. If you can't carry any of those things, make your own striker from a hacksaw blade, or get creative and improvise. This is good info for those of you who travel frequently; knives can't go in carry-on bags but small trauma scissors and TSA-compliant multi-tools may be.

Don't Push the Striker
This is another one that took me forever to learn. Learn from my mistakes here: pull the ferro rod, don't push the striker. Let me explain. There is a strong tendency for new users to poise the ferro rod over their tinder. Then they will strike in a downward motion toward the tinder. This causes two huge problems. Notably, you're always knocking your tinder pile and scattering it. If a spark did manage to land, you've probably lost it if you've completely disrupted your tinder bundle.

Second, your hand is moving toward a solid surface at high speed. You can probably see the problem...you're going to scrape your knuckles up. It's going to get pretty uncomfortable pretty quickly. Trust me, I've had the skinned knuckles to prove it. If you're building a fire from sparks with natural tinder it's probably going to take a dozen (or several dozen) strikes to get a fire going.

Instead, hold the striker stable and pull the ferro rod up. This creates the same shower of sparks, but obviously prevents you from striking the tinder bundle, scattering it, and scraping your hand. It also helps you better direct the flow of sparks by playing with the angle of the ferro rod against your striker.
A Couple Other Things
Just a couple other quick thoughts. These are probably obvious, but I'll throw them out anyway.
Choose the largest ferro rod that suits your application. I have several: on my person every day is a small exoTAC nanoSTRIKER. It works for day-to-day carry where the likelihood of need is very small. It also works as a first-line tool while hiking where it is backed up by much more capable devices in my pack. It works great as a last-ditch tool, but I'd want something bigger as my primary. The longer the ferro rod is, the longer the stroke and the more sparks you'll get. The wider it is the longer it will last and the more surface area each strike will address, again giving you more sparks. My favorite "big" ferro rod is the exoTAC fireROD.

Match your tinder to your tool. Sparking tools require very fine tinder. I have a future article in the works about tinder, but bottom line: you'll need some very dry, fluffy stuff to take a spark and turn it into a flame. I see this consistently messed up whtn building a fire with sparks, so choose wisely. Manmade tinder is easiest to come by and you should have a little on you. If not you'll have to scour the woods to find something that will reliably catch a spark.

Have a Spare: I recommend having a spare ferro rod. Correction: I recommend having one you practice with and one that you depend on. Ferro rods sometimes go into kits for years if not decades. The coating on those rods is there for a reason: to protect it from oxidation. It's probably a good idea to have an extra ferro rod in your kit, and another that you use for all your practice sessions.

In the case of the exoTAC fireROD and nanoSTRIKER I have backup inserts for both. I recently contacted exoTAC and was gratified to learn the still sell replacement inserts for the nanoSTRIKER, even though it has been discontinued. I have purchased several fireROD inserts and nanoSTRIKER inserts to keep these tools running.
Parting Shot
Nothing ground-breaking here, just the result of building a couple dozen fires over the past few weeks. I wouldn't have known most of this - and I certainly wouldn't have appreciated it - if I hadn't gotten out and done; reading books and watching YouTube just isn't quite the same. I hope you learn from this article, but my words and photos are a terribly poor substitute for experience doing. Get out and do and learn firsthand!

