Deadbolt Security I: Forced Entry Resistance
In my last post on physical security I talked about improving the security of your locking knobset. This time I am going to talk about the real workhorse of personnel door security: the deadbolt. I will talk about what to look for if you are looking for new deadbolt, as well enhancing deadbolt security on locks you already own/have installed .
This article contains affiliate links.
Image attribution: featured image of kicked-in door courtesy of Tim Samoff, https://www.flickr.com/photos/timsamoff/79357451.
The Overlooked Deadbolt
If you don't have a correctly installed, high quality deadbolt, that should be one of your top security priorities. Part of military mission planning is identifying the enemy's most dangerous (MD), most likely (ML), and least likely (LL) courses of action (COA). Kicking in your front door is probably both a MDCOA because of its likelihood for success, and a MLCOA because it's really likely someone breaking into your home will try this. Before spending tens of thousands on Level IV plates, night vision, and an integrally suppressed .300 BLK to deal with attackers HALO'ing into your backyard on a moonless night (LLCOA), maybe spend $50 for a really good deadbolt on each of your exterior doors.
Good, correctly-installed deadbolts, do a couple of things. They lower the chance of a "kick-in" attack being successful. Second, good deadbolts also help give you time to prepare if your door is being kicked in. If your door opens under one kick, the bad guy might be in your house before you even sit up. If it takes 12 kicks to get the door open, you - and your land-shark, if you have one - are probably going to be up and and fully awake by the time the door finally opens.
As I discussed last time, locking knobs and levers rarely provide a meaningful level of security. Deadbolts do, and you should have one on each exterior door including personnel doors between your garage and your house. Even one door without a deadbolt negates the security of all the others. This post will discuss choosing a deadbolt, briefly touch on installation, ensure it is installed and adjusted correctly, as well as a few minor enhancements.
The only factors that most people consider when selecting a deadbolt are cost and appearance. I completely understand both and believe you should choose a deadbolt that appeals to you visually and is within your budget. Those are not the only criteria you should look at, though.
Choosing a Deadbolt: ANSI Grades
You should also pay attention to the ANSI grade. Locks receiving a Grade 1, 2, or 3 from ANSI have been tested by an independent laboratory, and this number will appear on the package. If the lock is ungraded - i.e. you can't find a Grade statement on the package or in the product description online - DO NOT purchase it! If your lock is a cheap Kwikset (or Kwikset knockoff like Brinks, Copper Creek, Defiant, etc) that was installed by the builder, it is probably a Grade 3 lock.
Grade 3 locks are the lowest grade and are by far the most common residential locks. Grade 3 deadbolts can be had for as little as $10. You don't always get what you pay for, but you usually do. The stuff and - more importantly - the people in your home are worth protecting with more than a $10 lock. I would recommend stretching to at least a Grade 2 deadbolt. Grade 2 deadbolts can often be had for $20-30 or so and represent a strong upgrade in quality. These locks have to withstand much more stringent tests, and are designed with more inherent strength. The quality of these locks is also generally higher, meaning tighter tolerances, making things like lock-picking and key bumping more difficult.

The best grade is Grade 1. Grade 1 locks are much, much strong and of higher quality than Grade 3 locks, and a significant increase over Grade 2. These locks can start getting expensive when you need four or five of them, but it will be worth it. A Grade I lock will be stronger and resist kick-ins better. It will also have higher tolerances and be constructed of better materials. This will help us prevent other, less likely attacks (like lock picking) in the future.
My recommendation: Grade 2 is the minimum acceptable standard that you should consider. If you can afford a Grade 1 lock, get a Grade 1 lock. Regardless of whether you get a Grade I or Grade II lock, ensure it has a six-pin cylinder! The easiest way to do this is to purchase a lock from your local locksmith and tell them what you want rather than buying online or at a big-box store. Big box stores carry products based on their profit margins; I have been disappointed over and over by the locks at home improvement stores. I would call a locksmith, explain that I wished to purchase a Grade 1 deadbolt with a 6-pin cylinder and a Schlage "E" keyway. These little features mean a great deal if you are interested in defeating keyway attacks.


Keyed Knob/Deadbolt Combos
If you start shopping for deadbolts you will doubtlessly run across combinations of keyed knobs and deadbolts. In fact, your home might already have a keyed knob/deadbolt combo. The thinking on these seems to be that if one lock is good, two is better. I disagree.
If a deadbolt is actually any good, the locking knob does nothing. I would much rather see you spend twice as much on a better deadbolt than on two shitty locks. The locking knob also creates a problem, and one that I see occasionally with some people in my own life. If you have the locking knob, you may be tempted to use it - and not the deadbolt - when you run out for something and will "be right back." Well, now you're leaving your home with much less security for the sake of convenience. The deadbolt without a locking knob prevents this. It is an all-or-nothing security measure.

One more thing I dislike about locking knobs: it's possible to lock yourself out. I know many people who lock their knob via the button on the inside before closing the door. This is creates all sorts of opportunity lock yourself out. If you have a deadbolt, you have to lock it with your key. This ensures you have your key on you before you leave. As humans we dislike inconvenience, so we will sabotage our own security to achieve greater convenience. One way in which we do that is by hiding a key outside our house.
I know a locksmith who owns three shops. His employees are forbidden from looking for hidden keys when they are called to residential lockouts. Why? They almost always find one. Once they find a key, the homeowner doesn't think they should be charged $85 for the locksmith's time because they, "didn't do anything." DO NOT HIDE A KEY OUTSIDE YOUR HOME! Your key is much easier to find than you imagine. Not hiding a key is much easier if you don't have a locking knob that could potentially lock you out.
Installation/Adjustment
Ensuring your deadbolt is correctly installed and adjusted is the most important step you can take toward enhancing deadbolt security. Modern deadbolts are designed to extend at least 1" from the rim (edge) of the door. You should ensure that your deadbolt is allowed to extend fully. If it is only partially extended it is not truly "dead", meaning it is not locked into place in the extended position. We are after kick-in protection; the more it extends into the jamb, the better our protection, so make sure it extends fully.
To understand the concept of a "dead" bolt versus a "live bolt, open your door slightly. Extend the deadbolt, but not quite all the way. Now attempt to push it back into the door. When fully extended it should be locked out and you should not be able to push it back into the door. Failing to extend fully just just a fraction of an inch, though, and it isn't locked into place.
To verify that your deadbolt extends fully when you door is closed, follow this procedure: open the door and extend the deadbolt fully, ensuring that it locks into place. Using a Sharpie, draw a line on the bolt, as close to the edge of the door as possible.

Retract the deadbolt and close the door. With the door closed, extend the deadbolt. If the line you drew is not visible, the bolt is not being allow to extend fully. You should correct this situation immediately. If you can see the line the bolt is extending fully band becoming "dead".

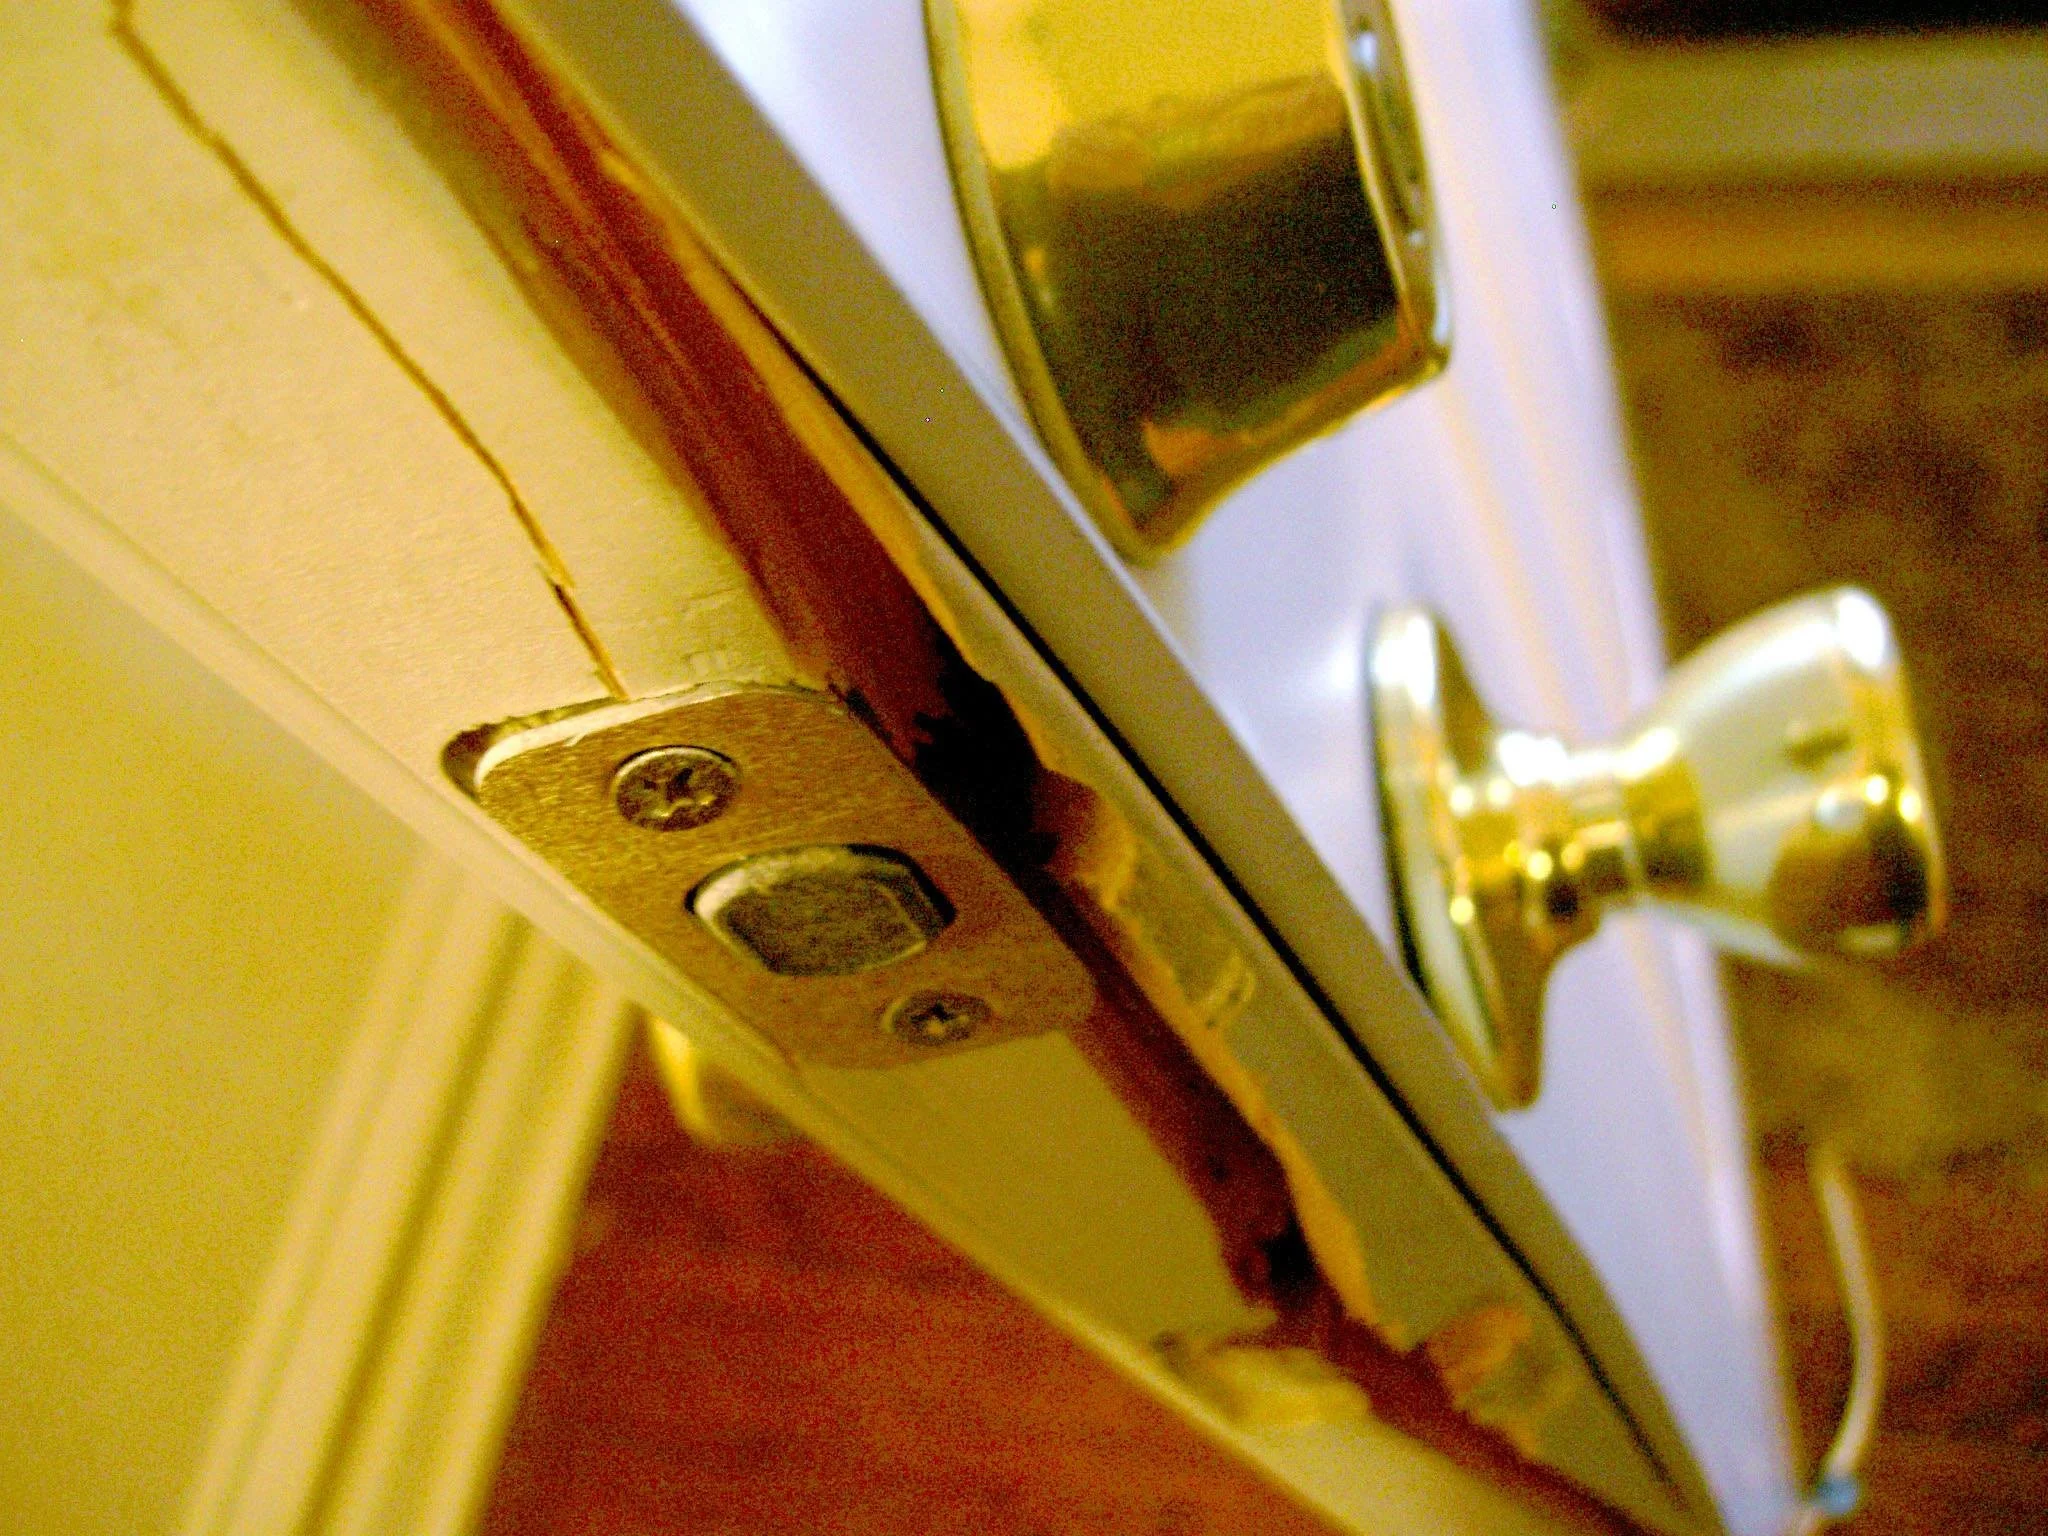
Most residential doors open inward, but some - like the French doors in the photos here - open outward. If your door happens to open outward (or be "reverse" handed) you should make damn sure your deadbolt extends fully. On an outward-opening door the bad guy can see and interact with this bolt. If it doesn't extend fully and is "live" a small, sharp object (like a pocket knife) can be used to "walk" the deadbolt back.
The Jamb Side
The deadbolt is only part of the equation. You can spend hundreds of dollars (literally, up to $600 or $800 per lock) on some super high-security locks. But if you don't correct any issues with the door jamb it really doesn't matter. The photo below illustrates the typical construction of the jamb. On most pre-hung doors (a door that comes from the factory already fitted into a frame) the only thing keeping your door closed is 1/2" of pine. When the door gets kicked, it's typically that piece of pine that gives way.

Using a metal strike-box can help you ensure the deadbolt extends fully. The strike-box will also offer much greater kick-in protection than a standard strike plate. The strike-box below was installed one of my former residences. It completely surrounds the bolt in steel. Rather than being held in only by two screws, it is held in by four, two of which are deep in the back of the box.

All four screws are 3" or greater in length, ensuring the strike box is firmly anchored to studs. That strike-box came with the high-security locks I used, but you can purchase them separately. I found this one on Amazon, and the exact one shown in the photo below is available here. Installing a strike box takes a bit of time, some tools, and patience but it is one head and shoulders above simply replacing the screws in the strike plate.

Whether or not you decide to install a strike-box, you should absolutely replace the screws in your door's strike. The normal screw length for deadbolt strikes is 3/4". Remember: what's holding your door closed is 1/2" of pine and two 3/4" screws. You can definitely do better than that! Your deadbolt strikes should be secured with 3" to 3 1/2", coarsely threaded wood screws. As I mentioned earlier, this will secure it to the stud(s) (in modern "stick-built" construction doors are bordered on each side by two studs: a jack stud and a king stud).
If you want to get really expensive with it, there are some very cool "expanding bolt" options for certain locks. The photo below depicts an expanding bolt that is designed to lock itself into a metal strike box when fully extended. When not fully extended the ball-bearings retract into the bolt. While I think this is a super, super neat idea (and did install them at one place I lived) I don't think the $150 upgrade cost for these bolts is quite worth it.

Door and Hinges
Reinforcing your door is a good step to take, regardless of which locks you choose. Even a $500 Abloy deadbolt will do you little good if your door delaminates or falls off the hinges. There are several products on the market that improve the rigidity of the door, the jamb, or both. These include simple reinforcement sleeves that slide over the door and are held in place by the locks. More comprehensive products that also reinforce the door and the jamb are available, including the Door Devil and DJArmor line of products.
If you are in the market for a new door (replacing the doors on my current home are a medium-high priority, you can do a lot better than the common residential door. The cheapest residential doors are a very light layer of steel wrapped around styrofoam insulation. Sounds crazy, but if you're front door feels like metal, that's probably how it was constructed. The problem with these doors is their tendency to de-laminate. The sheet-metal begins to separate and eventually their isn't enough there to hold the deadbolt in place. If you are building a home, I strongly recommend trying to stretch the budget just a bit and purchase solid fiberglass doors. Fiberglass is massively stronger than laminated metal or wood doors, and far more resistant to the elements than wood.

It is also a good idea to reinforce the hinge-side of the door. We don't think about this a whole lot; while most of us interact with our lock on a daily basis, few of us give much thought to our hinges, but they literally holder the door onto your house. They are important! You should also ensure the screws holding your door to the frame are contacting a stud. I recommend replacing standard-length screws with 3" to 3 1/2" wood screws.
Paying attention to your hinges is especially important if your door opens outward, because your hinges are on the exterior of the door. If you are using standard residential hinges, the pin holding them together can sometimes be tapped out, and the door lifted out of the frame. Hinge security pins like these "security hinge bolts" or the "HingeMate" can prevent this from happening, and installation is very simple.

Wrap-Up
If you've got some time at home and just a little spare cash, you can make a very real difference in the security of your doors. Your doors protect all your "stuff" - all of the expensive defense items and preps and whatever you keep in hand. They also protect you, your spouse, your kids - whoever lives in your home. Give this an hour of your attention and maybe $100 - $200 if you have it. Some good, high quality security upgrades are an investment that will probably serve you for a couple decades to come.
Also - quick side note - if you put nice, high-quality locks on your doors, save the old, crappy ones. If you ever move, take your expensive locks with you. I made this mistake with my Abloys and seriously regret it.
