Handling Patient Firearms for EMS Professionals I: Pistols
Firearms are a fact of life for EMS professionals. Patients sometimes have guns on or around them. Usually it is up to law enforcement to secure firearms, but that's just not always feasible. This article takes a look at some of these situations. More importantly, it offers a principle-based approach to handling patient firearms for EMS professionals. This article is also great information for firemen, cops, and just about anyone else.
This article contains affiliate links. Using these links gives us a small commission but costs you nothing. Please consider using our Amazon link to support this blog.
Handling Patient Firearms: Disclaimers
Let's get the disclaimer stuff out of the way up front. You should always follow your local and state laws, your agency's standard operating guidelines, and any applicable protocols. I'm not suggesting you work around your agency's rules and regulations. Generally speaking you should probably let law enforcement handle firearms when possible. This keeps you legally in the clear, and if you don't know what you're doing, keeps everyone around you safer. And it frees you up to focus on your actual job: patient care.
Unfortunately, shit happens and sometimes the safest thing you can do is deal with a firearm yourself. Once you are transporting and find a gun, it's a little late to have an LEO take care of it for you. Sometimes a firearm may be on a scene and the safest course of action is for you to clear and secure it. There are millions of situations and scenarios, even ones you can't imagine, where YOU - the EMT or medic - may be the best person to clear and secure a firearm.
This requires some judgment on your part, but that's part of being a medic. If they can trust you to judge whether an amio or dopamine drip is appropriate, I believe I can trust you to decide when it is appropriate for you to deal with a patient's firearm.
There are thousands of firearms designs on the market. This article offers a principle-based approach to handling patient firearms that works whether you are an expert, or have never touched a gun before. First, I will share a couple anecdotes about handling patient firearms.
Disclaimer: Disputed Possession
Nothing whatsoever in this article should lead you to believe that you should wrestle, tussle, grapple, struggle, fight, argue, or become involved in any kind of confrontation about the possession of a firearm. This article is about picking up guns lying around on scenes, or taking guns off unconscious patients - not disarming opponents.
If your patient is opposed to giving up his firearm, crew safety should become a first and foremost consideration. There are classes about that stuff, but you're not going to learn it from this article or any other. Remember that old thing you rattled off in a million scenarios: SCENE SAFETY!
Handling Patient Firearms: Anecdotes
I work for a rural agency in the Appalachian mountains. I encounter firearms on a regular basis - leaned up in corners, hanging from gun racks, sitting on night stands, in cars, in holsters and patient's pockets. You don't have to be a medic in the middle of nowhere to run across a gun, though. Firearms are everywhere in the United States.
I probably actually handle a patient's firearm every quarter or so. Here are a couple of the times I chose to make a firearms safe and secure without relying on other parties to do so.
Handling Patient Firearms: Anecdote #1
The first example was a diabetic problems call. A home health nurse and called and said the patient "wasn't acting right." My partner approached the patient who was sitting in a recliner. He was agitated and not super happy we were there. My partner, a very young, inexperienced, EMT-B, failed to notice the cocked and locked 1911 on the table right beside him. I gently nudged her to the other side of the patient as she continued to talk to him and began to take vitals. With his attention on her, I subtly picked up the pistol, made my way to the kitchen and quietly rendered it safe. The environment felt much safer without a loaded .45 within the patient's reach. My partner later told me she never saw a gun.
The alternatives weren't good. I could have left the gun in place, which would have been incredibly dangerous. Or we could have backed out and called police. But that still left an altered patient in the home with his wife and disabled, adult son. I didn't feel great about that, nor was I comfortable with the idea of escalating the situation. Simply taking care of the problem myself was the course of action that was in the patient's best interest and safest for everyone involved.
Handling Patient Firearms: Anecdote #2
In another instance an old man was felling trees and one landed on him. He was conscious when we arrived, and gave us a 9mm pistol from his holster. I simply passed that one off to his wife and left it on scene. On the way to the hospital, as we were cutting off his clothing, another gun came tumbling out of his pocket. Rather than leave it loaded, I chose to render it safe and hold on to it until we arrived at the hospital and it could be transferred to hospital security.
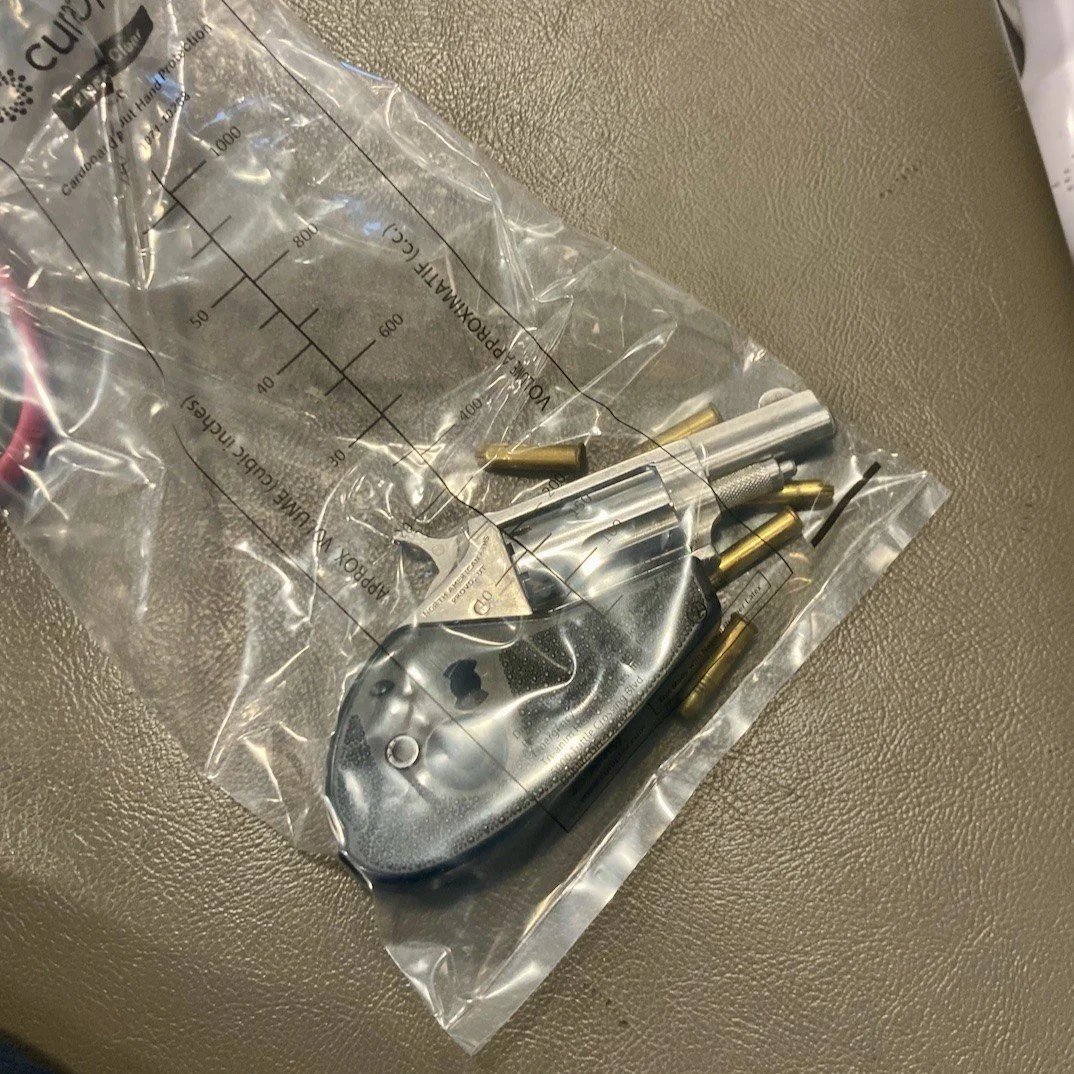
My alternative in this case was to leave the gun loaded and bag it up, or unload it. The NAA Mini Revolver in this instance has a quirk: if care isn't taken when the gun is loaded, the firing pin can rest on the primer of the cartridge. This can cause the gun to go off if dropped. Frankly, I also doubted that hospital security would know how to unload such a firearm, so the safest course of action seemed to be to unload it for them.
In neither of these situations was it ideal to wait for law enforcement to render the firearm safe and secure it. Sometimes, knowing how to do it yourself is the safest and best course of action.
1. Scene Size-Up Before Touching the Gun
Before picking the gun up, do a good "scene size up." The gun may be partially hidden or concealed. Make sure you know where the trigger is before you blindly grab for the gun. More importantly, make sure you know that nothing is in the trigger guard (the metal loop around the trigger). In general, it is a good idea to attempt to fully expose the gun before moving it.
If it is in a pocket, make sure keys, a tube of Chapstick, a zipper pull, or a cigarette lighter is not in the trigger guard. All of these items can and will depress the trigger, causing the gun to fire. If it is lying in the wreckage of a vehicle, attempt to fully expose the gun before moving it. No matter where it is or what type of gun it is, expose the trigger guard and ensure nothing is in it before moving the gun!
Now that we have done a scene size-up, we will proceed to rendering the firearms safe starting with three of the Big Four firearms safety rules.
2. Treat Every Weapon as if it Were Loaded
This isn't really a step in the process of handling patient firearms. Think of this one as an ongoing mentality that will keep you safe. There should be no such thing as "conditional gun handling." Conditional gun handling means treating a gun one way if it is loaded, and another if it is unloaded.
The problem with this approach is that it gives you permission to break other safety rules when the gun is "unloaded." We always want to behave as if the worst-case scenario were about to happen. When handling patient firearms (or any firearms), treat them all as if they were loaded, at all times.
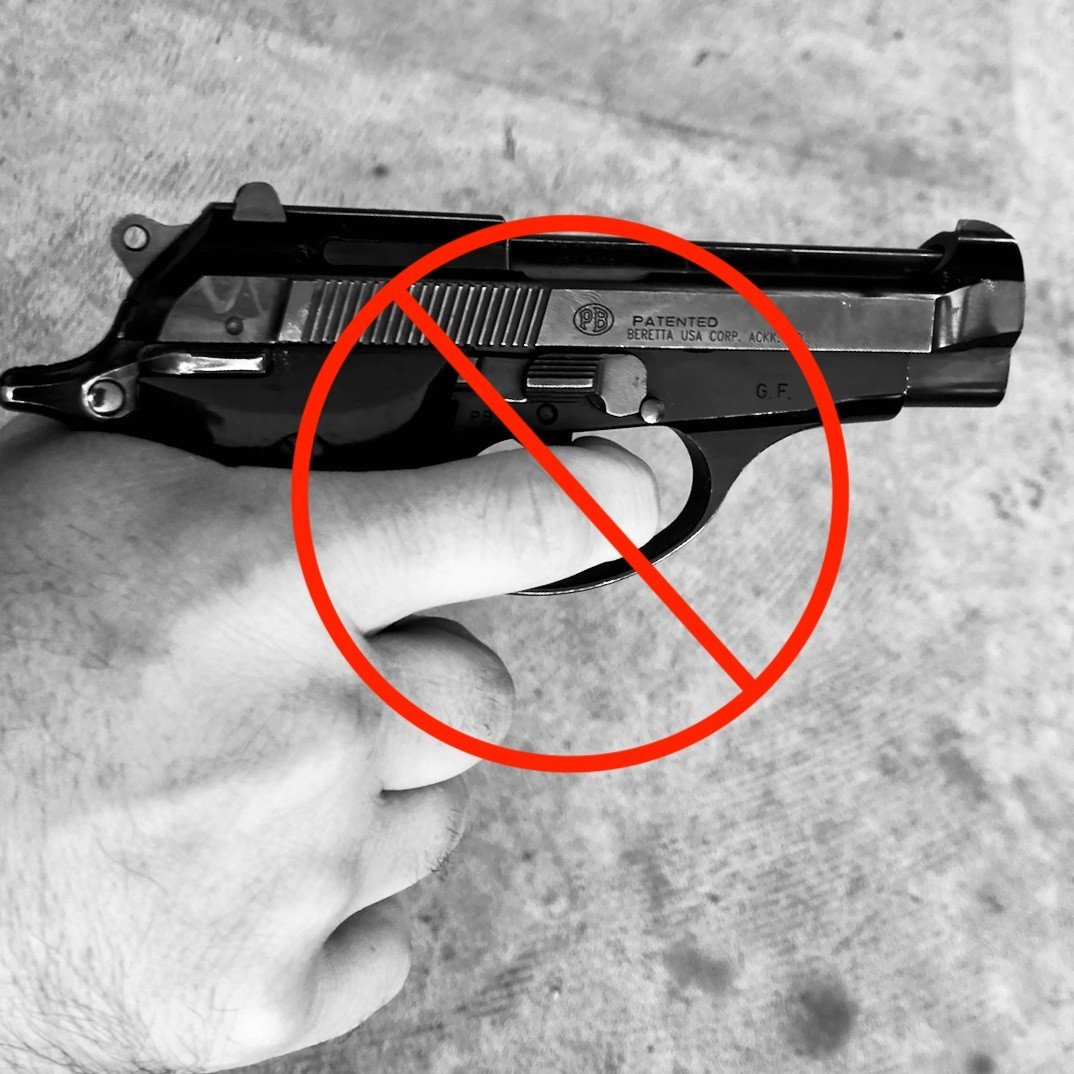
3. Keep Your Finger Off the Trigger
The next one is a non-negotiable, as well: KEEP YOUR FINGER(s) OFF THE TRIGGER!!! When picking up a firearm, it is sometimes natural for the index finger to go to the trigger. You must avoid this at all costs. A sympathetic response when slipping, tripping, of falling, or a flinch in response to a loud noise could cause your hand to clench and pull the trigger. You may also be unaware of the force necessary to pull the trigger and pull it inadvertently. This is why it is imperative to keep you finger straight and off the trigger!
This rule also applies when initially picking up a firearm. It is impossible to predict where you will find a pistol that will need to be dealt with. It may be in a wrecked car that you need to step or crawl into. You may find yourself touching a gun during a trauma assessment. It may literally fall out of a patient's pocket onto the floor of the ambulance.
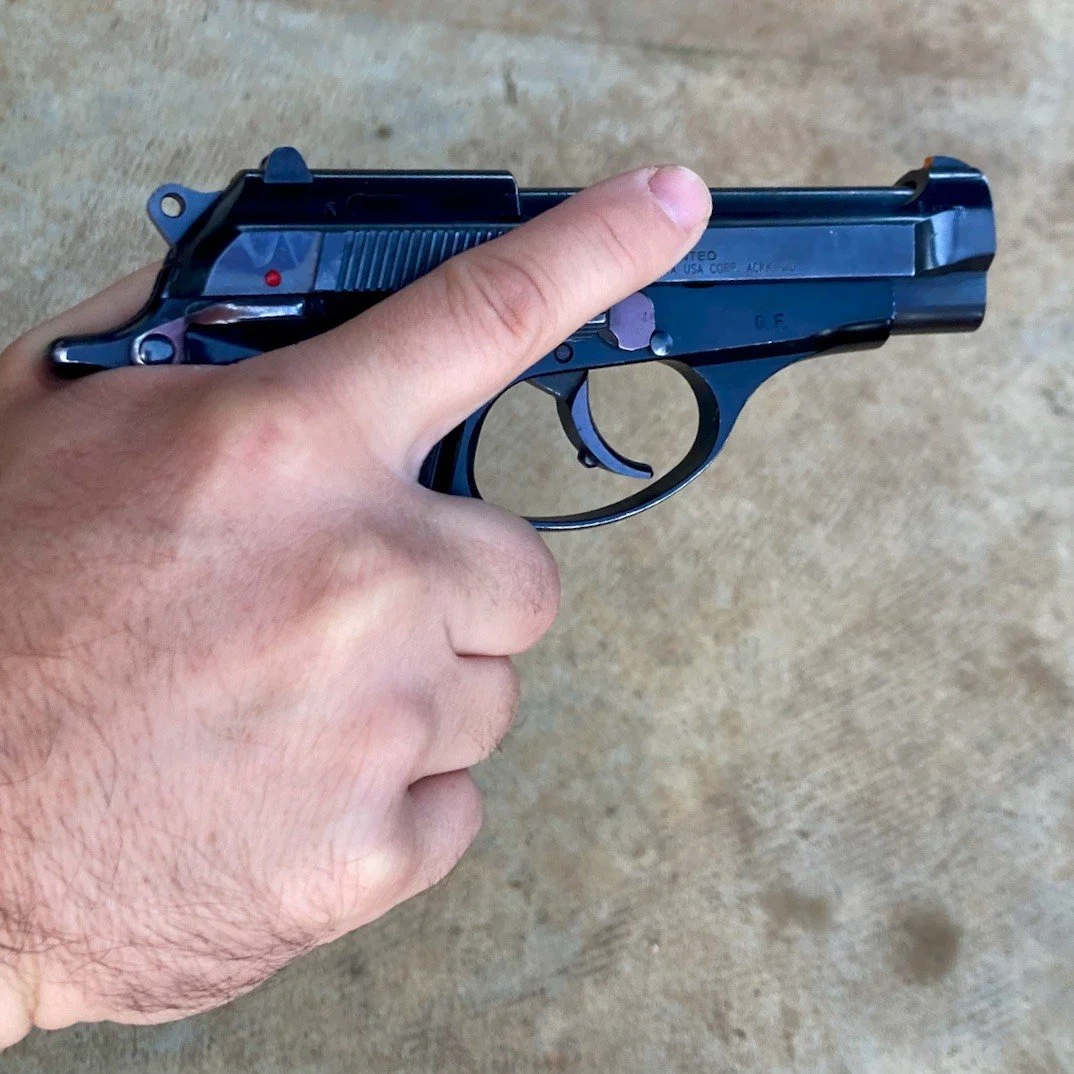
Once you are holding the gun, it is not enough to keep your finger off the trigger. If your index/trigger finger is straight, you must keep it ON something that is NOT the trigger. In fact, don't keep the trigger finger anywhere near the trigger guard. Shooting enthusiasts call this trigger finger placement "in register." Find some distinct, tactile landmark, well away from the trigger upon which to place your index finger and leave it there.
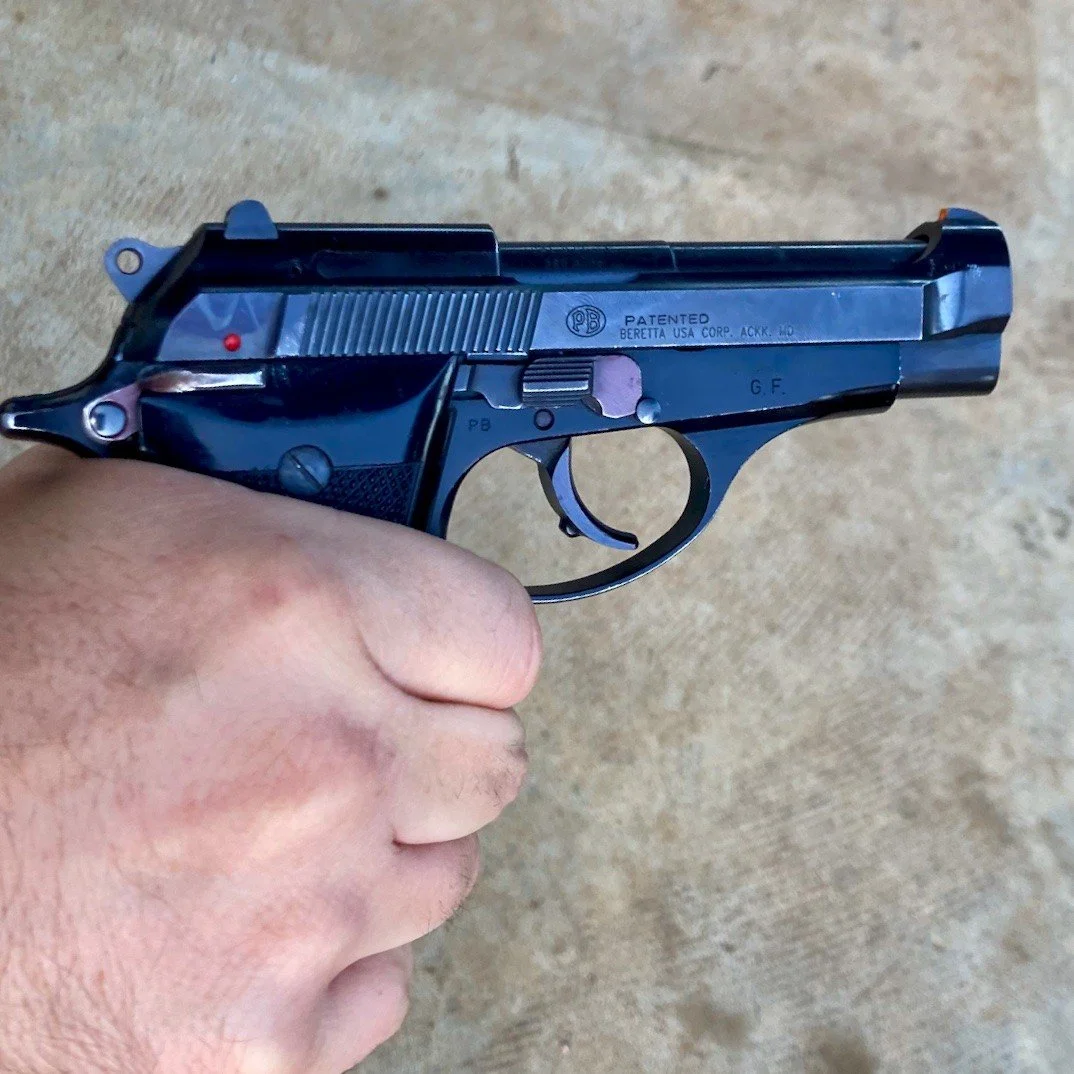
The alternative is to simply wrap all four fingers around the grip of the pistol Since we have no intention whatsoever of firing the gun, this is a perfectly acceptable grasp on the pistol. Just make absolutely, 100% certain that no fingers are inside the trigger guard.
4. Point the Gun in the Safest Direction Possible
Once you have picked up the gun and are studiously keeping your finger off the trigger, point it in a safe direction, or at least the safest direction possible. If you are keeping your finger off the trigger, the gun should not go of. If, for some reason, it does this will ensure that the bullet does as little damage as possible and does not endanger you, your partner, your patient, or bystanders.
In the ambulance, the safest direction possible is likely to be the floor of the ambulance. Bullets can pass easily through the walls of an ambulance. Pointing it forward risks hitting your partner who is probably driving(!). Pointing it to the sides and rear of the ambulance endangers other cars on the road, or firemen, family, and bystanders standing around outside the ambulance. It also risks hitting your oxygen tank - not a good situation. Keep it pointed toward the floor, where a bullet will most likely pass through and into the ground.
If you are still on scene, the safest direction will vary. Very often it will be toward the ground or straight up in the air, but this will depend on what is going on around you. If you are in a two-story home pointing it up may endanger people on the second level, and pointing it down may endanger people on the first level, influencing which direction is safest. Pointing the gun to one side may be the safest course of action. This requires an understanding of spacial awareness on your part. It also requires understanding that walls, and ceilings, and floors do not stop bullets.
5. Remove the Magazine
The magazine contains ammunition. The magazine should be removed before attempting to empty the chamber; otherwise you risk simply putting another round in the chamber.
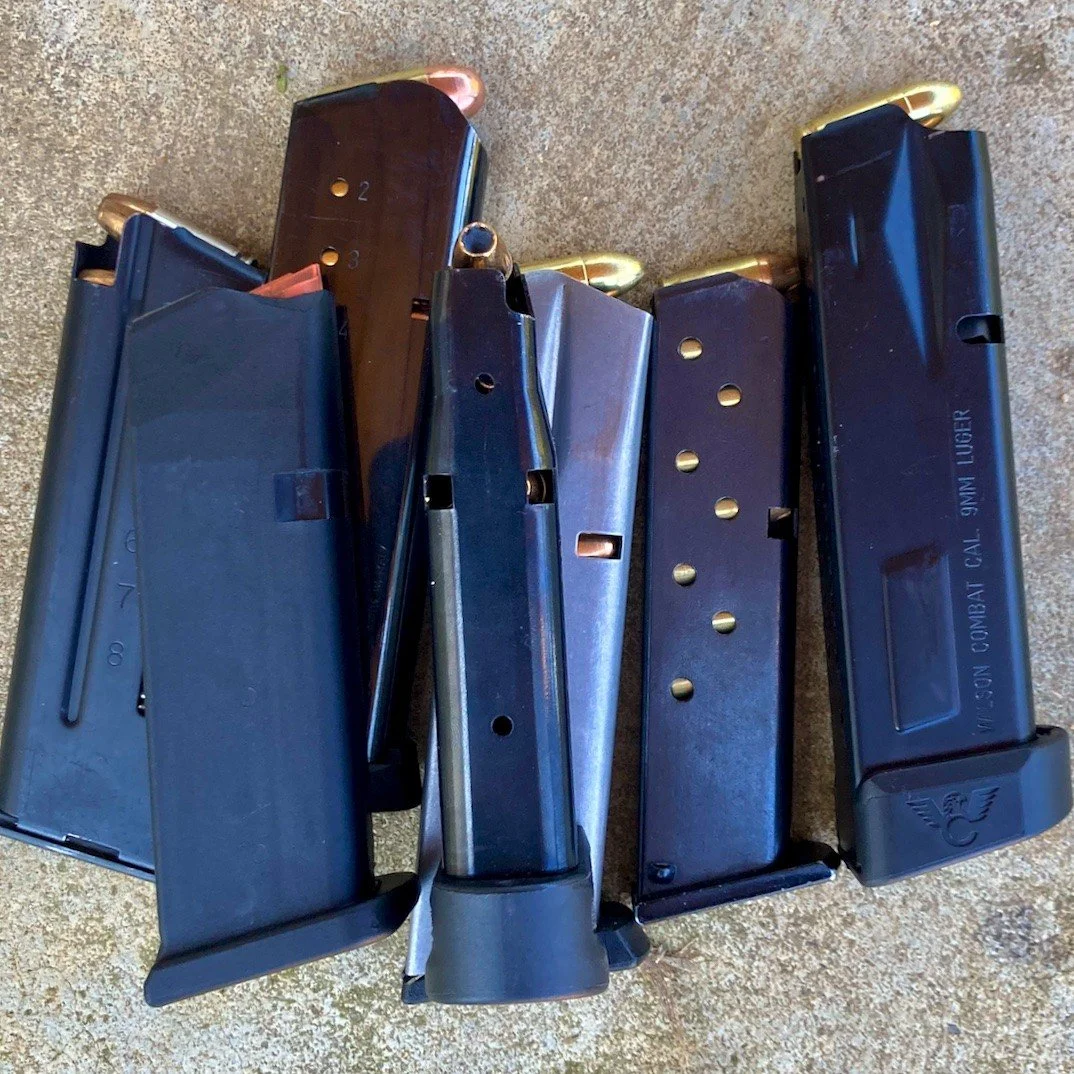
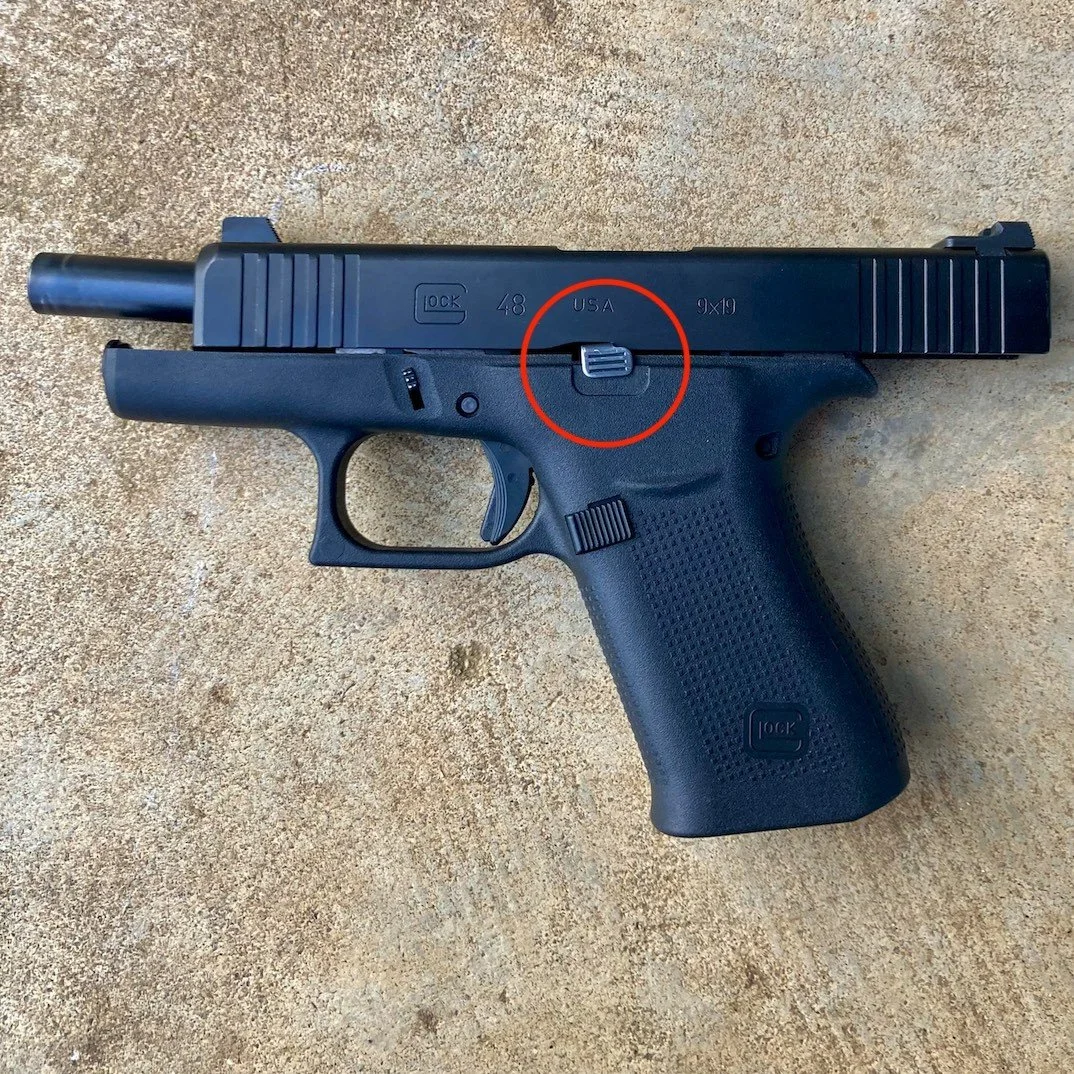
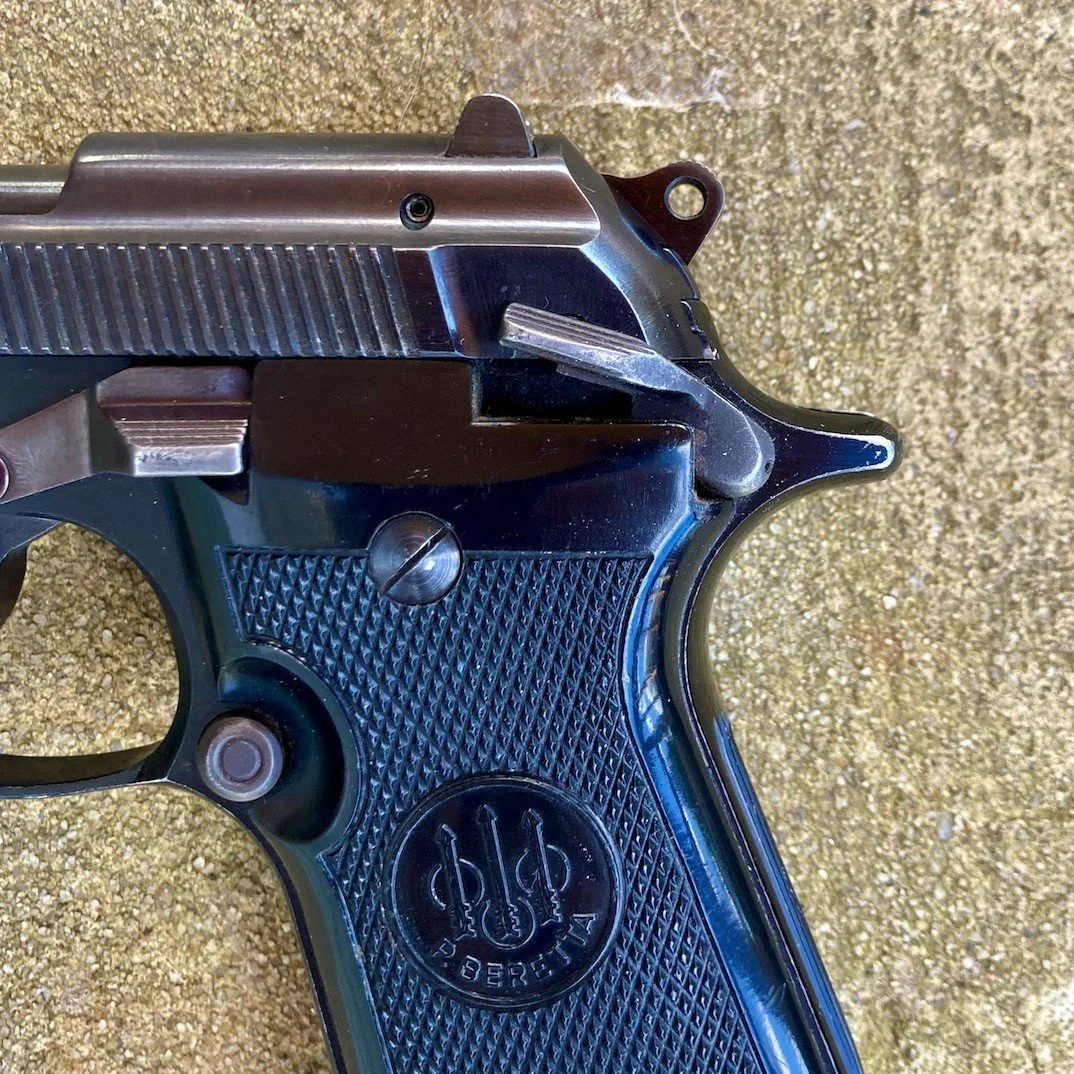
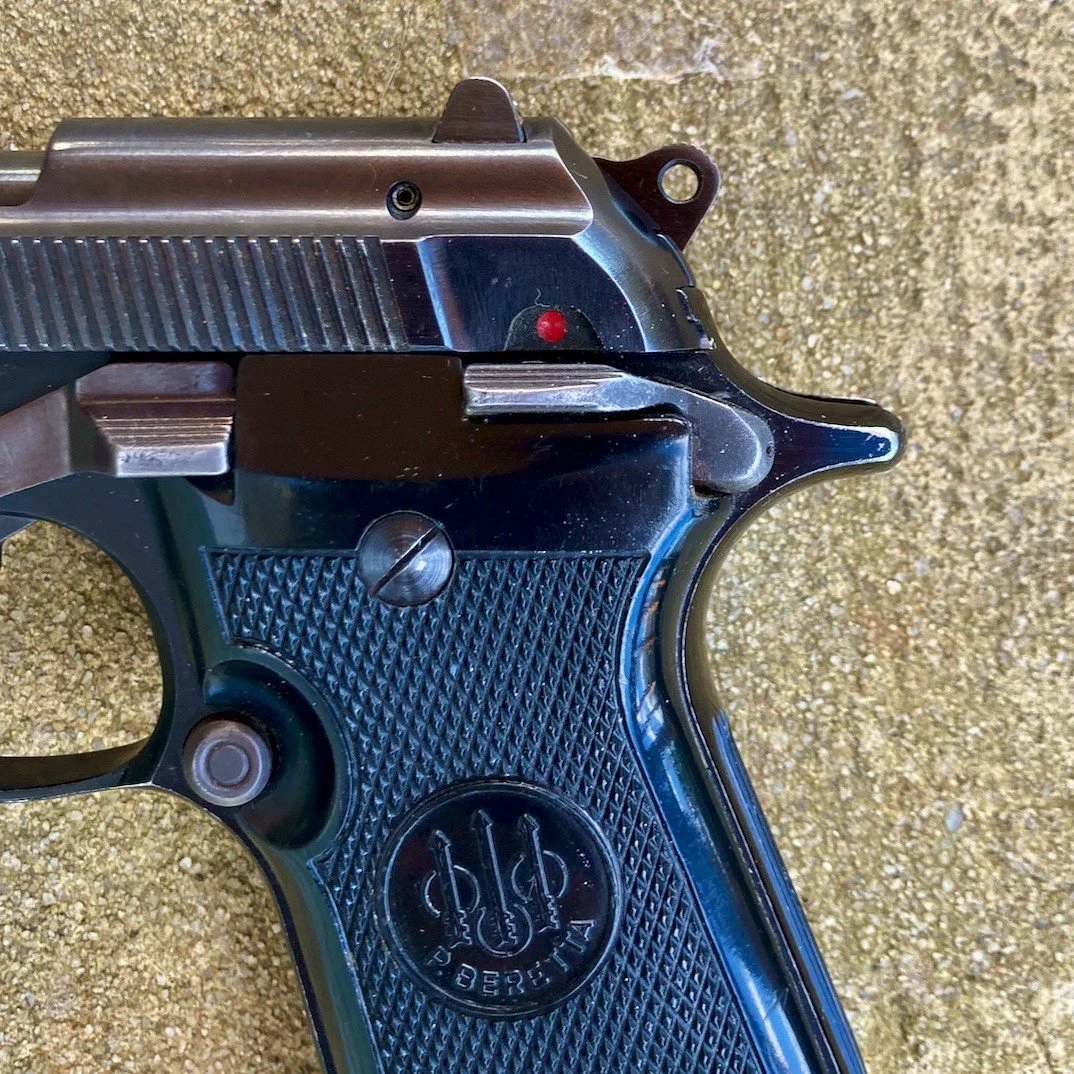
With some very rare exceptions, all semi-automatic handguns have a magazine release button. It is almost universally located on the grip area, behind the trigger guard, on the left side of the gun. Below are several examples of conventional magazine release buttons.
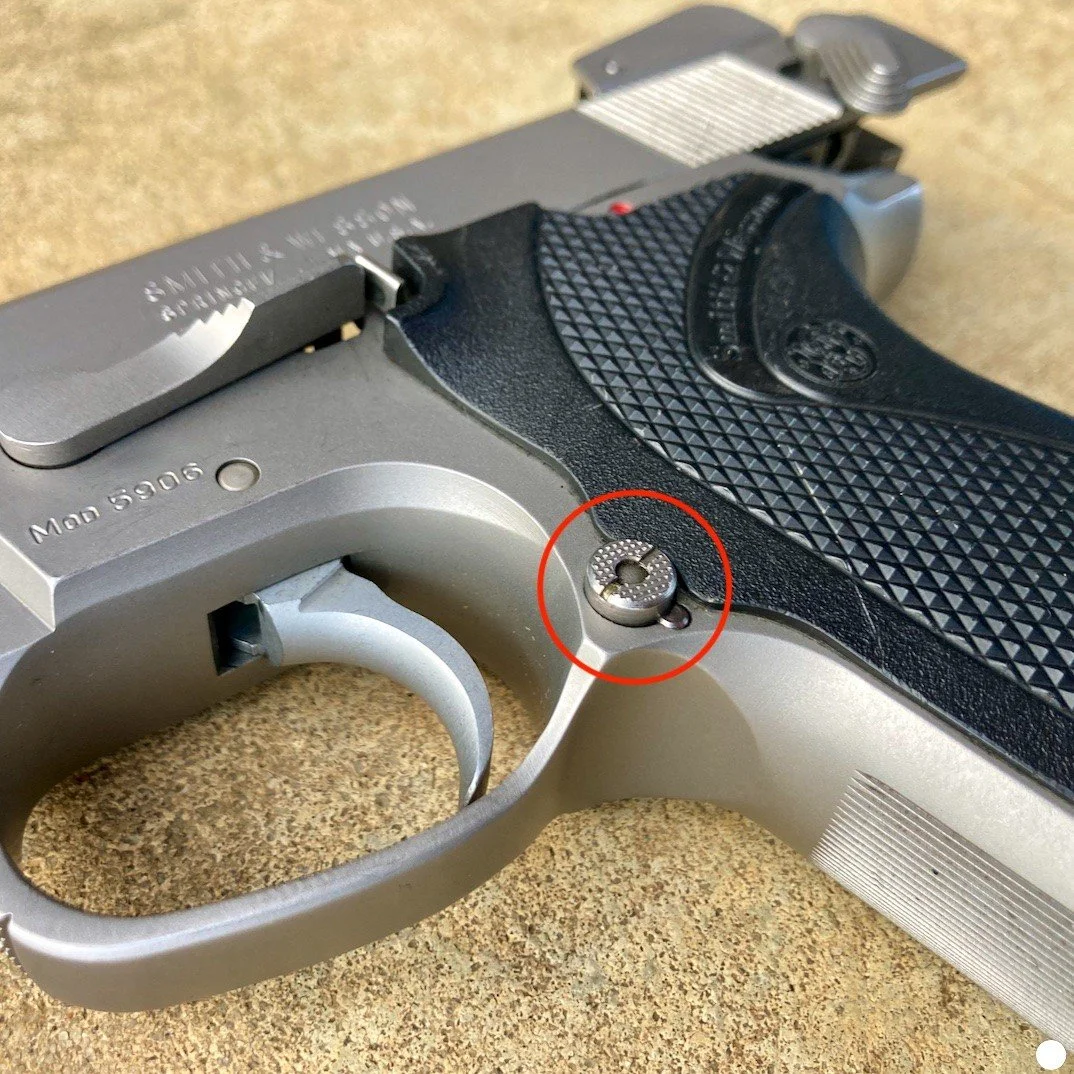
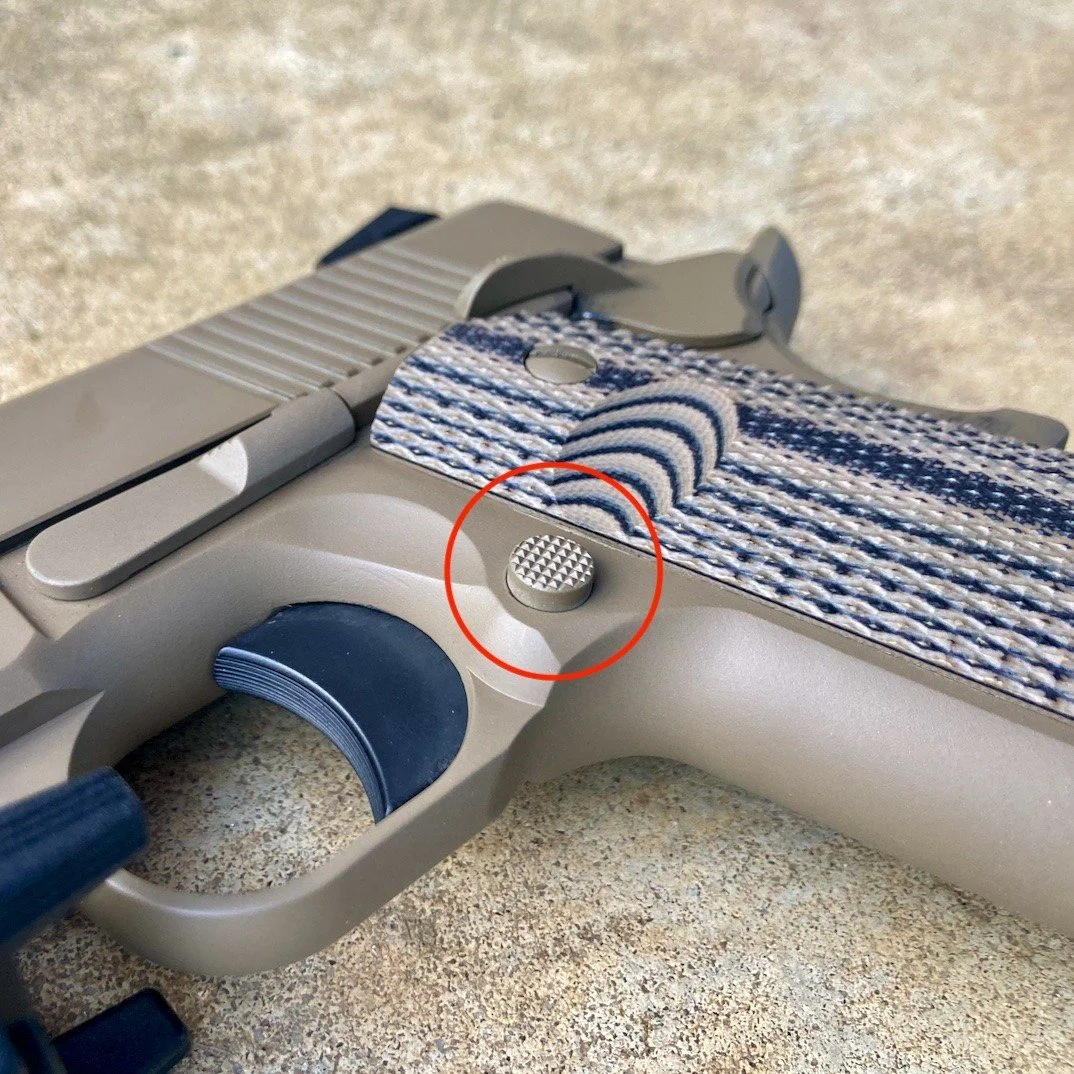
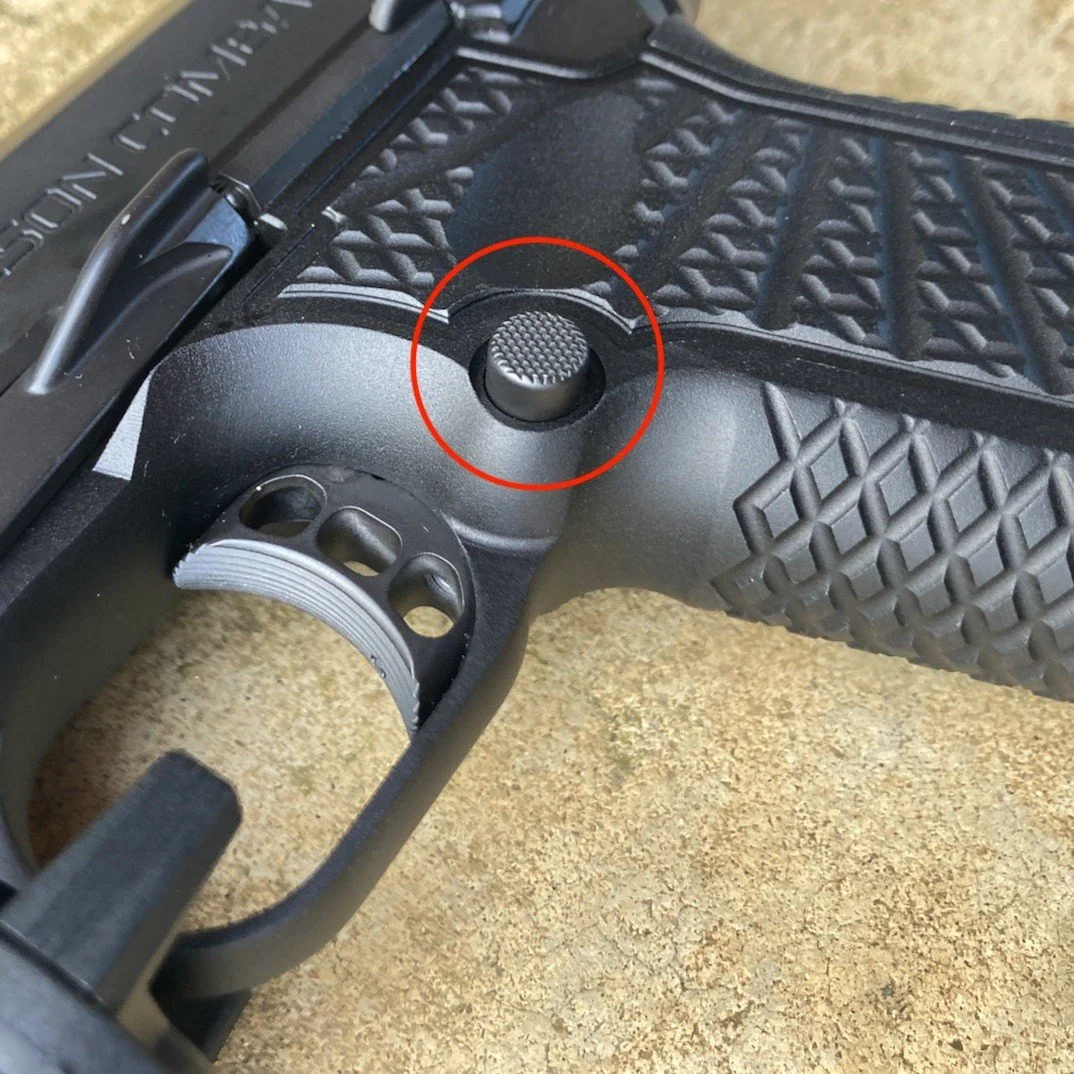
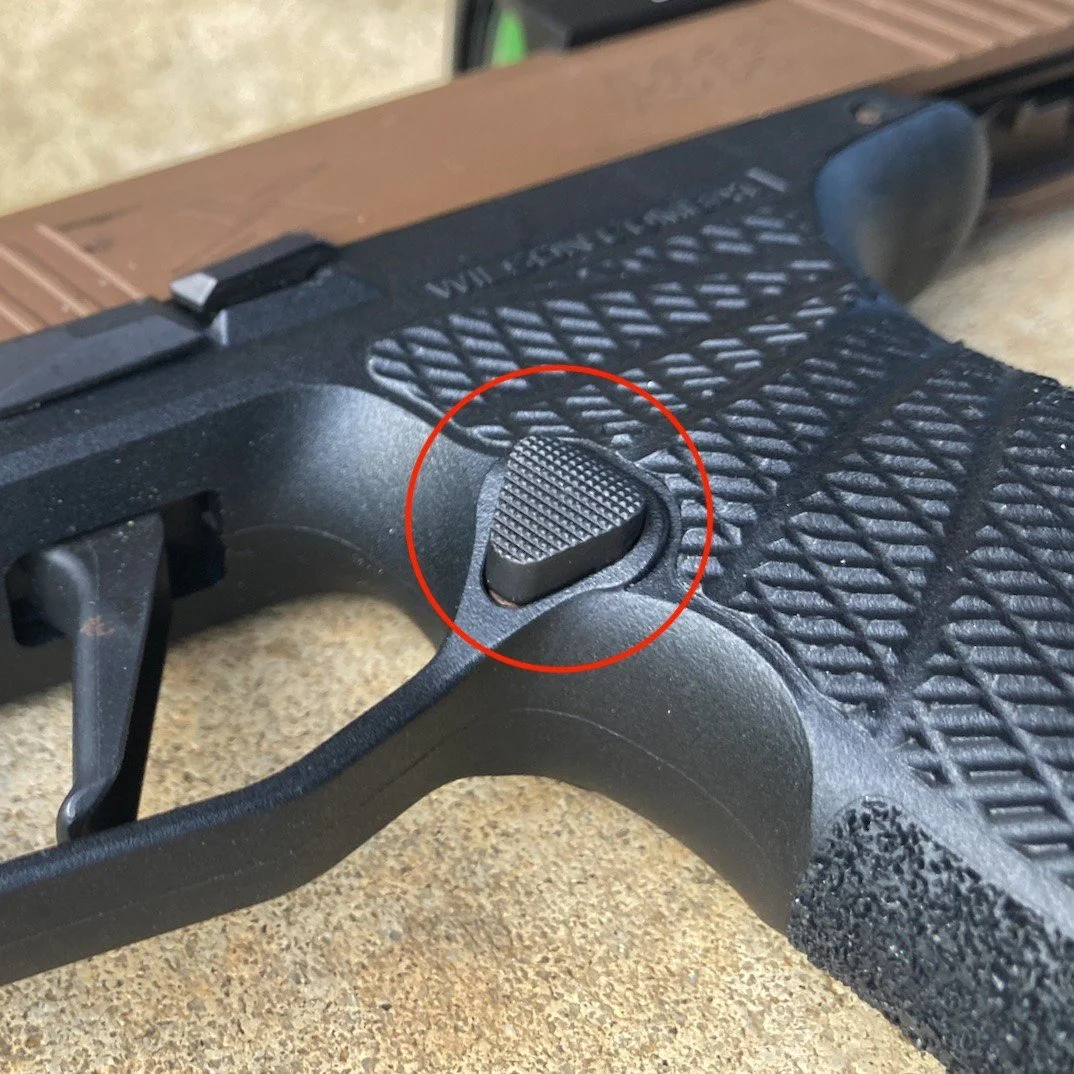
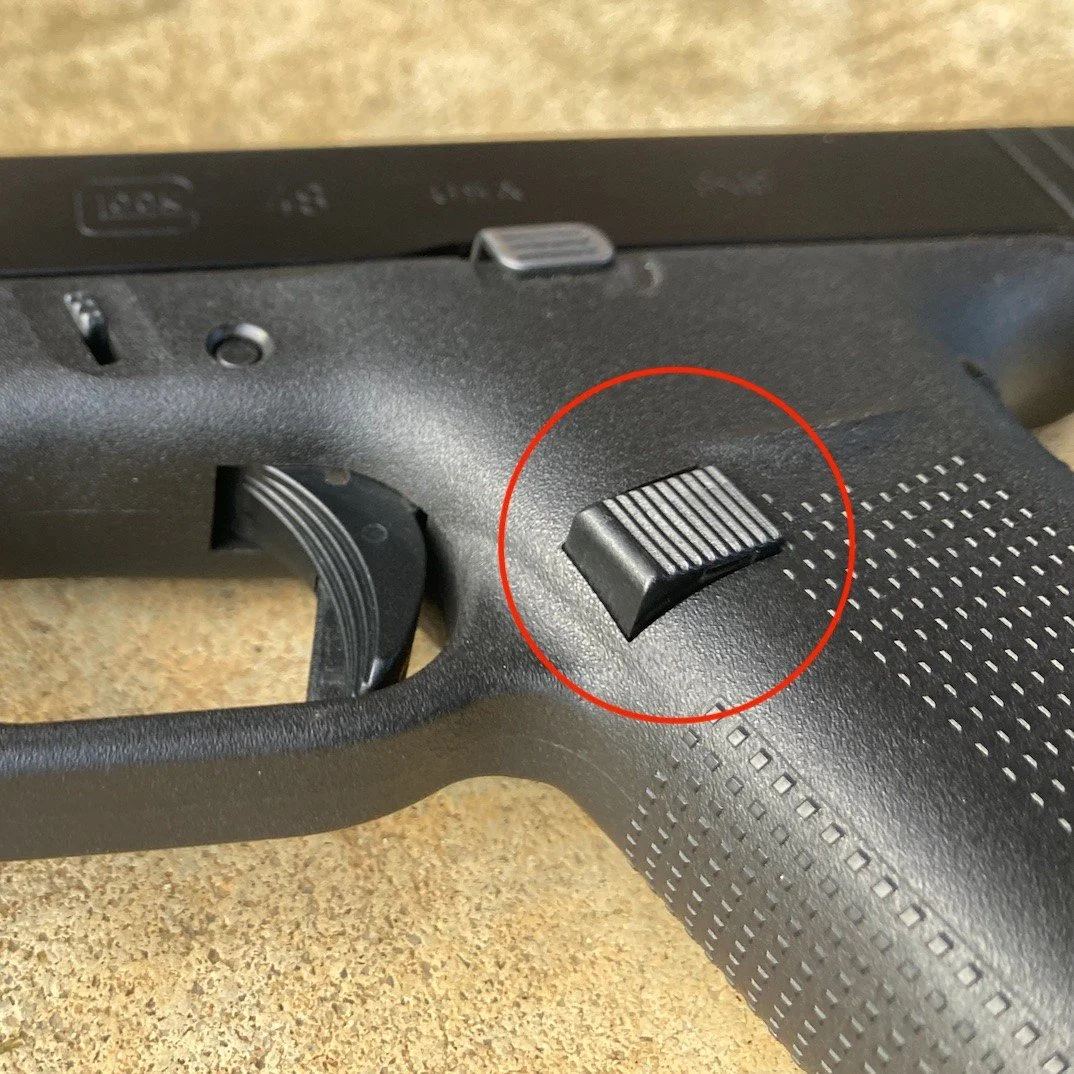

Usually depressing this button will allow the magazine to fall free. If you are pointing the gun at the ground, it is likely it will not fall completely free of the gun. If the magazine does not eject fully from the grip of the pistol, remove it manually with your other hand.
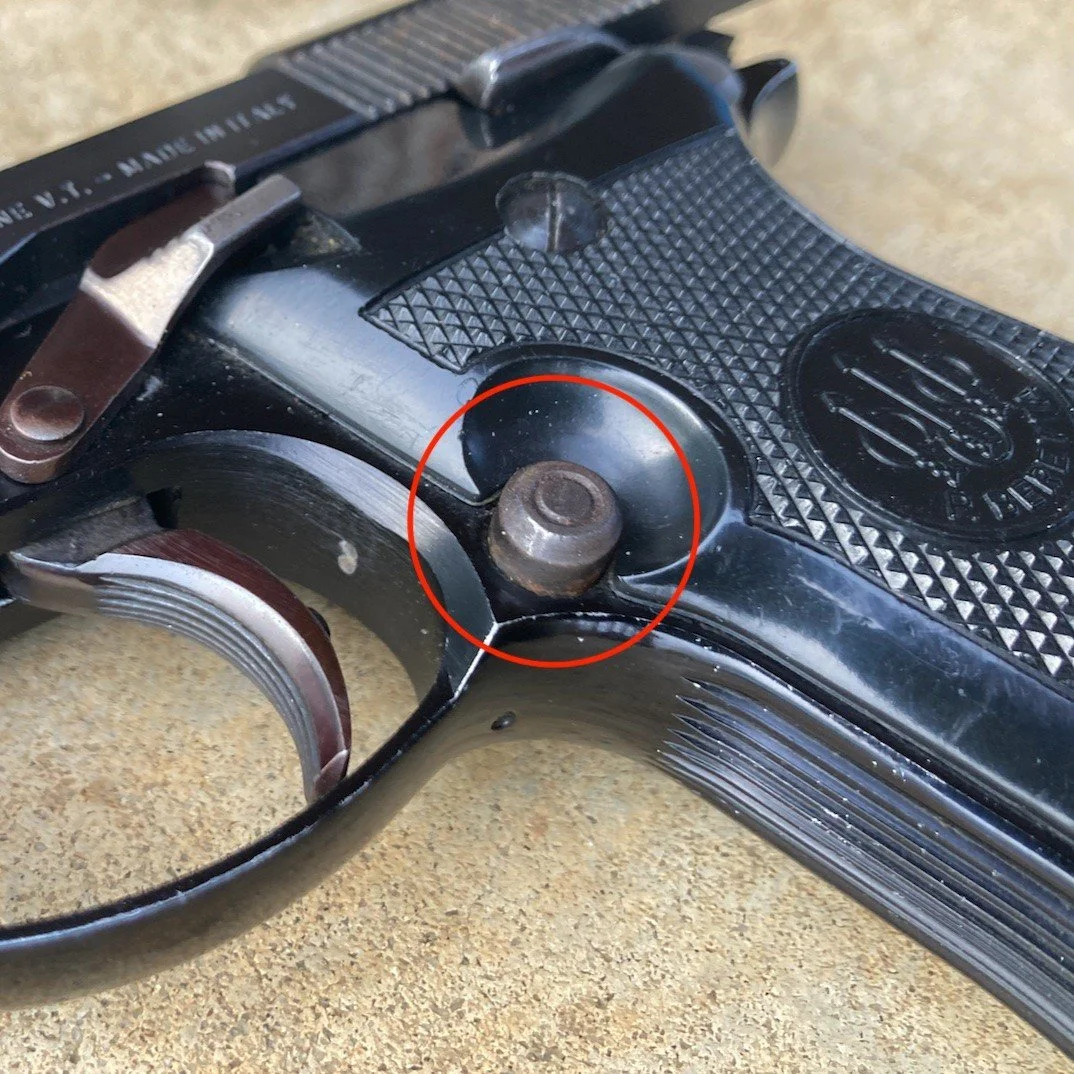
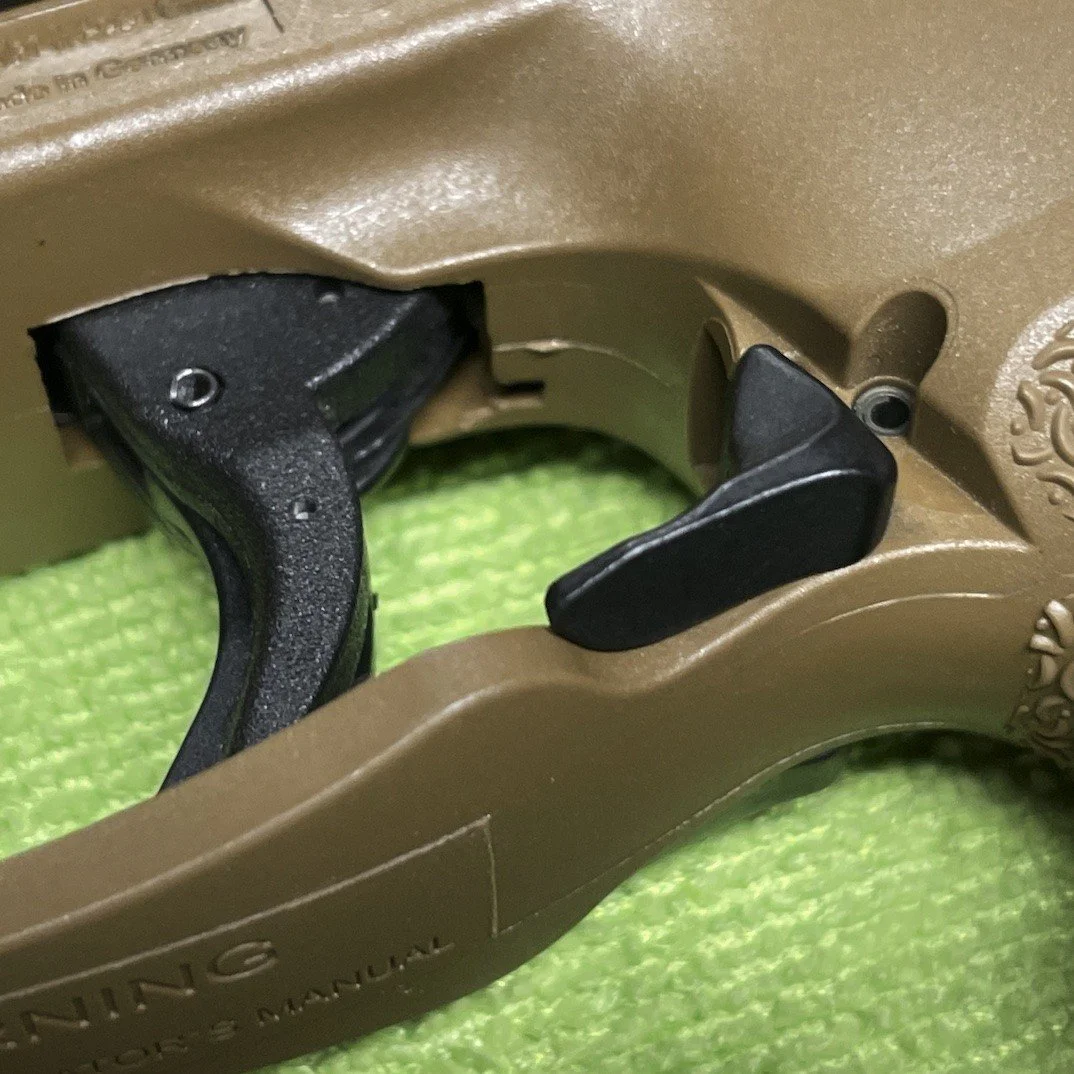
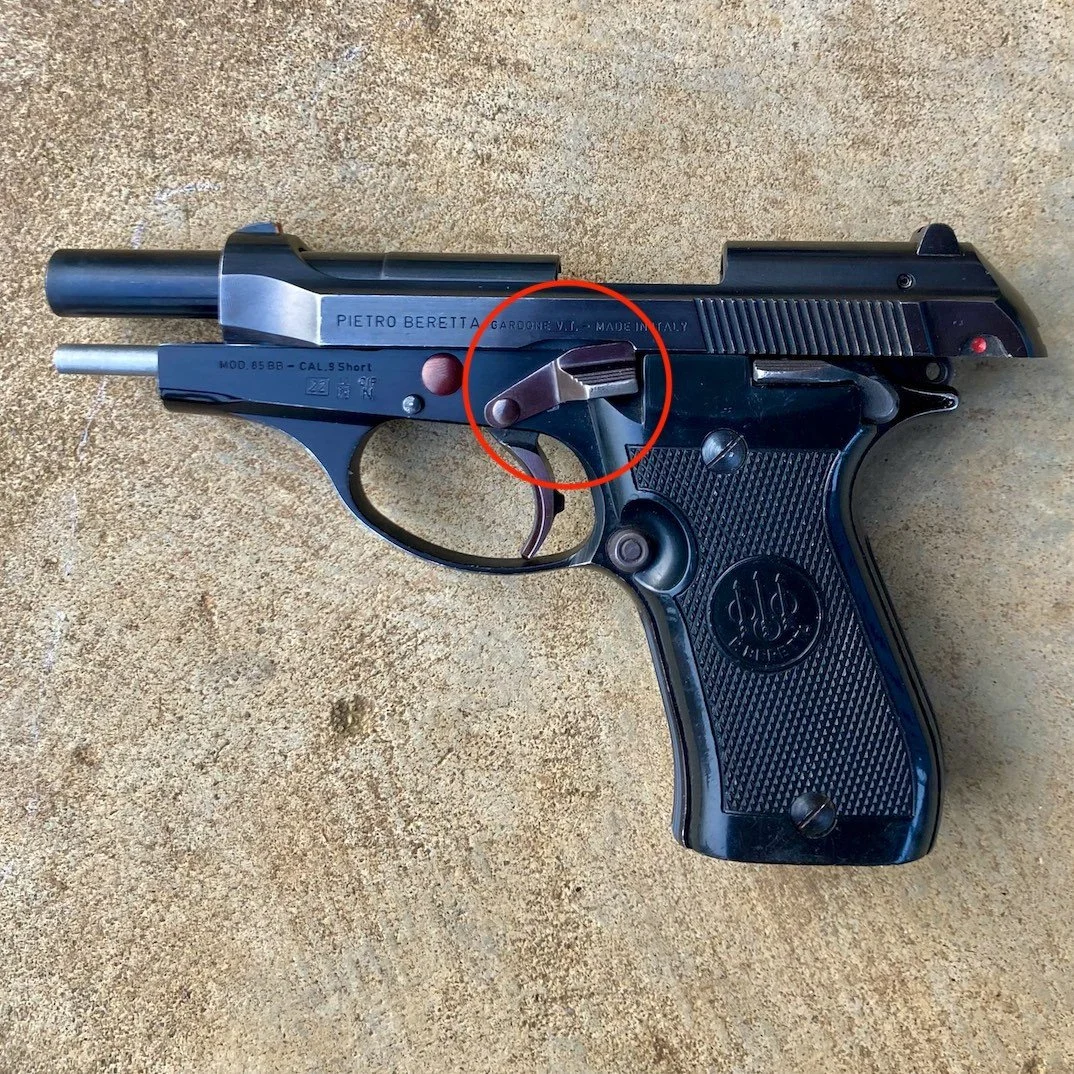
Not all magazine releases follow this pattern. Below are two exceptions. If you do not see a button, look for one of these. The first is a lever at the rear of the trigger guard. Instead of a button that you push in, push this lever down to release the magazine.
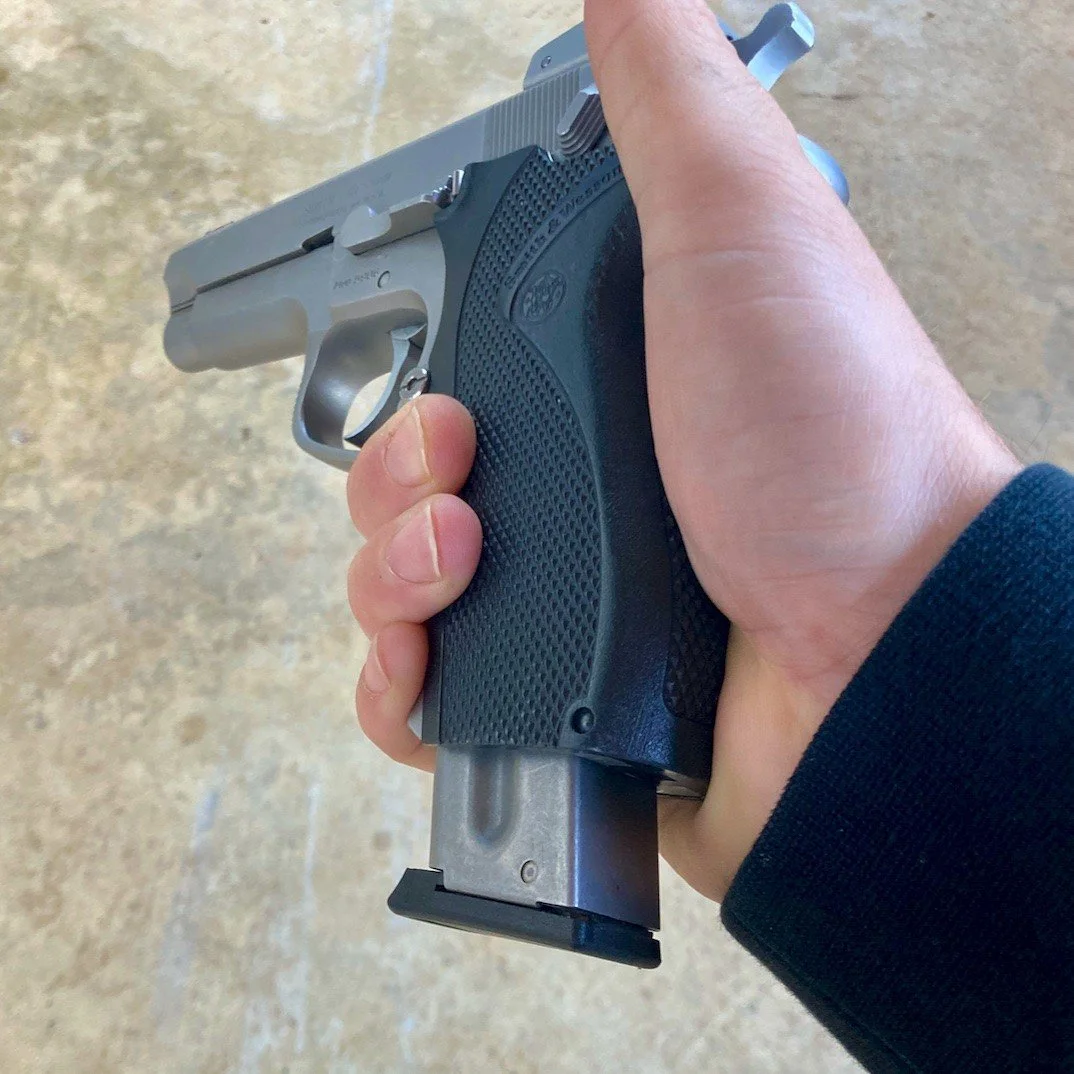
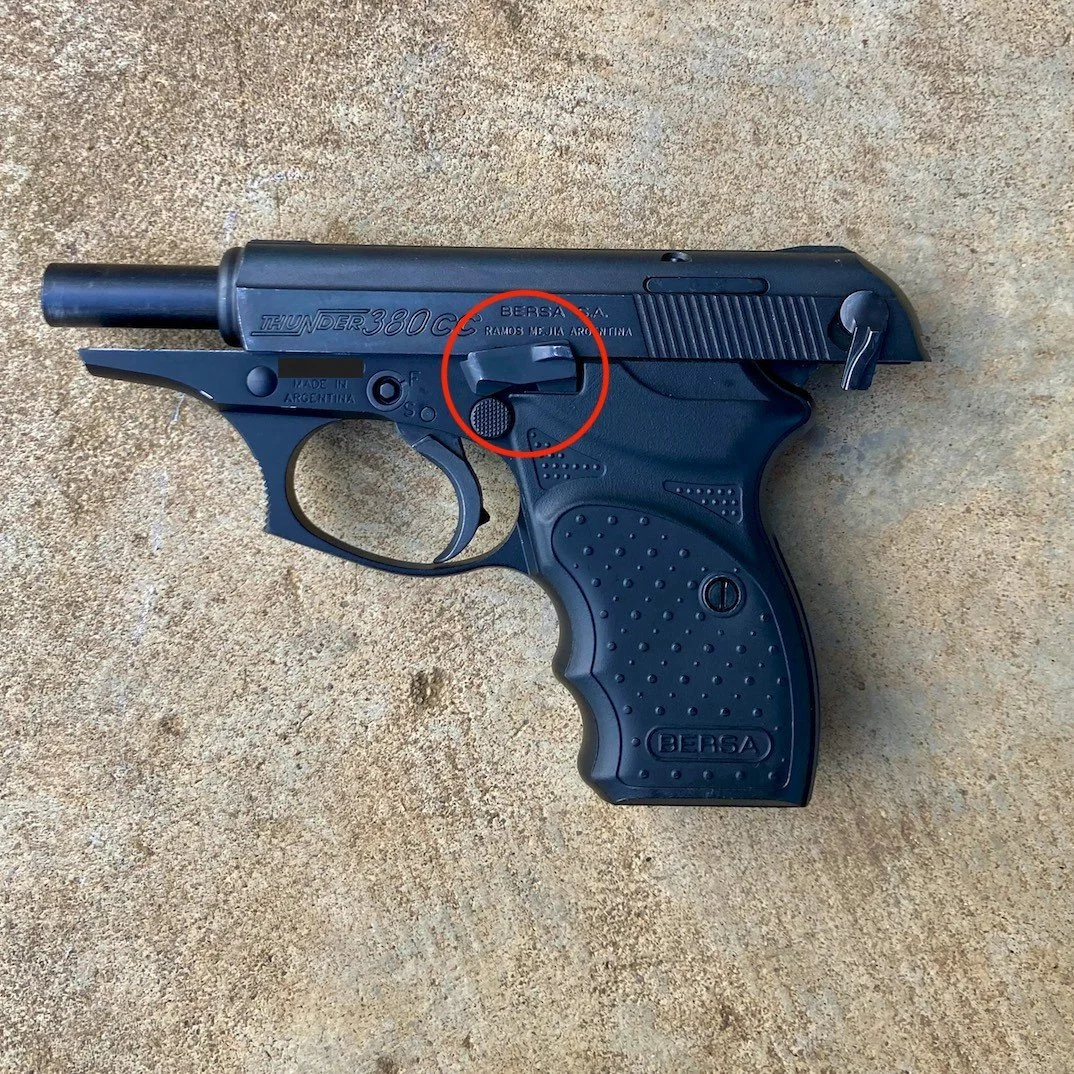
Another exception is the heel-release magazine. These are uncommon in the United States. They are usually found only on inexpensive and dated designs. This is a spring-loaded button that covers a portion of the bottom of the magazine. to release it, push the button away from the magazine. If it doesn't fall free, pull it out.
Once the source of ammunition is removed, you can now remove the round from the chamber.
6. Lock the Slide to the Rear
At this point you are holding the gun with your finger(s) off the trigger. You are very consciously keeping it pointed in a safe direction, and the magazine has been removed. The gun is still dangerous. There is a very good chance that there is a round in the chamber. At this point you will lock the slide to the rear. This will empty the round that was in the chamber, and put the gun in a demonstrably safe condition. It can be a little awkward to do so, but you will perform this while continuing to keep the gun pointed in a safe direction.
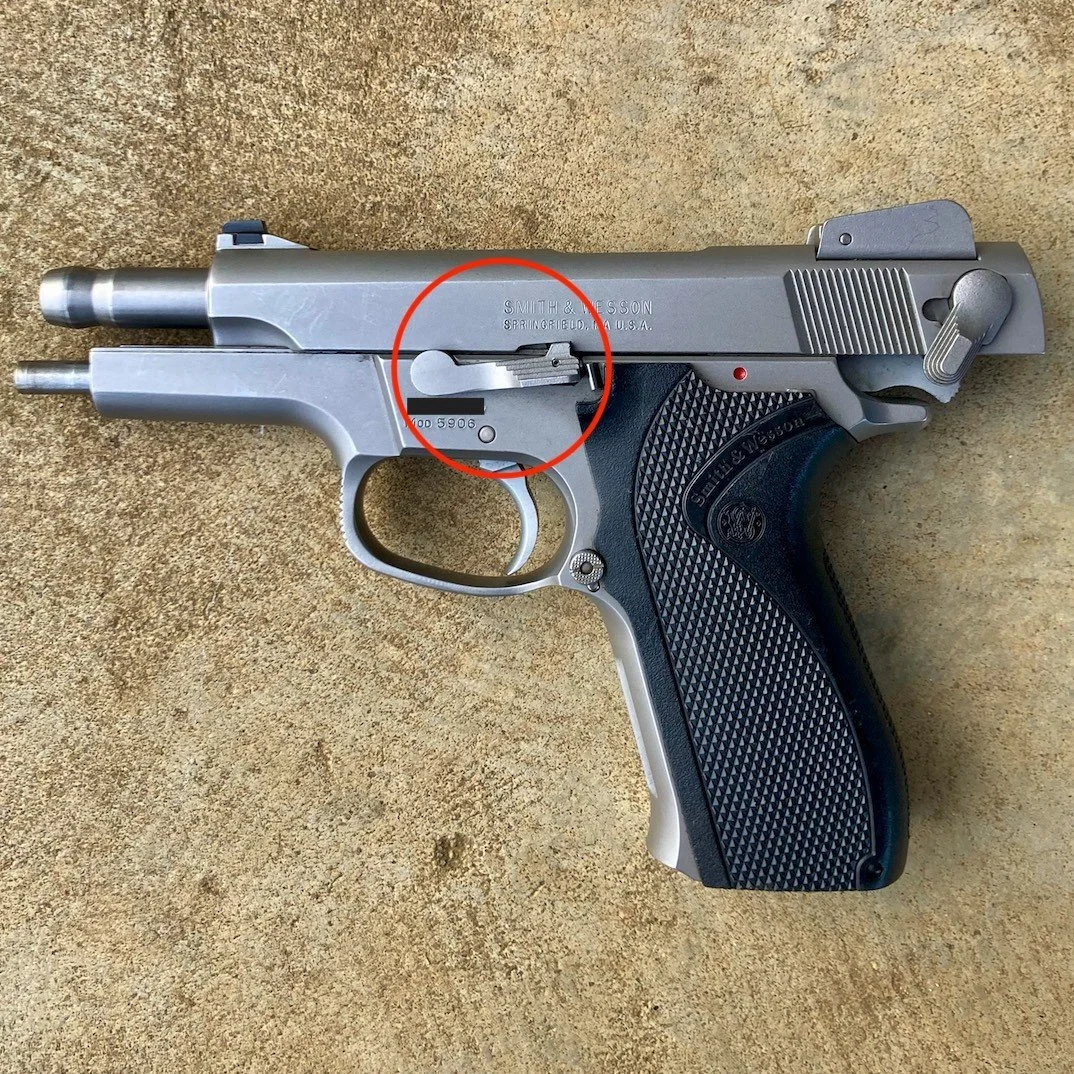
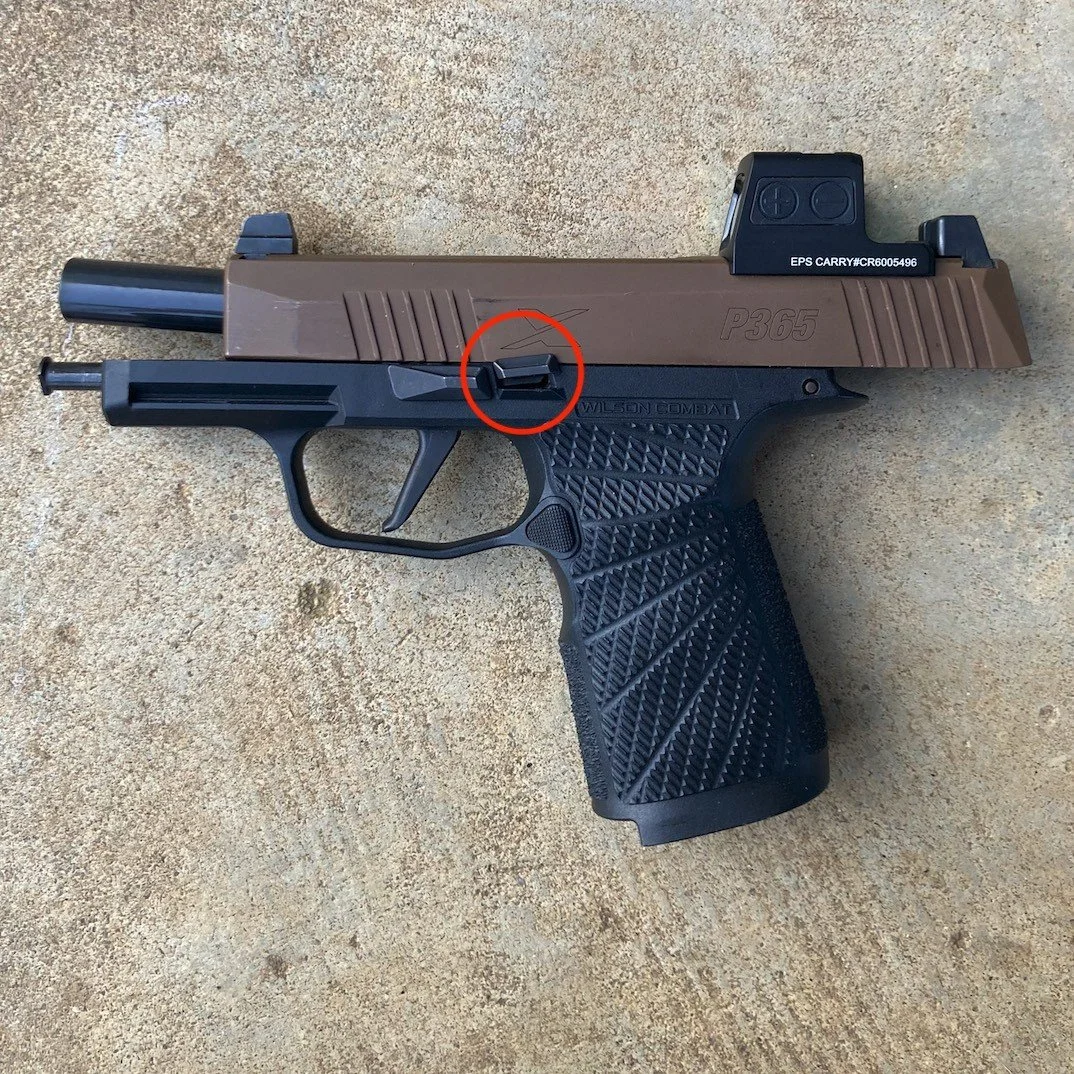
First, locate the slide stop lever. Sometimes it is very obviously a lever, and sometimes it is more subtle. This lever is almost always on the left side of the gun. On some newer guns the lever is ambidextrous and appears on both sides, but the left side is the safest bet. You need to do two things simultaneously. First, pull the pistol's slide (the reciprocating, upper portion) to the rear. At the same time, with the other hand, apply upward pressure to the slide stop lever.
Important Caveat #1
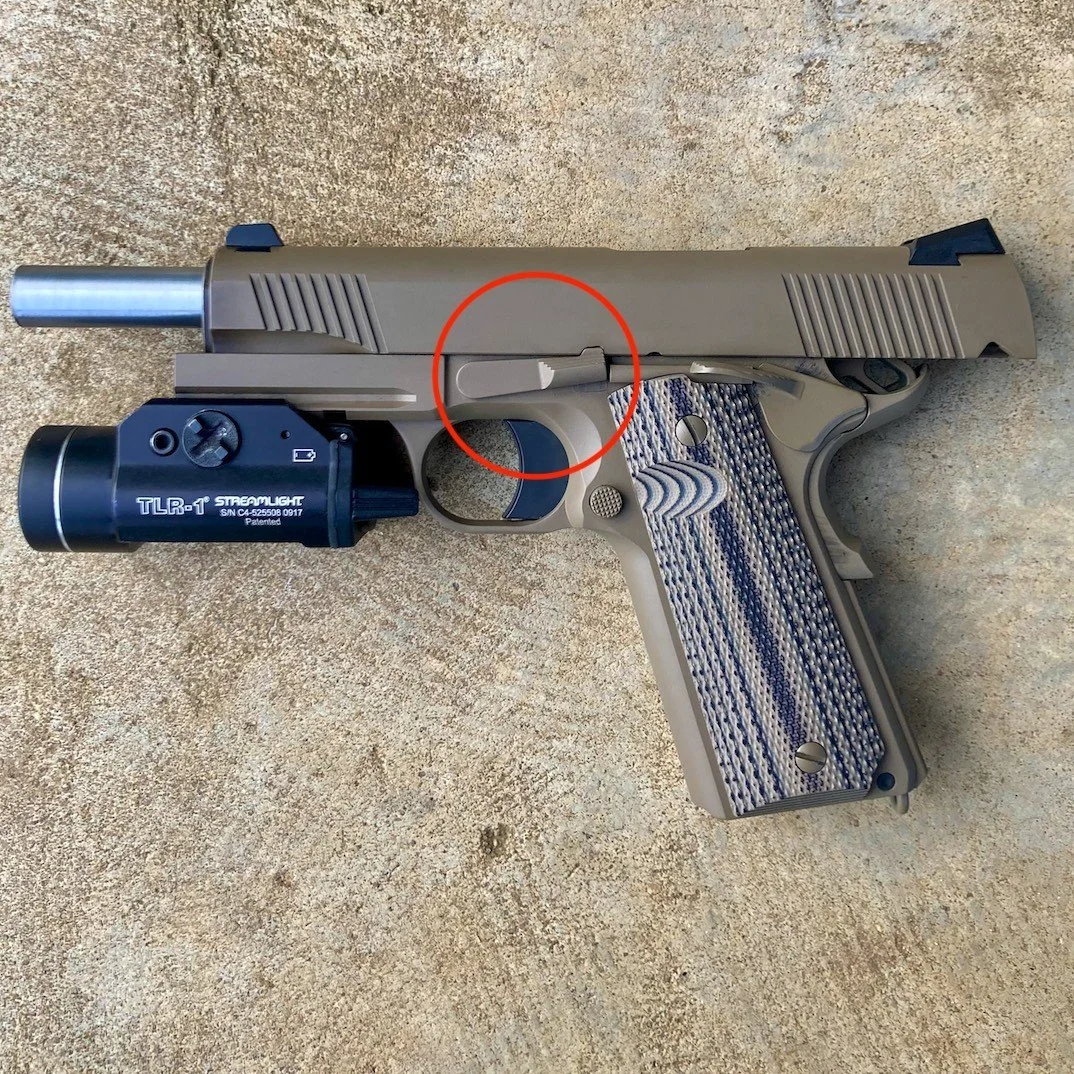
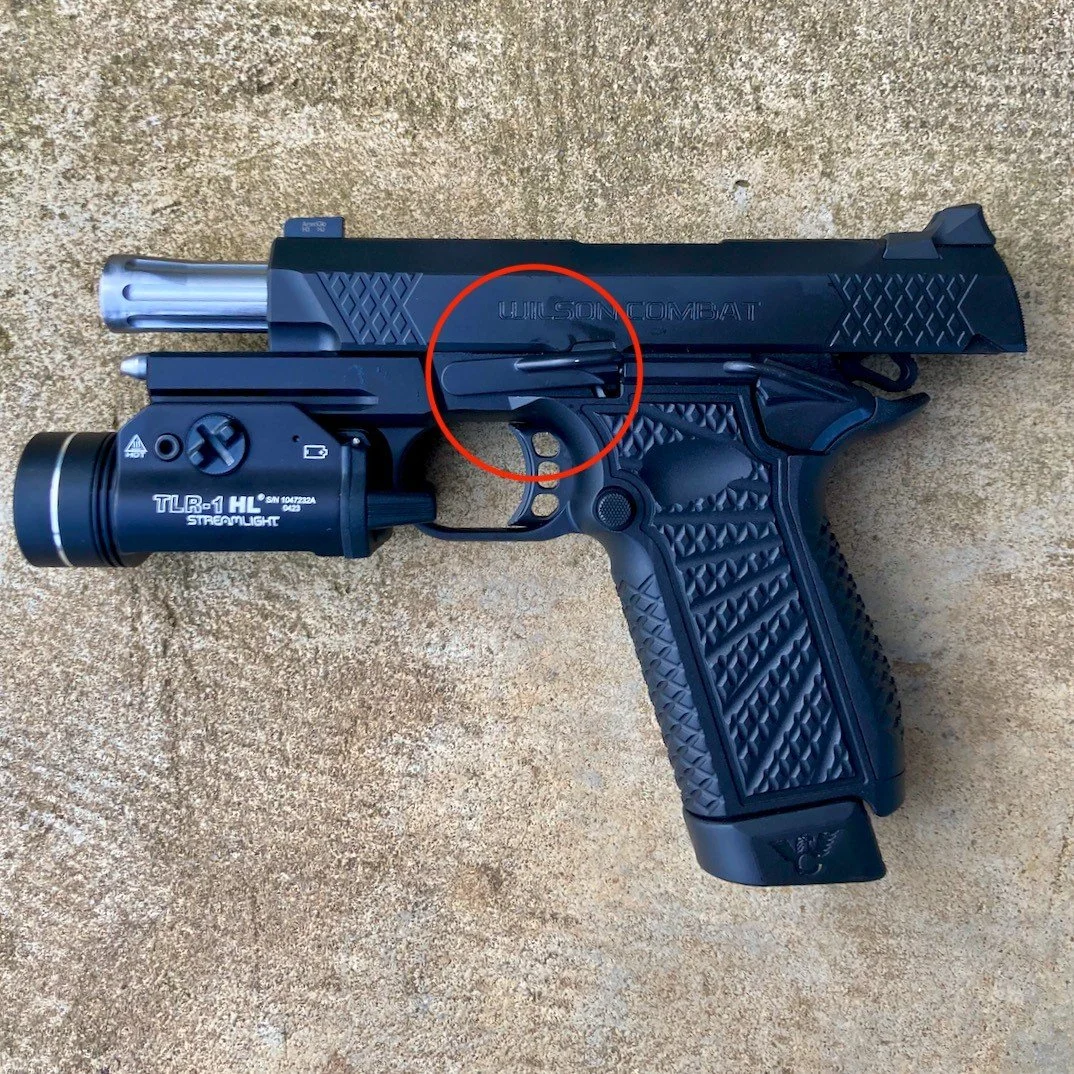
I have avoided discussing manual safeties because they are largely irrelevant to our purposes here. There is one huge exception, however. Some pistols have a safety that, when engaged, prevents the slide from being pulled to the rear. This is not very common in newer designs, but the 1911-pattern pistol, which is incredibly popular and common, has this feature. It is certainly worth pointing out due to the sheer numbers of 1911 pistols out there.
If you encounter a pistol whose slide will not budge, check for a manual safety that physically blocks the slide. Usually this lever is on the frame (the grip portion) of the pistol. Often it can be seen directly interfacing with the slide, as you can see in the photos.

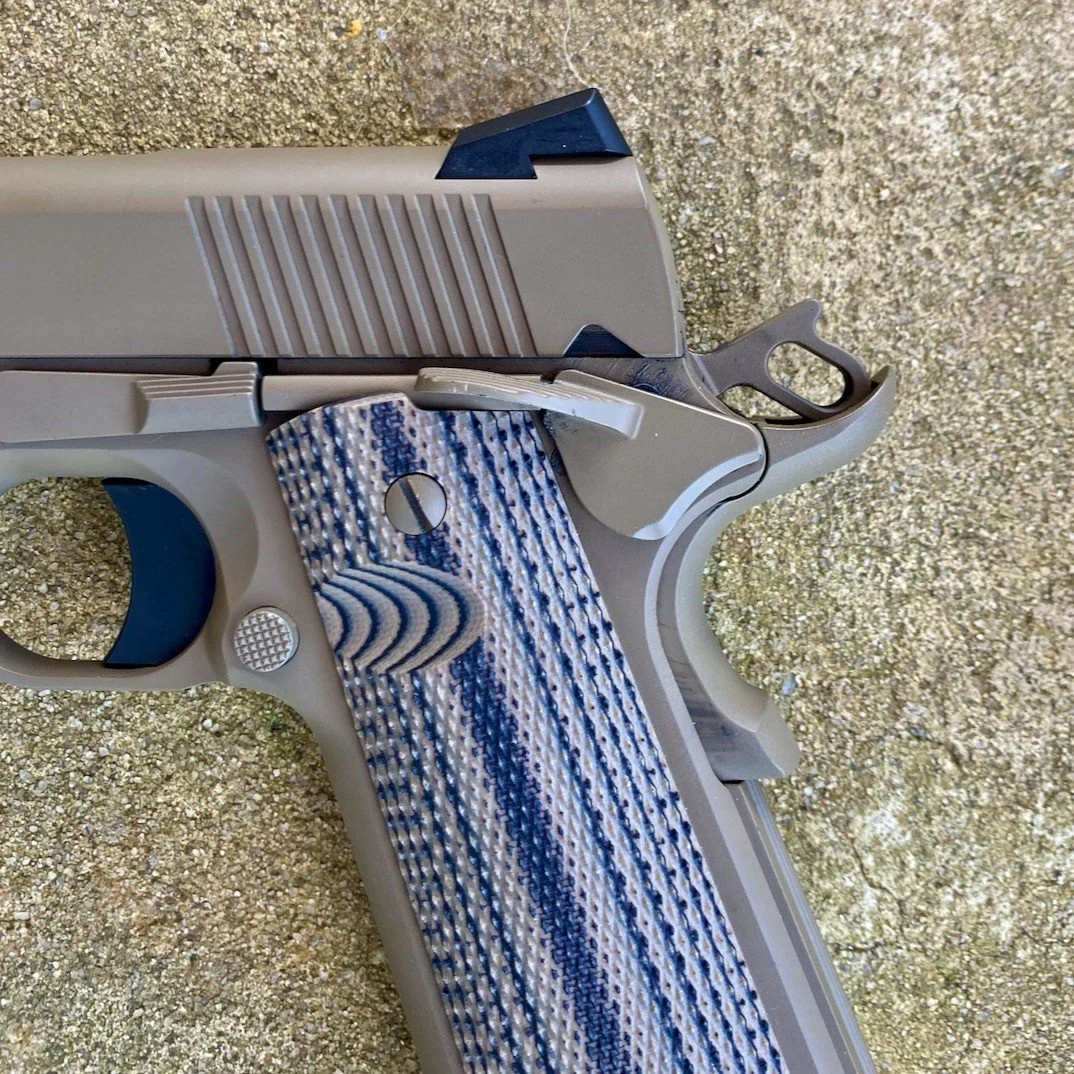


In these instances you must disengage the safety to be able to lock the slide to the rear. Just remember to keep the gun pointed in a safe direction and to keep you finger(s) off the trigger and out of the trigger guard.
Important Caveat #2
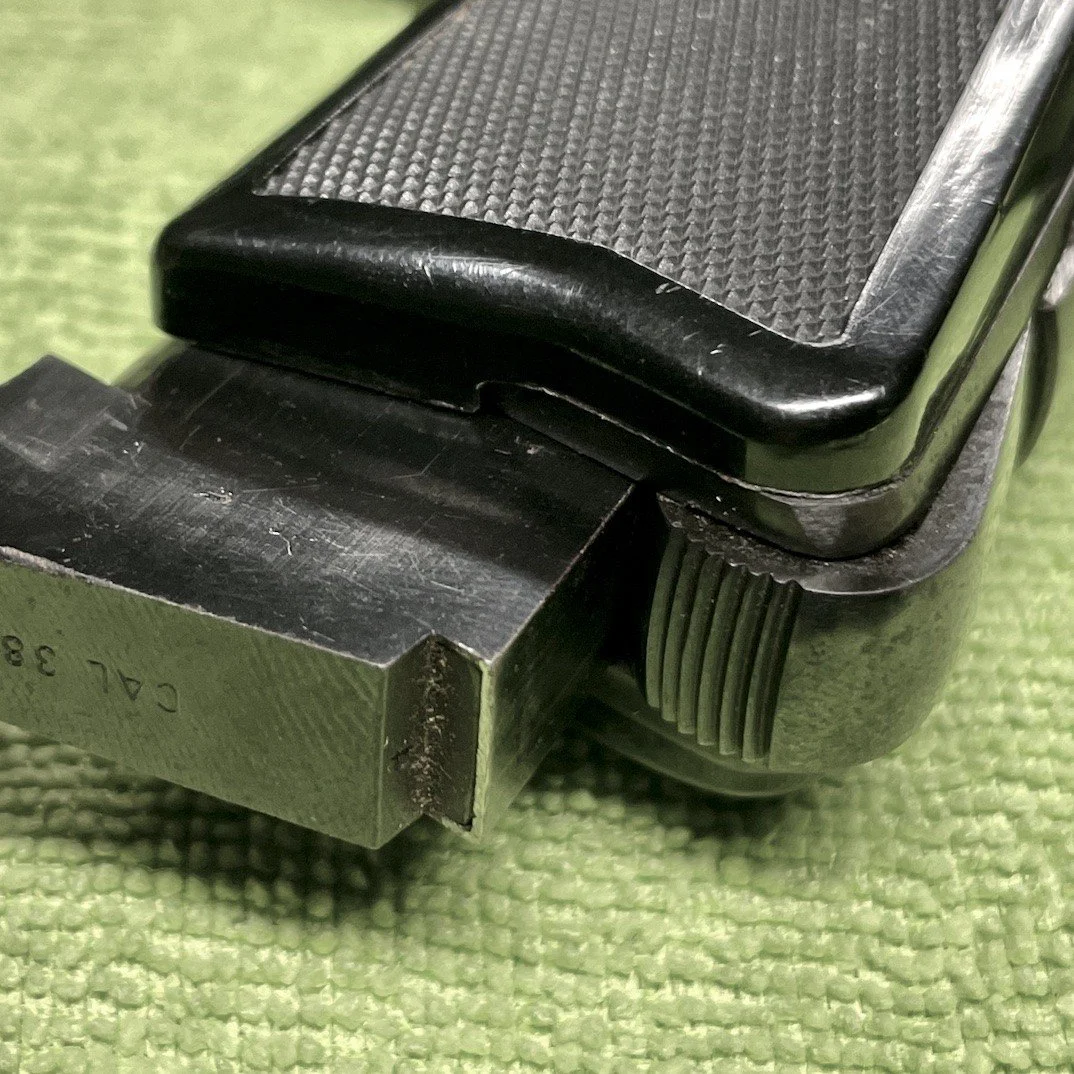
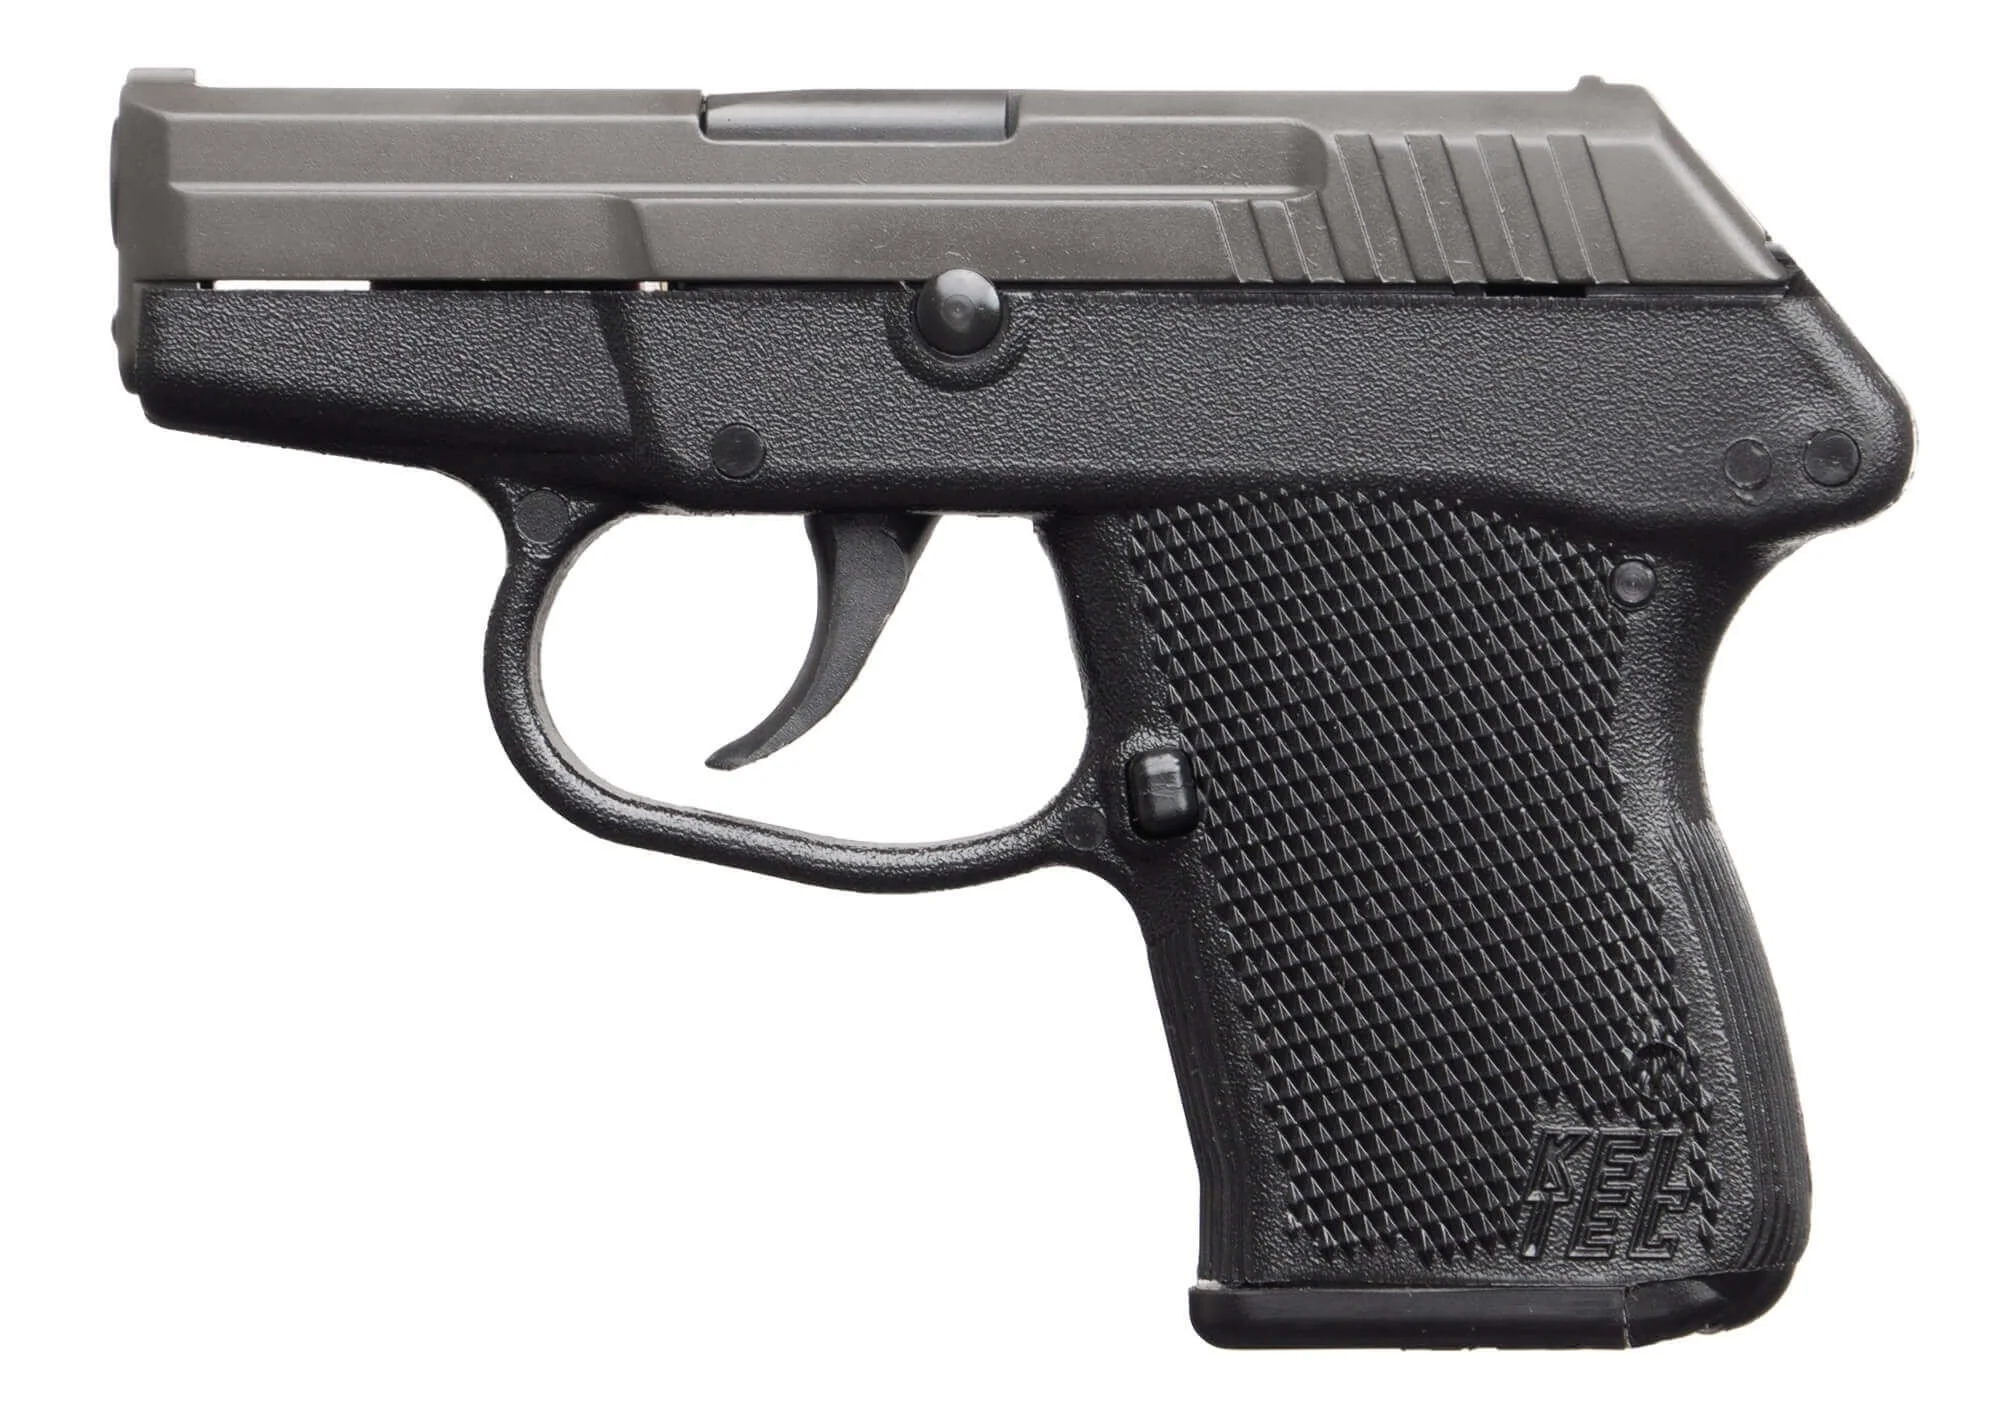
Some pistols - usually older designs or very small pistols - do not have a slide stop, like the one shown below. If this is the case, simply hold the slide to the rear as you perform the next step, visually and physically inspecting the chamber.
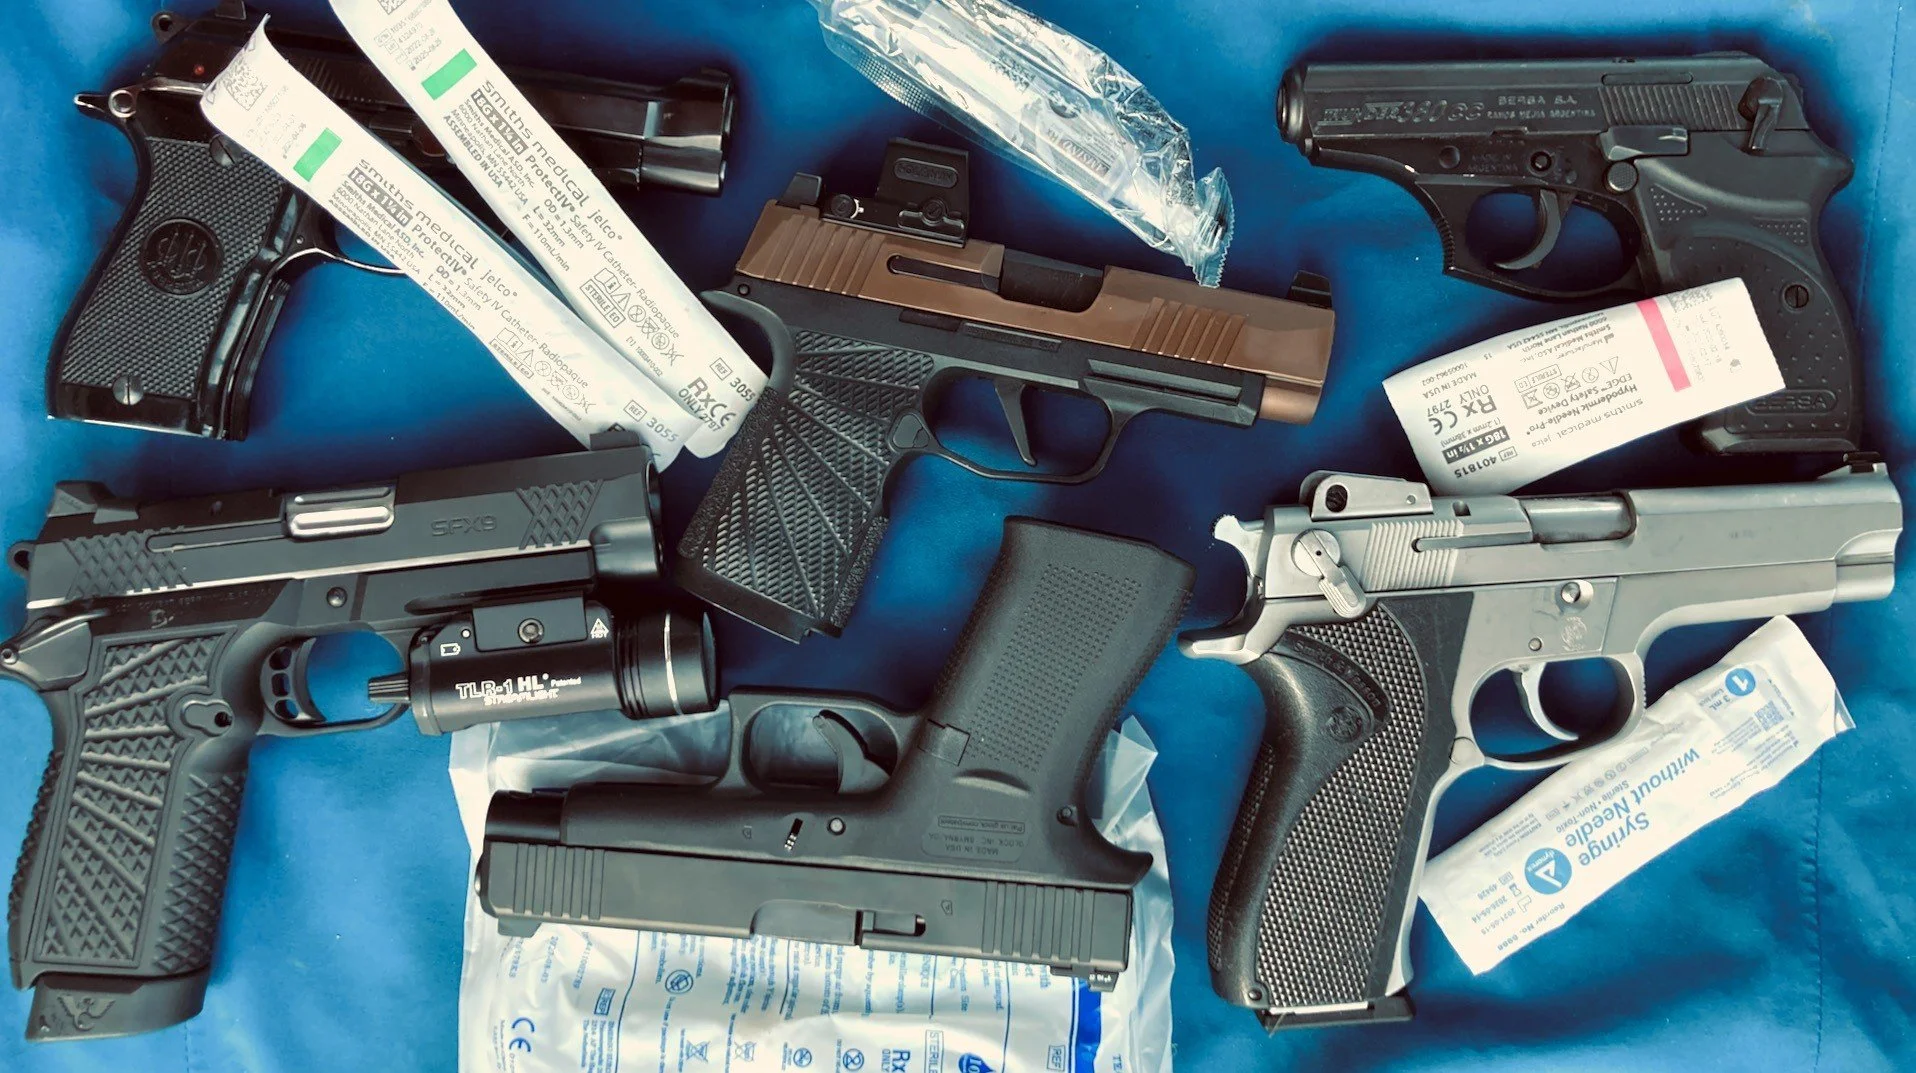
To keep the slide locked to the rear to visibly demonstrate the condition of the gun, you can place some foreign object into the action of the gun. A syringe, a Jelco cover, an oxygen wrench, a pen, or a pen light are all readily available items on an ambulance that will serve this purpose.
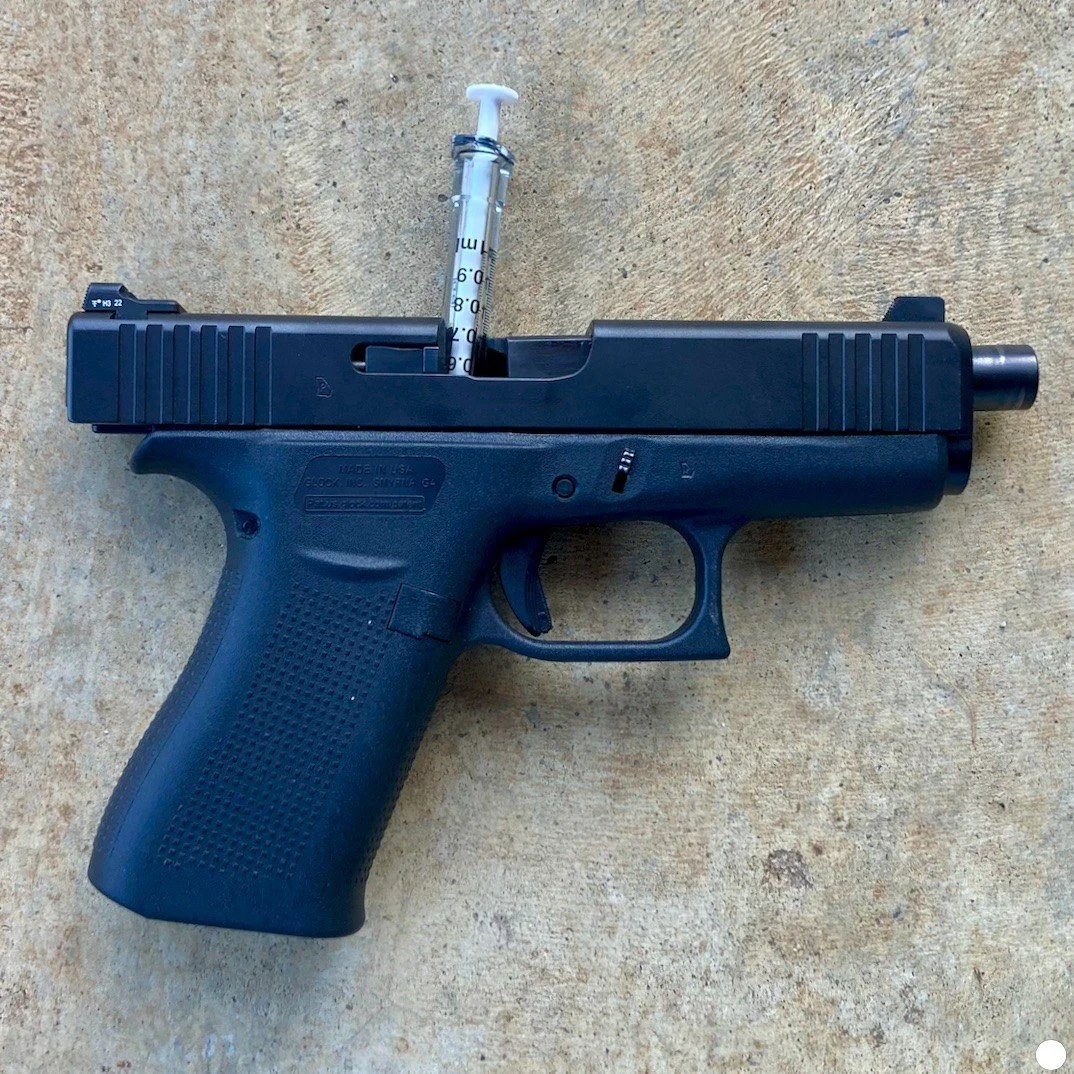
This will require help from your partner. You will have to hold the slide to the rear as he or she inserts the foreign object, then lower the slide on it.
7. Visually and Physically Inspect the Chamber
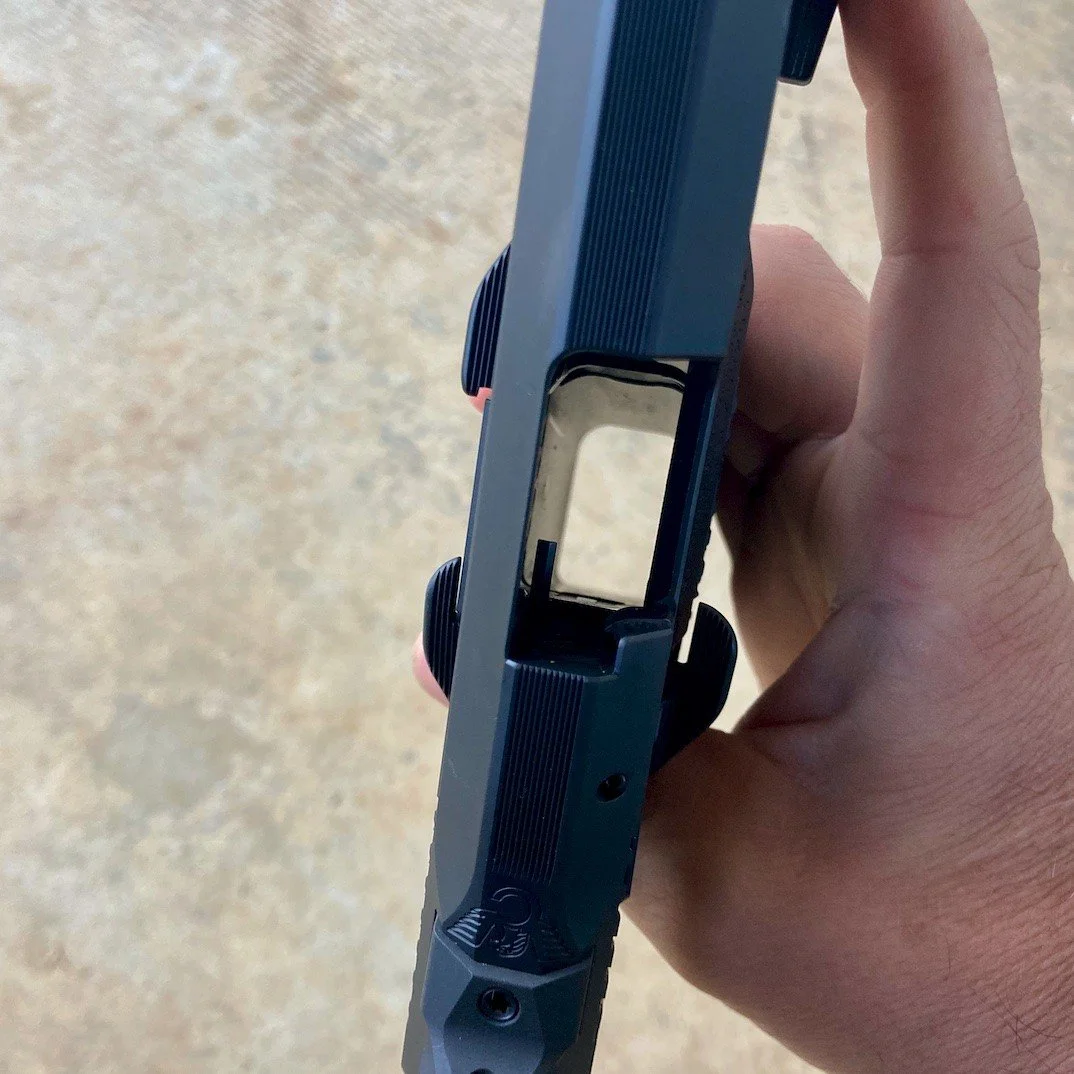
As you retract the slide to lock it to the rear, a round of ammunition may or may not be ejected. This depends on whether there was a cartridge in the chamber or not. Sometimes, even if there is a round in the chamber, it may fail to be ejected. Take a moment to visually and physically inspect the chamber. First, look into the open action of the pistol. You should be able to see all the way through it due to the absence of a magazine. If a magazine is still there, remove it as described in Step 4.
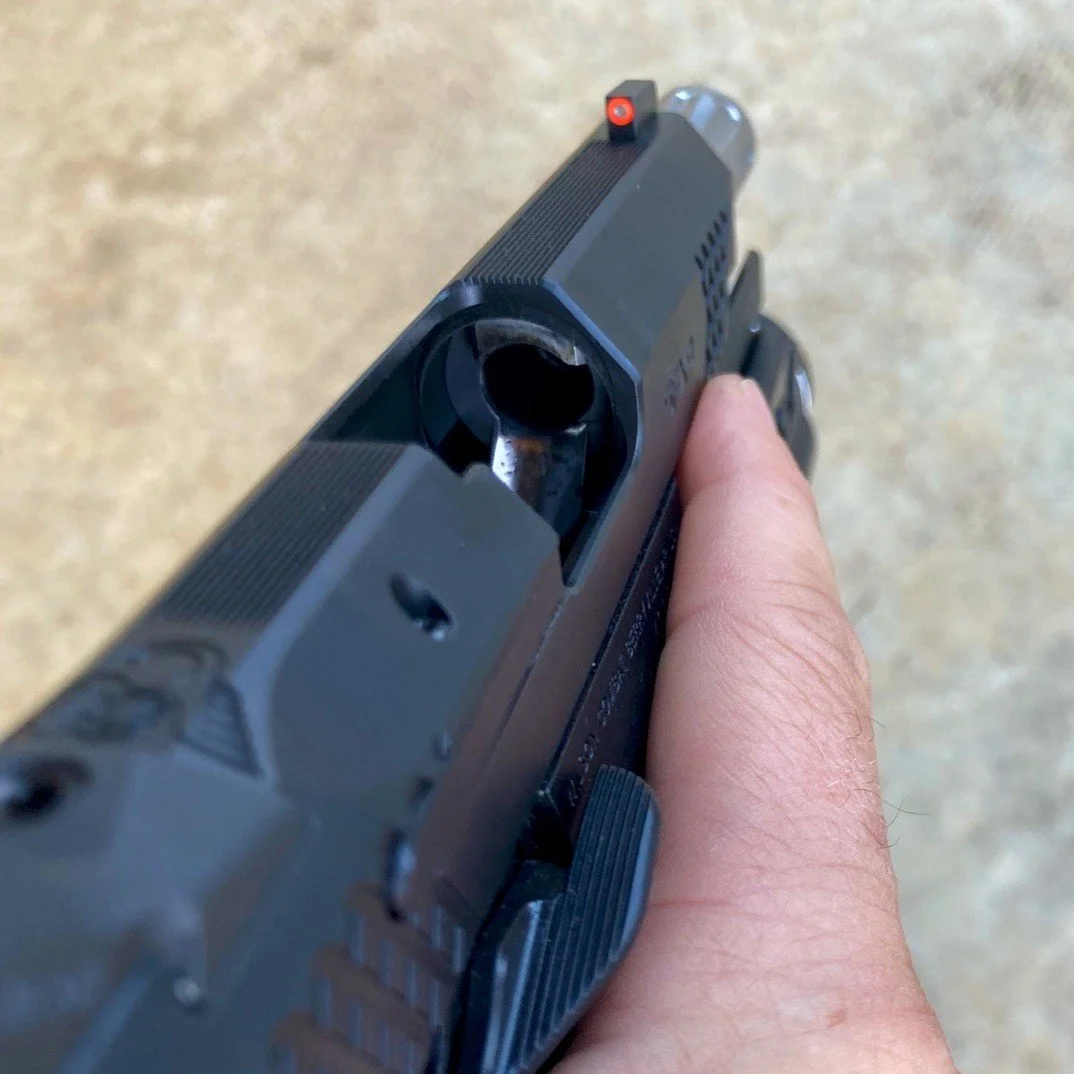
Next, look into the rear end of the barrel, also known as the chamber. There should not be a cartridge in the chamber. Cartridges are usually a shiny brass or nickel color, though sometimes they can be dark green or even black. If you see a round of ammunition in the chamber, the gun IS NOT SAFE! You need to remove it before the gun is considered safe.

Mostly likely, though, if you have followed the steps here, the chamber will be empty. On many pistols, the chamber is easy to see.
On some firearms the action is fairly closed. You will need a light source to see into the chamber. Even a pupil pen light will be adequate for this task.
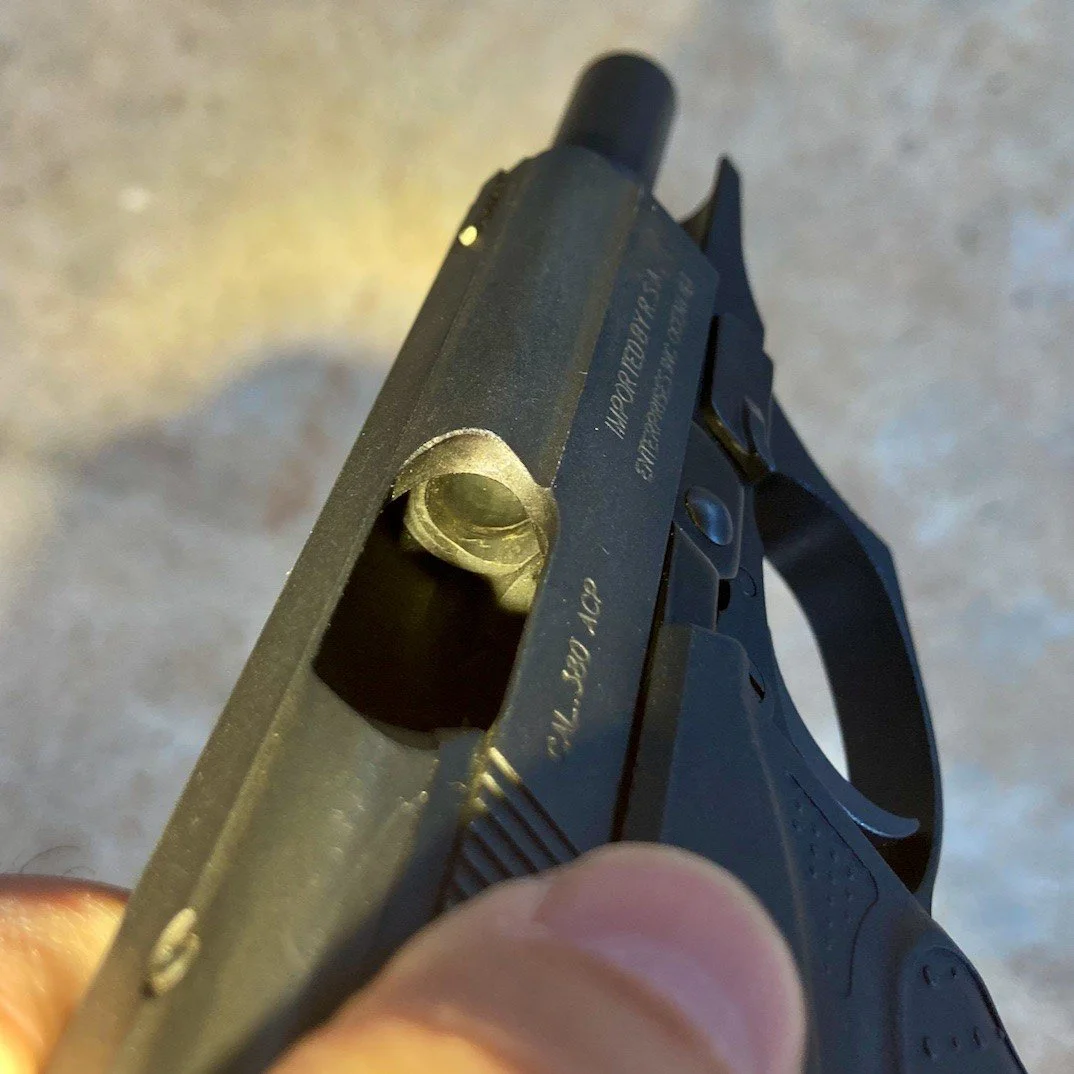
Once you have visually inspected the chamber, physically inspect it. Stick your finger into the action, and press it against the rear portion of the barrel. This serves as a secondary verification. For you experienced firearms practitioners, especially, it also breaks you out of preset programs where you may perform the physical action of "looking" without your brain "seeing."
8. Turn the Firearm Over to Proper Authorities
At this point you've rendered the firearm safe. You need to turn it over to someone. Usually that person is hospital security, if you are transporting the patient. Rather than walk into the ER holding a firearm, I usually drop the gun into my cargo pocket. I've mostly dealt with very compact handguns; if I come across a larger one I will likely lay it on the head of the stretcher and throw a blanket over it.
Once in the ER, I don't loudly announce that I have a gun. In all cases I have been able to quietly let someone know and ask that they alert security. At both hospitals I routinely transport to, security will retrieve the gun and some patient information, then lock the gun up. Once the patient is discharged the firearm is returned to them along with any other personal property.
Recap: Handling Patient Firearms
That seems like an awful lot of information! It probably takes 100x longer to read this article than it does to execute the steps described here. Let's recap those steps really quickly.
Scene Size Up: Determine if it is necessary to attempt to safe the weapon. Also make sure nothing else is in the trigger guard or acting on the trigger!
Treat Every Weapon as if it Were Loaded: Always! This isn't a discrete step, but an overarching principle.
Keep Your Finger(s) Off the Trigger: In this situation you should never touch the trigger.
Point the Gun in the Safest Direction Possible: Usually the floor of the ambulance; the ground or the sky if you're outside. Situation dependent if you're indoors.
Remove the Magazine: Find the magazine release and remove the source of ammunition.
Lock the Slide to the Rear: Remember, some guns may have a safety that blocks movement of the slide, and some may lack a slide stop lever.
Visually and Physically Inspect the Chamber to make sure no ammunition is present.
Turn the Firearm Over to Proper Authorities, usually LE or hospital security.