Humaning 101: Basic Hand Tools, Part I
I recently got a reader request for an article on tool maintenance. I'm not necessarily the expert on tool maintenance but I'm willing to take a stab at it. Before I do that I think we should talk about one of those things every halfway competent human should possess: a set of basic hand tools.
This article contains affiliate links.
"Why," you may ask, "should every household should have a basic set of tools?" That's a totally fair question. I think it boils down to basic self-sufficiency. You should have some tools to do some basic tasks yourself without having to call in a handy many, carpenter, plumber, or what-have-you. This is especially true if you are a homeowner and to be honest, probably just as true if you are a renter. You don't want to have to call building maintenance every time you need a screw tightened. As I've mentioned before your home is your most valuable preparedness item - be prepared to take care of it!
There is also a more important reason: in a disaster you may not be able to call someone to turn off your gas or fix that leak or repair that ___. You may have to make do on your own until things calm down. This is going to be much easier to do if you have just a few basic tools. As with anything tools are nearly useless without knowledge. Get out and learn how to use your tools!
This article will proceed in a logical fashion. Not every tool is as important as every other tool, and not every tool is as imp0rtant to you as it is to someone else. I'm going to try to cover the things that are important to the masses here, starting with the very basics that everyone should have. If you're starting completely from scratch - as a new homeowner, new college grad, or putting together an awesome gift for your child who is about to leave home - I don't think you can go wrong purchasing items in the order listed here.
Disclaimers and Caveats
Since I am in the midst of writing a series on preparedness, this article will be focused toward the goal of being prepared for an emergency or disaster of some sort.
Every time I write about tools or carpentry or whatever some of you guys write in with much more detailed thoughts on the matter. So I'm just going to be up-front with you: I'm not the expert on carpentry, mechanics, tools etc. I'm just an average dude. I've worked carpentry before, and I consider myself pretty handy but at the end of the day I'm a layman talking to laypeople.
A note on tool quality: I am not a tool snob. I would love to have a full set of Snap-On tools and if anyone wants to buy me a set I wouldn't turn you down. That level of quality is very expensive and I'm not convinced it's worth it for the average individual. On the other hand, though, you should not buy junk. I wouldn't buy my tools at the grocery store, the drug store, the dollar store, or a big-box department store. Unless you just have money to spend, I would recommend buying a solid, middle-of-the-road, consumer-grade tools.

If you go too cheap you're going to end up buying again. The Swanson Speed Square(s) above is a perfect example: the metal one is over 25 years old. I purchased it and misplaced it for a while. While it was missing I purchased the orange one that is less than five years old. The orange one is broken in two places. Because of my own error I ended up having to buy twice, but if you're given the choice between spending $5 for the plastic one or $9 for the metal one...the metal one is the better deal.
On the other hand, if you go too expensive you're going to spend far more money than you need to spend. I wouldn't spend $50 for this type of square no matter what it was made of. Most of the tools I link to here are Craftsman or other, solid, middle-of-the-road brands. You will note that many of my tools are mix-and-match. That's just the result of breakage and - much more commonly - loss over the years.
Personal Protective Equipment
This is an often-overlooked category stuff when talking about tools. Using tools generates the potential for injury. Sometimes this potential is really small, as when tightening a screw on the leg of your dining your chair. Sometimes this potential is fairly high, as when operating a power saw. Many tools require specialized personal protective equipment (PPE). For example, if you are running a chainsaw you should absolutely have on a set of chaps (ask my brother-in-law - a man who has spent much of his adult life using a chainsaw professionally and who buried the bar of his chain saw in his leg last year). There are a few common, simple pieces of PPE that are fairly universal, however.
Safety Glasses: You will want some safety glasses. It amazes me to to see people operating weedeaters, chainsaws, and other power tools without safety glasses. Eyesight is so incredibly important to your day-to-day function. I wouldn't want to attempt "normal" life under optimal conditions without the use of both eyes. I certainly wouldn't want to attempt to brave a long-term emergency with a preventable, substantial loss of eyesight. I like these inexpensive, Z87.1-rated glasses from 3M.

Hearing Protection: I have mentioned in a previous post that I am extremely disciplined at protecting my hearing. This is because I have lost a great deal of my own hearing. Most of this hearing loss was completely, 100% preventable. Hearing loss ican be chronic, meaning you can lose a little bit at a time with a drastic cumulative effect. Your hearing is important to your function under adverse events. Wear hearing protection when running your lawn mower, chainsaw, weed eater...whatever. Once it's gone it's not coming back. I like these passive muffs from Peltor. When working with extremely loud tools (or shooting guns) I double them up with ear plugs.
Gloves: These might not be absolutely essential in day-to-day life. For most of my life - up until the last year or so - I have never been fan of work gloves. I don't know why; I just haven't liked them. I have finally started wearing gloves but to be honest, more often than not I will get to work without putting them on. This isn't a good practice during an emergency where access to healthcare may be limited. Though it's really easy to forget that minor cuts and scratches used to kill people, they did, and they still have the potential to today. I have a couple pairs of Mechanix gloves, and I am much better at wearing them now than I used to be. Even if you don't use gloves all that often I recommend having a pair on hand.
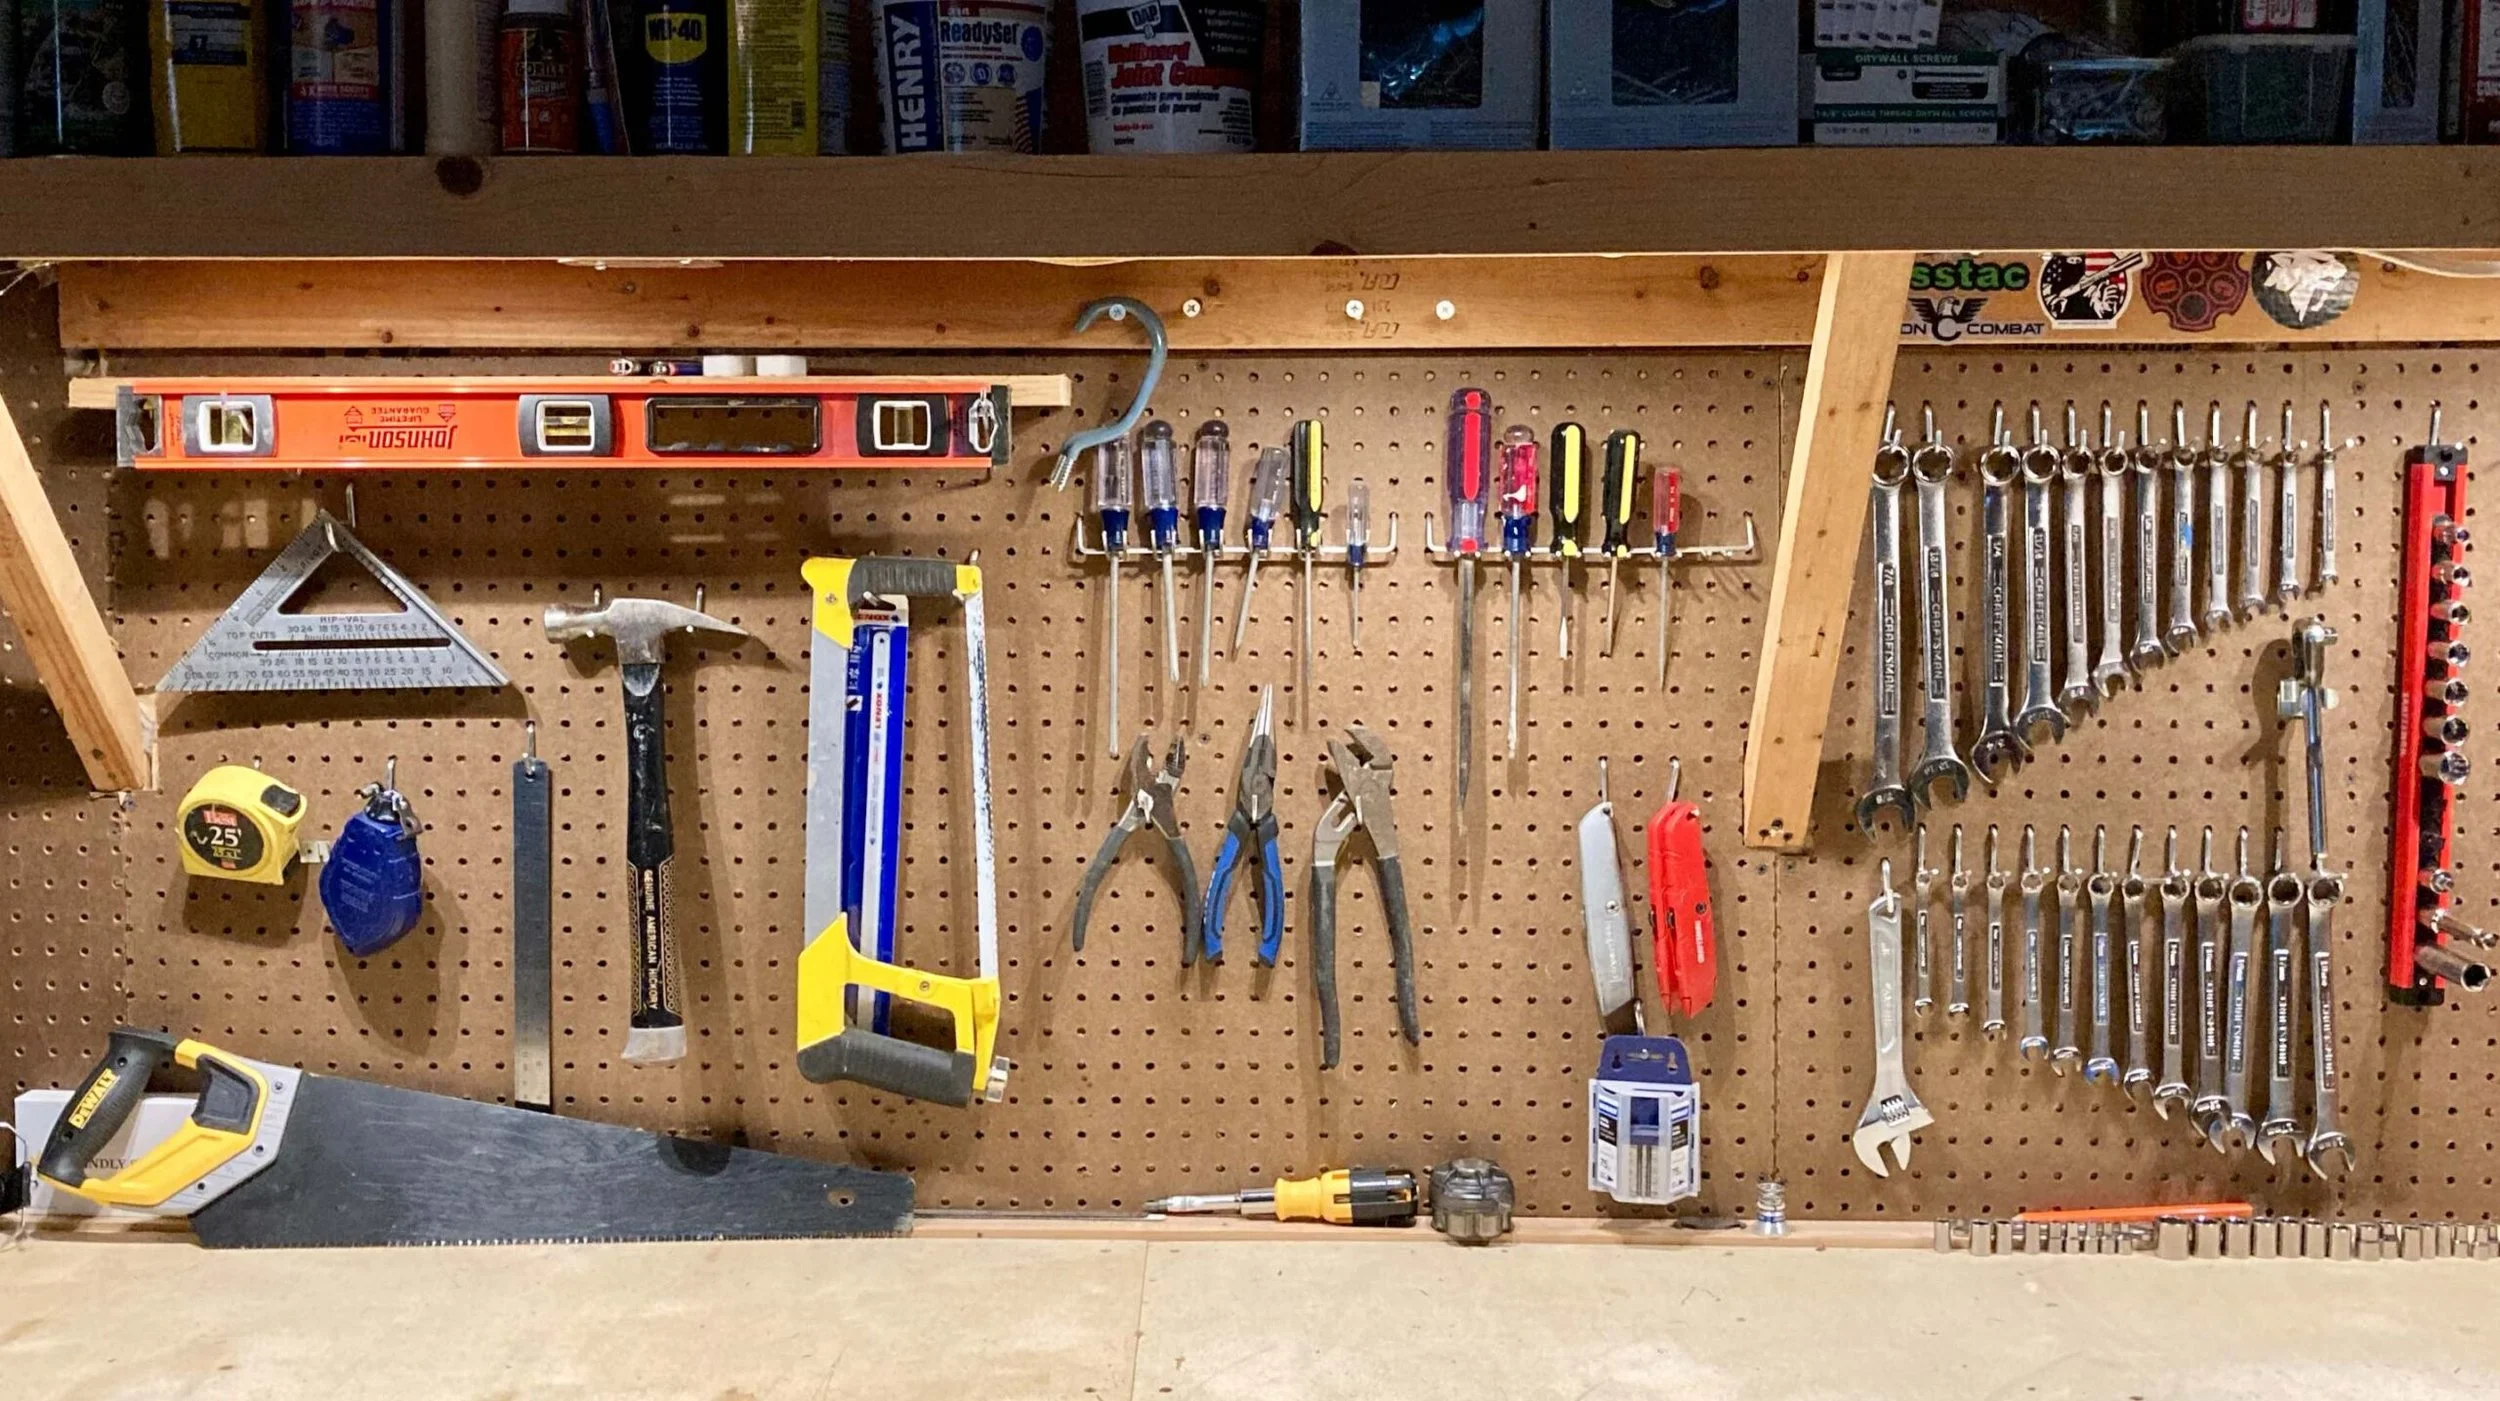
Screwdrivers
This is probably the most basic of the basic. You will need both some slotted and Phillips screwdrivers, in several sizes each. Most people can probably avoid the very large and very small versions and stick with the mid-sized screwdrivers. This Craftsman 8-piece set is the basis of my screwdrivers and a really good starting point.

The bare minimum: if you are on a budget, extremely tight on space, or just want a really nice junk-drawer screwdriver - check out the Lutz 15-in-1 screwdriver. My local hardware store sells branded ones, and I have several. I keep one upstairs in a kitchen drawer, one on my workbench, and one is a "rover" that's constantly making its way around the house. This thing is probably my single most-used tool. In addition to having 7 double-ended bits, it also ratchets. You can ratchet forward, backward, or lock in both ways. Seriously - once you have this thing you'll wonder how you lived without it.

Pliers
I definitely recommend having some pliers. Pliers can subsitute for a wrench and allow you to tighten or loosen bolts, they can grasp things firmly, cut wire and more. If you're only going to have only one set of pliers, I think it should be needle-nosed (sometimes called long-nosed) pliers. Needle-nosed pliers will grip small items similar to regular, slip-joint pliers. But they will also fit into smaller spaces and they generally have a wire-cutter built in. In my opinion they're just a little bit more versatile than other types of pliers.

Next, I would say get a pair of slip-joint pliers, followed by more specialty pliers like lineman's pliers and channel-locks (yes, I know it's a trade-name). Channel locks are awesome because their jaws can be adjusted to accommodate a very wide range of material sizes (somehow I have ended up with half a dozen sets of them). If you want to buy a fairly comprehensive set of pliers, I would recommend this set from Craftsman.
Hex Keys
Hex keys screws are insanely popular because they are cheap to manufacture and the tools to turn them are strong and cheap. All of us have ordered some product that came with a hex wrench to be used for assembly. If you are a much more organized than me you may have saved all of these hex keys (I use the terms "hex key" and "hex wrench" interchangeably, by the way). If you're like most people those things are long lost by the time you need to tighten up the legs on that chair. And the freebie hex keys aren't that great anyway. I think you should own a good, high-quality set of hex keys.
I really like this set from Rexbeti (whoever they are). It includes standard, metric, and star wrenches. In what I think is the coolest idea in a long, long time, they separate the standard and metric by making one black and one stainless. There are certainly less expensive sets, but most of mine have ended up looking like the mess in the photo below. Not any more.

These wrenches also have a "ball end" which makes it possible to turn screws without being perfectly inline with them. This is a nice set. If you only want the standard and metric and not the star bits you can save yourself a few bucks and just get the SAE and Metric set.
The tools we have covered so far are very simple tools, yet they will allow you to deal with a substantial number of problems. Even if you're the type of homeowner that would never dream of doing your own repairs or even hanging pictures, these tools are important just for general upkeep. And they form the basis of everything else.
Hammer
Everyone should own a hammer. I recommend this Estwing hammer. There are a few things to be aware of in regards to hammer design that this hammer has. Let's look at them.
Claw style: standard construction hammers come with a claw on one side. The claw is designed to remove nails for any number of reasons: they are bent, were placed temporarily, they need to be replaced, or you're disassembling something. The claw can either be curved or straight. The claw on my hammer (the one appearing in all these photos) is straight. I prefer a straight claw because honestly I think it's easier to remove a nail with a straight claw. The straight claw can also be used to arrest your fall should you go sliding toward the edge of a roof, and it's a little more helpful with light demolition chores. The Estwing hammer I recommended here has a straight claw.

Handle material: I used to think handle material was much more important than it actually is. I would turn my nose up at any wood-handled hammer. Then for one reason or another I needed a hammer and didn't have a lot of money, so I purchased the hickory-handled Kobalt hammer you see in the photos here. That was almost five years ago and guess what? My dad has a wood-handled hammer that he remodeled our whole house with when I was a kid. I also think back to a hickory-handled hammer my grandfather had that were going on five decades.
You will occasionally miss the nail and it (or the substrate) with the handle of the hammer. Obviously that creates some risk of breakage. I wouldn't get too bent out of shape about material, though - hickory handles are plenty tough. The alternatives are fiberglass, which I've always preferred, and steel. The Estwing hammer I recommend here has a steel handle that is almost guaranteed to last a lifetime and only costs $20 - about $5 more than a fiberglass handled hammer. If anything gives out on this hammer it will be the handle.
Weight: When buying a hammer you will often see a weight listed in ounces. This is the weight of the head. The greater that weight, the less force you have to apply to put the same driving energy onto the head of a nail. Unfortunately that's also more mass you're moving thousands of times per day, so... it's up to you. Think about your use-case and how much you'll actually use it, and what you'll actually use it for. I believe a 16-ounce hammer is just fine for most laypeople.
Measuring & Marking Tools
Measure twice, cut once! It only makes sense to talk about measuring tools before we talk about cutting tools. In a minimalist's tool kit there are only a couple of things you really need.

Tape Measure: I imagine that most households already have a tape measure. Maybe it's a little "mini" tape measure in a purse or a full-sized on in a junk drawer, but you probably already have one. If you don't, you should fix it, post-haste. I really like Stanley tape measures. I own two - one is over 20 years old and one is ten years old. Both are going strong. From converting a van to an RV to putting in fences to...you name it, I've used those Stanley tape measures for just about every imaginable purpose and they still work. I'm seeing a lot of newer tape measures with built in lasers and whatnot. My advice: keep it simple.
Carpenter's Pencils: Get a bunch. Sharpen all of them. Leave them strategically placed around the perimeter of your workbench. Put one on both sides of your tool belt. That way you'll always be able to find one (and a sharp one) when you need it. I also like to keep Bic lighters around the perimeter of my work bench - another thing you often seem to need but are rarely able to find.

Chalk Line: I wasn't going to put a chalk line into this generalist kit until I looked it up and realized it is only $6. A chalk line is a reel containing some thin, cotton string that is covered in colored, powdered chalk. Then you pull out a section of the string, pull it tight on a board, and "pop" it, it marks a long, straight line that you can then cut, use to apply nails in a straight line over a joist, or whatever. If you're going to be doing any appreciable building or cutting of lumber (especially ripping sheathing) you will need one of these. Otherwise you might be able to skip it but for $6 I'd probably pick one up.
Swanson Speed Square: Not named after Ron Swanson (to my knowledge) but the Swanson Speed Square is essential! I have at least three of these (unfortunately one of which is the broken plastic one). The Swanson Speed Square does a lot of different stuff and I'm not going to go into all of it here. Most commonly I use it to mark straight cut lines across dimension lumber. I'm telling you - it would be hard for me to function without one of these. As I mentioned earlier I recommend the metal version over the plastic. Your grandchildren should be able to pass them down to their children one day. I keep one on the work bench and one in my tool belt.
Saws
I recommend that most people have two saws: a hacksaw and a handsaw. Each of these serves a separate purpose, so let's take a closer look at each.
Hacksaw: The hacksaw is used, primarily, to cut metal and plastic. Tasks like cutting the head off a bolt, cutting a piece of pipe or shortening a piece of angle-iron call for a hacksaw (assuming power tools cannot be used, of course). A hacksaw basically consists of three components: a handle, a blade, and a frame that places tension on the blade. The hacksaw pictured here is a Stanely saw that I bought five or six years ago and it is a fantastic saw. It tensions really well, allows you to mount the blade in a standard, vertical orientation, as well as several other angles that are useful for cutting in tight spaces. It also holds some extra blades in the top bar of the frame. Unfortunately I do not believe this saw is made any longer - I can't find it anywhere.

If I were buying a saw today I believe I'd buy this Klein hacksaw. It's $25 and some hacksaws are cheaper, but there isn't a massive price-band here. The cheapest hacksaw I was able to find on Amazon was $13. I'd go ahead and spring for the far, far superior Klein. While you're at it, make sure to pick up some extra hacksaw blades. Blades break. Even worse, they dull, making you work twice as hard to get the same amount of work done. Make sure you know the length of your hacksaw frame (blade length is the critical measurement) when buying blades (yep, I've made that mistake).
Handsaw: the handsaw is made to cut wood. A good handsaw will cut just about any kind of lumber: plywood, dimension lumber, whatever. You can rip plywood with one, or trim up a 6x6 post. They don't require batteries, extension cords, or any of that stuff and believe it or not they can actually be a bit more forgiving when it comes to cutting a straight line. I wouldn't be without a handsaw!

There are two ways to get a a handsaw: go buy a new one, or find an old one at a flea market, second-hand store, garage sale, estate sale, or the like. Because metal is so much harder than wood, a handsaw blade rarely does, and those old handsaws were made to a completely different (read: better) standard. I have an old one but it's at my dad's, so the one I'm showing you here is a new one, a 20" Dewalt, and I really, really like it. You want to hang your handsaw as pictured to keep the blade from warping.
Wrap Up
And that will wrap up Part I of this two-part article. I really hate to break this into two parts. However, this already fairly lengthy article is not really close to being finished and may double in length. Since I have limited time, and since I have to come up with a LOT of articles for this site, it makes sense to break this up. If you didn't see something you were looking for here, it might be in Part II, so stay tuned.

