Defensive 1911: Managing 1911 Safeties
The 1911 has a two manual safeties that must be disengaged simultaneously to operate the firearm. These safeties are often misunderstood or simply misused. Managing 1911 safeties effectively and reliably is paramount to deploying the defensive 1911. There are hardware and software issues that go into managing these safeties, and today we take a look at those factors.
In this article I'm going to focus on the aspects of managing 1911 safeties that pertain to actively shooting and manipulating the pistol. I won't get into here, but you should periodically verify your safety devices are functioning correctly.
"Not-Quite-1911" Safeties
Before we get into managing 1911 safeties it's also worth pointing out that there are many 1911-like firearms. These firearms sometimes look and operate a lot like true 1911s. However, they don't necessarily have both of these safeties. The most commonly removed from 1911-like guns is the grip safety.

I'm not going to name every 1911-like firearm lacking a grip safety. Here are a few, though. Browning's Hi-Power is the most readily 1911-like pistol I can think of. It has only a thumb safety. The Sig P238 and Sig P938 (both of which I reviewed for GunUniversity.com) have a thumb safety but no grip safety. Same with the Springfield 911. The Wilson Combat EDC X9 is very similar to a 1911 but lacks a grip safety, too. Going further afield, the CZ-75 also has a 1911-like thumb safety but no grip safety.

A very few handguns have a grip safety but not thumb safety. Examples of this category are harder to come by (and often don't resemble the 1911 at all). The Sprinfield XD is the only one in current production that I can think of though I imagine a few others are out there. This article will focus on 1911 pistols equipped with both a thumb and a grip safety. However, much of the information presented is the same, regardless of the presence of a grip safety, as you will soon see.
The 1911 Grip Safety
The first 1911 safety that needs addressing is the grip safety. The grip safety sits along the back of the frame. It is a flat lever that is depressed by the web of one's hand when the firearm is held in an appropriate shooting grip. This also happens to be the most controversial 1911 safety. Though less common than it used to be, you still occasionally hear about users desiring to disable this safety. As a quick, DIY "fix" for poor technique users will sometimes wrap a rubber-band or tape around the grip, holding the grip safety down. As a more permanent fix the user will have the offending safety lever pinned into the depressed position.

Let me be absolutely, unambiguously clear: I don't recommend disabling the grip safety. If you want a gun without a grip safety, choose from the nearly unlimited selection of guns that aren't manufactured with a grip safety. Don't disable your safety features, for myriad reasons. I do begin to understand this compulsion, however. Stock, government-issue 1911s had terrible grip safeties. They were essentially flat and difficult to deactivate. This seems to be the genesis of the movement to pin the grip safety.

If you cannot be dissuaded from disabling a defensive 1911's grip safety, I would strongly recommend avoiding a rubber band. Rubber bands get broken, and they can easily be displaced off the grip safety by rubbing against your skin all day. You'd hate to rely on that rubber band to depress the safety, onto find that the $.02 rubber band had failed.
Rather than disabling a 1911 grip safety, I would have it replaced with a more modern version that you can actuate reliably. That, or consider a new carry pistol. Since you're reading an article about 1911 safeties, though, I assume you're interested in carrying a 1911, so let's look at how to work that safety.
Managing the 1911 Grip Safety
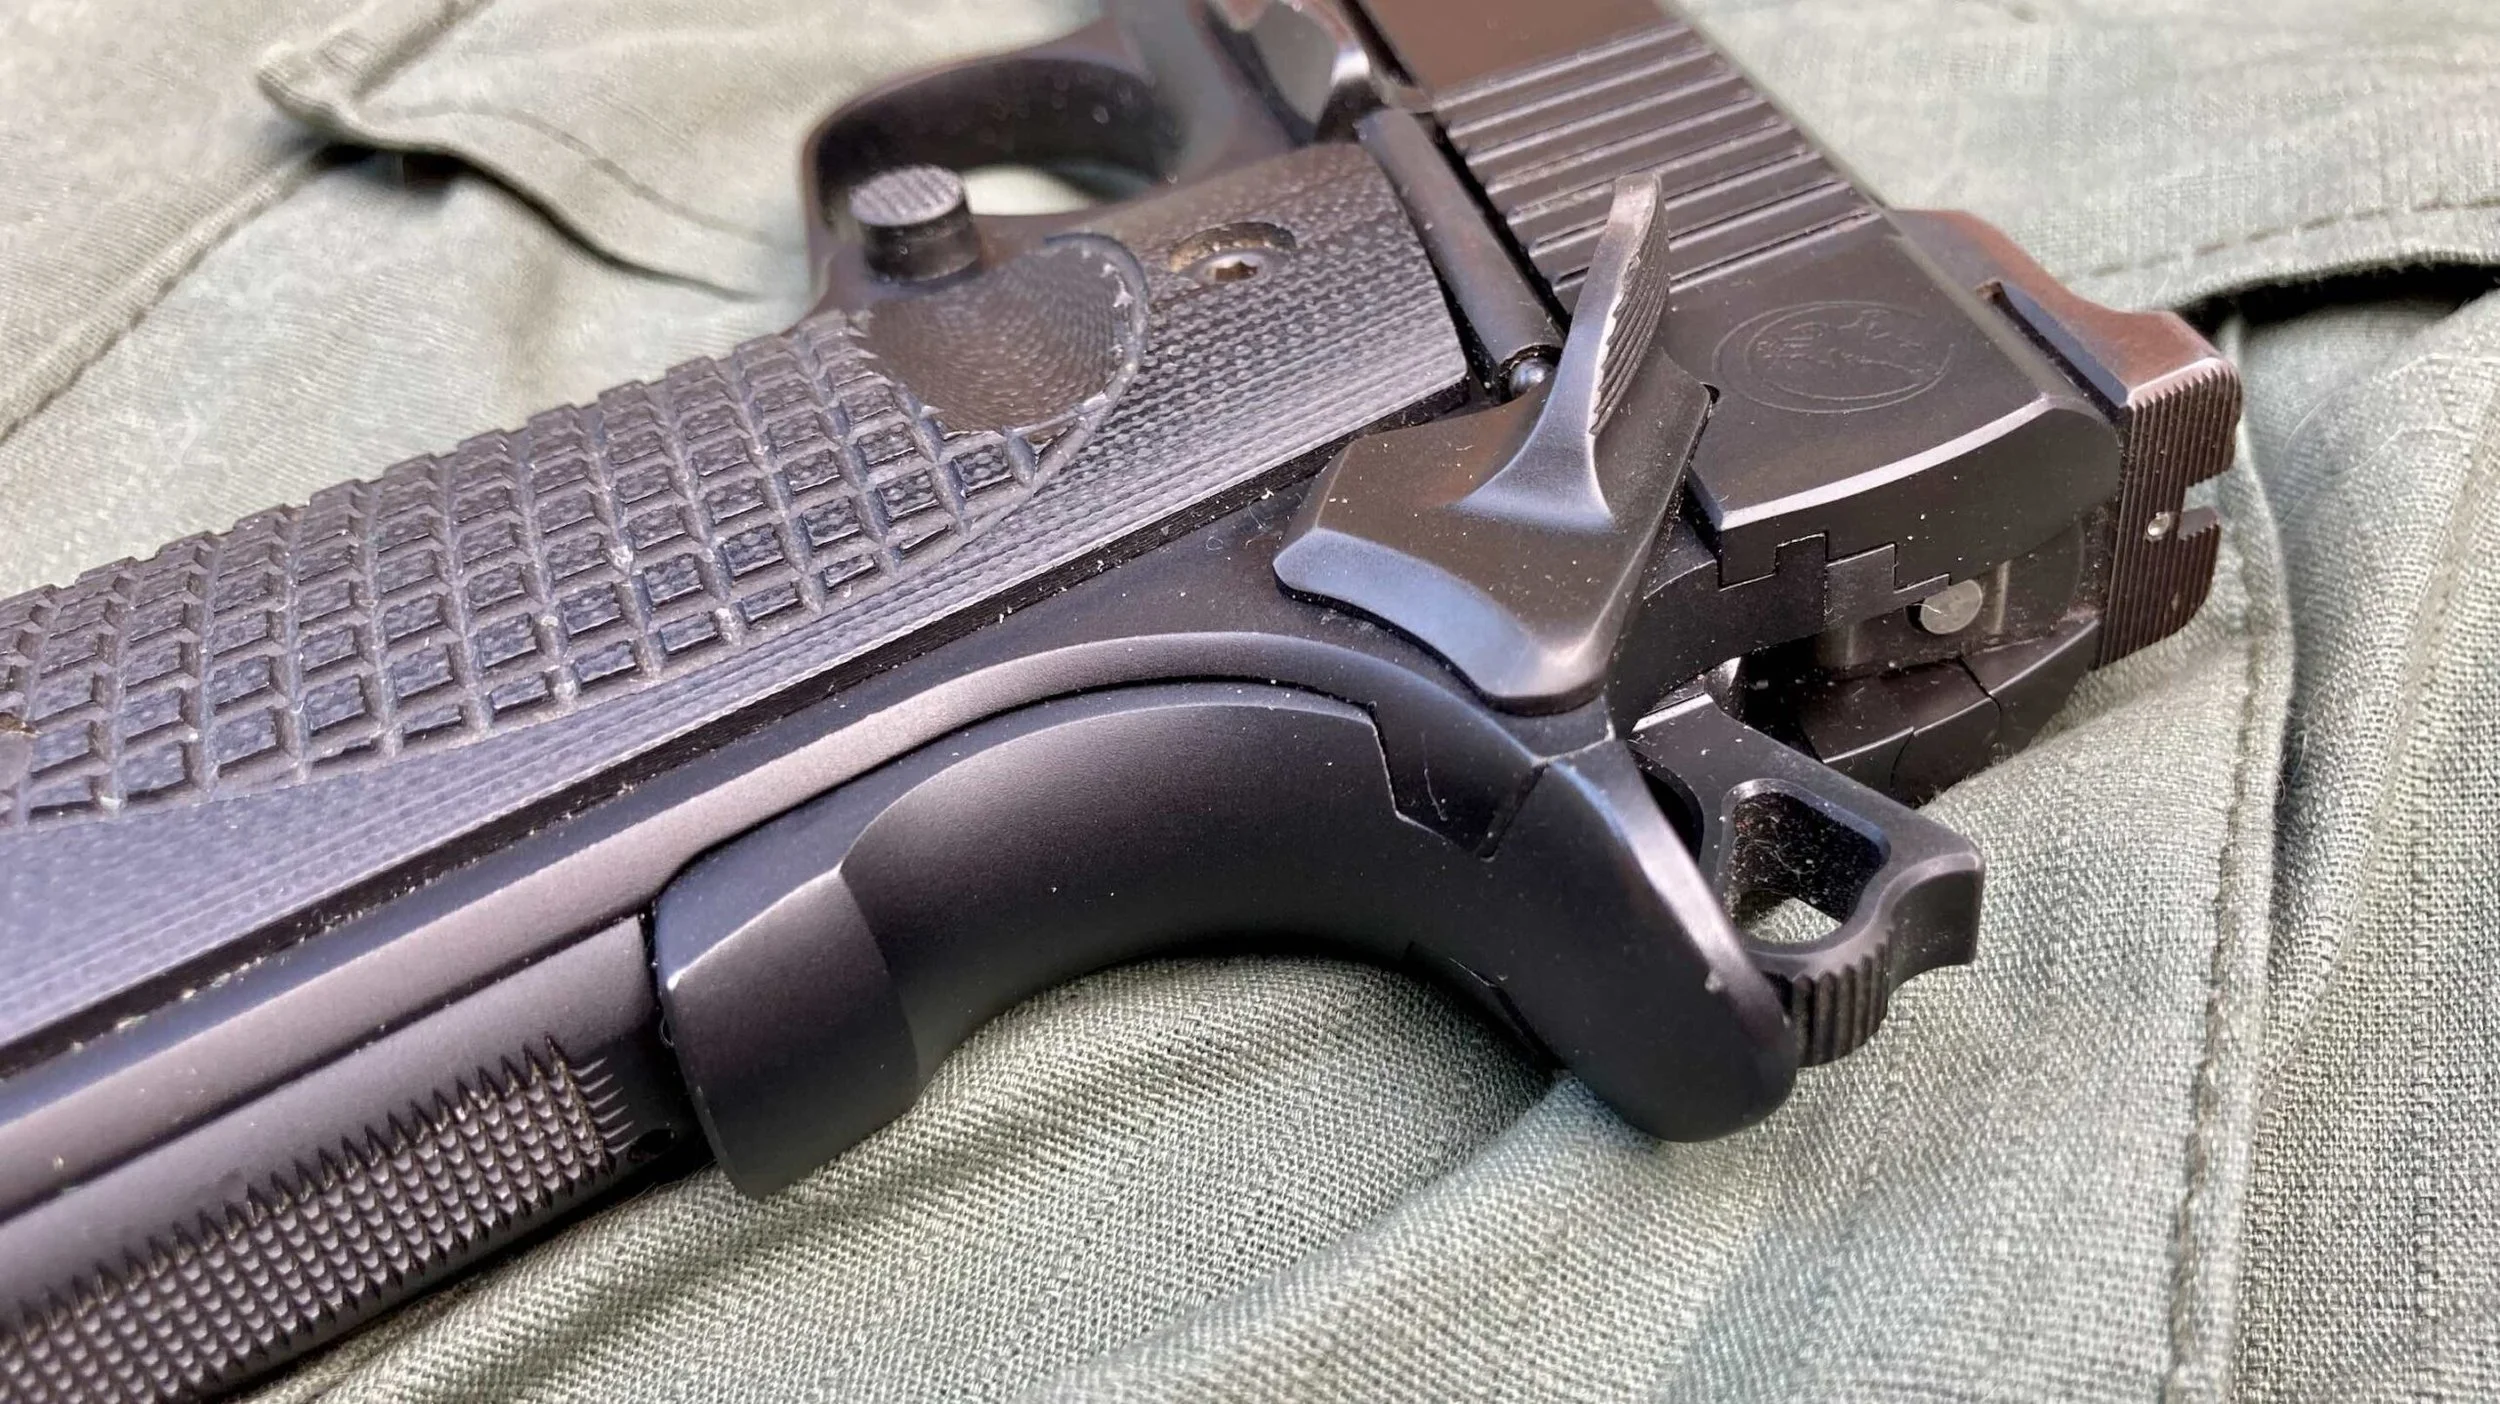
The keys to managing the grip safety lie in both hardware and software. The hardware portion is the easiest to accomplish. Modern 1911s are very frequently equipped with a better grip safety. The grip safety below is an outstanding example; it has a "speed bump." The speed bump is the protrusion at the bottom of the safety.

When the gun is grasped it is very easy to depress the safety. In fact, it happens automatically when one assumes a high, firm grip. This type of grip just so happens to work really well with the thumb safety, as we'll see. The protrusion is at the furthest point from the safety's fulcrum.

Again, this makes the grip safety very easy to depress with anything even approaching a decent grip. This has a couple benefits. First, it works very well with the ideal grip for the thumb safety. Second, it serves as a bellwether of good (or bad) grip. If your normal grasp of the 1911 doesn't depress the safety you probably have some work to do. Perhaps you need a holster that better accommodates a full firing grip. Maybe you just need to work on building your grip.

With good hardware and good software it is hard for me to imagine a problem disengaging the 1911 grip safety: just pick it up with a good firing grip and the safety is disengaged - that's it. With way more said about the grip safety than I though I could say, let's move on.
The 1911 Thumb Safety
The other safety on the 1911 is the thumb safety. The safety has two positions: up and engaged, or down and disengaged. There are a couple of other bugaboos inherent in this safety device. First, when the safety is engaged the slide will not function. This means the thumb safety must be disengaged to rack the slide for loading, unloading, press-checking and the like.

Despite my affinity for the 1911 thumb safety, this is sub-optimal. It necessitates a good deal of administrative handling with the manual safety disengaged. I understand that a manual safety doesn't negate the need for thoughtful, careful gun-handling, but I'll take the benefit of the safety over not having it. Safeties on some 1911-like firearms function the same (EDC X9, Hi-Power). Others allow the slide to reciprocate with the safety engaged (Sig P238/938, Springfield 911).

That complaint aside, the 1911's thumb safety is the best, most well-designed manual safety on any handgun...almost. It is ideally situated. The thumb rests naturally on it. When the thumb does rest on it, it forces a high, firm grip. The safety also provides a shelf against which to push down when shooting the gun. There's a lot to like about the 1911 thumb safety, except that one little thing...
Managing the 1911 Thumb Safety: Hardware
Again there are twin issues of hardware and software here. The original 1911 safety is far from perfect. It is too short, too narrow, and it is single-sided. In a word, the original 1911 thumb safety sucks. Position and manual of operations are outstanding, but the form-factor leaves a lot to be desired.

Fortunately the hardware solution is readily available: the extended thumb safety. Other than throwback models, its difficult to find a 1911 lacking an extended safety. If you have a 1911 without one and want to use it defensively I strongly recommend an extended thumb safety. The extended thumb safety is both longer and wider than the OEM lever. It is far easier and more reliable to disengage. It is also easier to maintain in the down position during firing.

While you're at it, I also recommend an ambidextrous safety. Frankly, I'm just as confused as to why a 1911 would ship without an ambidextrous safety as I am about problems disengaging the grip safety. The standard 1911 safety is single-sided. The ability to operate the handgun with either hand is an essential feature in a defensive firearm. If the safety only exists on the left side of the gun, left-handed operation is very difficult. The proximal knuckle of the left forefinger is also apt to re-engage the safety if pressure is not constantly exerted downward on it. The ambidextrous safety solves this problem.

There can be some issues with some ambi safeties. The safety that curves downward like those from Springfield tends to be problematic for me. The right lever pinches the web of my hand. These issues are fairly uncommon, though. The safety on my Nighthawk 1911 is absolutely perfect and most are at least tolerable.

Managing the 1911 Thumb Safety: Software
With hardware out of the way, let's address software. This is really where the rubber meets the road. This section is all about grip. A good, high, firm grip is critical to running a 1911 well. It is also critical to managing 1911 safeties well. Let's look at the technique.
Grip
First, grasp the gun as high on the beavertail as possible. This places your radius as close to inline with the bore as possible, lowering bore axis. The lower the bore axis, the easier it is to manage recoil. More germane to our conversation, it is also easy to manage the safeties effectively. As part of acquiring a firing grip on the 1911 pistol the thumb should be atop the thumb safety, prepared to disengage it. I will spend much, much more time discussing the thumb.

Thumb Placement
It wouldn't seem that I'd have so much to say about the placement of one's thumb but it is very important to managing both 1911 safeties.
Ensure that your firing thumb lives on top of the safety. I repeat: your firing thumb LIVES on top of the thumb safety lever. It is hard to overstate this. I often encounter users who switch the safety down, then remove their thumb from the lever. DO NOT DO THIS. The thumb on the lever accomplishes several things. First, it conditions you to leave your thumb there. When the safety is engaged your thumb is on top of it, ready to disengage it in a hurry. You don't have to find the safety; your thumb is already there.

Parking your thumb on the safety also ensures the safety is not inadvertently engaged during a string of fire. The proximal knuckle can sometimes reengage an ambi safety lever. Constant, downward pressure will ensure that does not happen. That same pressure also helps you control recoil. This is one of my training scars from using 1911s. Now when I pick up a striker-fired gun my thumb feels like it is going to fall off the side of gun. Finally, keeping the thumb atop the safety keeps the grip nice and high. It is somewhat difficult to both have a low grip, and have the firing thumb on the thumb safety.

The only time the thumb is not on the safety is when you are replacing the safety to the engaged position (up). Your thumb lives on top of the safety. It is allowed to "visit" the underside momentary to press the safety up. As soon as the safety clicks into place, guess where the thumb goes? That's right - back to its home atop the safety.

At Combat Speed
Managing 1911 safeties isn't all that difficult. If you're accustomed to working with manual-safety-less striker guns it may take some getting used to. That's a lot, so let's back up and cover it again without so many cluttering details.
- Ensure good hardware: a modern grip safety with a speed bump and an extended, ambidextrous thumb safety, both fitted to the gun.
- From the holster acquire a high, firm grip with thumb on top of the thumb safety.
- The firing thumb LIVES on the thumb safety. If the safety is engaged the thumb is prepared to disengage it. If the safety is disengaged the thumb is holding it down firmly.
- The firing thumb is allowed to leave the top of the thumb safety to visit the underside, in order to engage the safety.
- As soon as the safety is re-engaged the thumb goes back to where it lives - on top of the thumb safety and prepares to repeat this process.
As I write this there doesn't seem to be much too it. The concept of managing 1911 safeties doesn't seem foreign or difficult at all to me. I routinely see it done poorly though. Poorly mastered 1911 safeties are a huge liability.
If managed correctly the safeties on a 1911 can be assets rather than liabilities. Get good hardware. Build excellent technique. Master your 1911.

