Basics of Wilderness Survival Shelter Building
The ability to build a wilderness survival shelter is one of the most critical survival skills you can possess. Being stranded outdoors can be lethal without the ability to protect yourself from the elements. Shelter provides you protection from the elements: rain/snow, wind, cold, and beating sun. An effective shelter also provides a huge psychological boost and a sense of security.
This article contains affiliate links.
Wilderness Survival Shelter Building
Over the past couple years I've invested a lot of of my survival energy into mastering fire-building. Building a fire is certainly important - fire provides a lot of critical wilderness survival functions. Fire can heat you, cleanse water through boiling, warm and cook food, signal, provide an immense psychological boost, and stave off loneliness and boredom.

Without an effective shelter the value of a fire is greatly reduced, however, You can't stay warm by a fire alone in a driving rainstorm, or when it's 10 degrees and windy outside. A fire can help greatly, but you still need protection from the elements. This is where a wilderness survival shelter comes in.
Knowing how to build a shelter may seem intuitive and simple. Until recently I assumed I was pretty good at building shelters. Like most things, once I got out and started trying my hand I found that it was more difficult than I imagined from the comfort of my living room. Practicing these skills is absolutely crucial to performing them on demand!
Wilderness Survival Shelter Scenario
When would you need to build a wilderness survival shelter? I'll offer the following scenario.
You are solo hiking a well known area. You are well into a day hike when you decided to veer off the marked trail on to a "social trail." It is well-known that this little path cuts over to another major, marked trail. After an hour of walking you realize it's taking longer than expected to reach the other marked trail. Since you were familiar with the area where you're hiking you weren't using a map or compass. Now you're wondering if you even took the right social trail.
You turn back. After walking almost a mile you reach a fork in the trail that you realize you hadn't observed earlier. Right or left? You go left. Soon the trail has petered out and you're standing in the woods. You turn back. After another hour of this it's getting real close to dusk. It's currently in the low 50s and the temp will drop in to the high 30s, with a 50% chance of rain.
At this point your options are to keep moving, or stop for the night. Either way it's going to be cold and rain could turn the weather deadly. Rather than flailing around in the dark, risking injury, and being unprepared for the weather, it's probably time to stop and stay put. This is where a wilderness survival shelter could make your night much more comfortable, and possibly save your life.
Effectiveness of a Wilderness Survival Shelter
Several times I have used the term "effective" in relation to the wilderness survival shelter. Before we go further it is probably important to talk about what "effective" means in this context. An effective shelter should shield you from the elements in your environment that you can reasonably anticipate experiencing.
For example, in the desert you probably don't need to build a water-tight shelter, unless you happen to know that rain is imminent. It could rain, but unless you have some special knowledge that it is about to, the odds of rain are probably fairly low. In that case simple roof over your head to keep the sun off of you during the during the day may be sufficient.

For many situations cold, wind, rain, and snow may be credible threats depending on your location and time of year. If so, your shelter needs to be wind- and waterproof. If wind can blow through your shelter or you get soaking wet lying in it, it's not really doing much for you. As I will discuss later in this article, a little bit of preparation in the form of a shelter kit goes a long, long way to making an effective wilderness survival shelter.
Timeliness of a Wilderness Survival Shelter
Another aspect of effectiveness is timeliness: how quickly you can get the shelter up. You can construct shelters that are very elaborate, from nothing but natural materials. Put yourself into the scenario I described above, though. With darkness falling and rain on the way, how much time do you really have to build a shelter?
My goal is to be able to erect a shelter in 15 minutes or less. I would want to save as much time as possible for gathering leaves and pine boughs for insulation, staring a fire, and collecting firewood. The shelters you see in this article are not the high-speed, low-drag shelters you see on many survival and bushcraft websites. They were all constructed well within my self-imposed 15-minute time limit, however.
The reason for this time limit is the circumstances under which a shelter is constructed. You don't typically find yourself lost midday, and stop moving. Generally people move until it's too dark to move anymore. Understanding that makes it easy to see why being able to construct a shelter in a short period of time is really important.
Site Selection
Before you begin constructing a shelter you will have to select a site. Site selection is a pretty critical task; a poor site might make your shelter a little uncomfortable...or absolutely deadly. Choose your site with care. Here are some considerations for choosing your site, beginning with the Four "W"s.
The first time I saw the Four Ws was in Dave Canterbury's Bushcraft 101: Field Guide to the Art of Wilderness Survival. The Four Ws are Widowmakers, Wind, Water, and Wood. Canterbury puts them in a different order, but this is the order in which I'd like to explain them, so here goes!
Widowmakers
Widowmakers are deadfall that hasn't quite fallen yet. This can take the form of dead, but standing, trees, or branches that are dead and waiting to fall. When a good wind kicks up or trees and branches become loaded with snow widowmakers can come down with ample force to kill. Such accidents can and do happen with more regularity than you might imagine.

Dead Trees
When selecting your shelter site, look up. If possible avoid areas with tall trees altogether. In the woods this may not be possible, but it's the only 100% sure way to avoid widowmakers. If you can't avoid trees, avoid dead trees. Even in winter you can generally tell a dead tree from a live one.

Loose Branches
Next, look for loose branches. Sometimes branches will buckle without completely severing. Sometimes branches will break completely off but become lodged in other branches and not fall. These are extremely dangerous because they are simply awaiting the right time for gravity to get hold of them and bring them down.

If you are building a shelter at night, identifying windowmakers can be tough. This is a good reason to have a powerful EDC flashlight. Rather than simply shine the light aimlessly in the air and declare the area good, examine each tree that may be an issue. Start at the trunk and look upward, noting large limbs on the way up. Repeat with successive trees until you are satisfied.

Wind
Wind is a killer in cold weather and getting out of the wind is extremely important! It will suck the heat away from your body, especially if it cuts through your shelter and clothing. Wind can also make building a wilderness survival shelter much more difficult by tossing around your materials. It can cause widowmakers to fall, and cause branches to dump snow on you. We want our shelter to protect us from the wind, and we can get a huge jump on that by building a shelter that is, itself, protected from the wind.

Without intimate knowledge of an area you likely won't know which direction the wind is most likely to come from, unless it is already blowing. Even then wind can change directions. Do you best to build your shelter in an area that is protected from the wind. If wind is a concern, avoid hilltops, ridgelines, and open terrain. Instead seek out the military crest, natural windbreaks, and thickets of dense vegetation that will cut the wind.

Wind can also be reduced by building shelters very close to large wind-breaks like huge rocks, trees, or terrain like steep banks. Always attempt to build your shelter's opening in an area that is protected from the wind; wind coming in through the "door" is difficult to block and will make preserving any body heat next to impossible.

Sheltering your shelter from the wind also makes your fire much safer and easier to manage. Wind will cause your fire to burn faster, consuming excessive fuel. It will also scatter embers, risking setting your shelter - or the entire woods - on fire. Wind will also make it very difficult to utilize any heat produced by the fire.
Water
This is another two-edged sword; you want to be close enough to water to sustain yourself, but not so close that you'll be flooded out. "Close" in this instance doesn't mean close enough to reach out of your shelter and fill your cup. It means something more like within walking distance.

Being too close to a babbling brook (or raging river) has another disadvantage: noise. The water will drown out other sounds like approaching animals. Bear encounters sometimes happen along waterways for this reason. It can even drown out the shouts and whistles of rescuers. Stay far enough from water that it doesn't overwhelm your sense of hearing.

Depressions, draws, and the bottoms of valleys might seem like ideal spots for a wilderness survival shelter. They already provide some shelter from the wind and may even provide a rough structure for your shelter. However, arroyos, canyons, depressions, ditches, draws, and wadis all channel water when it rains. Sometimes this can result in life-threatening flash-flooding, especially in desert environments. It can also result in you finding yourself wet in the night, which can kill you less dramatically via hypothermia.
Wood
You shelter site should have an abundance of wood with which to accomplish your survival goals. For example, your goal may be to build a shelter and bed down for the night, with enough firewood to last a few hours. Or it may be to settle in for as much as a few days while awaiting rescue, warming yourself and boiling water all the while. The latter would require much more wood than the former.

Wood can be in the form of deadfall or standing, live wood, or a combination of both. I often like to cut a pole or two for my shelter, so I generally want some standing, live saplings. If you intend to have a fire you want an ample source of firewood, which is dead wood. We usually look for firewood on the ground, but don't forget to look up, too. Dead limbs still attached to trees can make excellent firewood. For more information on fire-building check out my unrivaled Comprehensive How to Build a Fire.
Secondary Considerations
The 4 Ws are the primary considerations of shelter building. There are a some assorted secondary considerations that are worth looking for when selecting a wilderness survival shelter site.
Level
Though not one of the Four Ws, your wilderness survival shelter site should be level. There are few things more miserable than trying to lie down (or just sit) while constantly sliding down a hill. Depending on your terrain, finding a level spot may be the most time-consuming part of your shelter-building. In the mountains where I live it can be extremely difficult to find a level spot. Remember, you don't need an acre of level ground - you just need enough to lie down, and maybe build a fire.

It also doesn't have to be perfectly level. On a slight incline you may be able to build up the downhill side of your shelter floor...or dig out the uphill side to roughly level it. But this is going to be difficult if you're on a very steep incline. A steep incline will also channel water into your shelter, making level ground even more valuable.
Morning Sun
This one is entirely negotiable, and may be hard to pull off, but I like to wake up facing the morning sun. The big heat tab in the sky will warm you up first thing and give you a huge morale boost after an unexpected camping trip. This may be difficult to do, due to the circumstances of a survival shelter. It may be constructed in darkness. You may not know exactly where the sun rises. Even if you do, you may be unaware of obstacles between you and the sun. Rather than a firm, fixed criteria this is just a "nice to have."
Shelter Kit
You can greatly improve the odds of a successful wilderness survival shelter by carrying a shelter kit. In fact, having a shelter kit is critical to being able to construct an effective shelter in 15 minutes or less. The contents of such a kit may vary. There are two contents that should be in any shelter kit: a waterproof sheet and some sort of cordage. There are a couple other items I keep in my shelter kit, but let's address these essentials first.

Though I don't include a fixed-blade knife in my shelter kit per se, it is a requisite item in all my survival kits and hiking setups. I consider this "common to all" equipment; you should have a high-quality fixed blade knife when you venture afield.
Waterproof Sheet
A waterproof roof is really difficult to create in nature. It takes an awful deep pile of needles and leaves to make a roof waterproof. With enough rain over a long enough period even very thick natural roofs may eventually begin to leak. You can use big strips of birch bark to create shingles, but doing so takes a lot of really specialized knowledge and time. Bottom line: a waterproof sheet cannot be easily recreated in nature.

The shelter goal of most wilderness survival situations is to quickly erect a shelter to protect us from wind, rain, and cold. Having a sheet of waterproof material gets you inestimably closer to this goal. A sheet of waterproof material can be wrapped directly around your body, used as a ground cloth to keep you dry, or as a roof over your head and a wind-break around you. Stuffed with leaves it can even be used as a sleeping bag.
Your waterproof sheet can be as fancy or as simple as you like - from a custom, silnylon tent to a big garbage bag, there are pros and cons to each.

The Lowly Trash Bag
A very compact option is 60-gallon, heavy-duty trash bags. A large, thick, contractor trash bag takes up hardly any space but can be incredibly useful. On the upside they are inexpensive, lightweight, and compact. It is really easy to convince someone to throw a trash bag in their pack because they are so small and light. Trash bags are also very versatile; you can put your pack in them prior to a river crossing, use them as a makeshift float/raft, cut a head-hole for use as a poncho, or cut them flat for a shelter roof.
Unfortunately trash bags also come with some downsides. They aren't very durable. It is really easy for holes to get poked in them. It's also hard to secure them very securely without risking tearing the plastic. And, because they are black, they are more difficult for searchers to see than brightly-colored tarps. Even if a trash bag isn't my primary waterproof sheet I keep one in my pack as a secondary, or for use as a ground cloth.
Multi-Use Tarps
A simple 6x8 or 8x10 tarp - the kind you buy at the hardware store - takes up little space and doesn't weigh much but can make shelter construction a breeze. Tarps have a huge advantage of being durable and having built-in grommets and can cost as little as $10. It will survive briars and pokes with sticks, and just be generally pretty durable. Though they take up more space than a trash bag, folded flat a tarp fits well on the back panel of a pack and doesn't take up a ton of room.

You can make your tarp even more functional by applying 550 cord to the corners ahead of time. Though I carry tarred bank line in my survival kit, the tarp in my pack already has 4' paracord lines on all for corners. When it's cold, dark, and a rainstorm is bearing down, any advance preparation is a huge asset.
Cordage
Another important aspect of a wilderness survival shelter kit is cordage. Cordage is another one of those items that is very difficult to make out of natural materials. It can certainly be done, but if your ankle is broken, snow is falling and sun is setting on a cold, January afternoon and you're still six miles from the truck, do you really want to start making cordage?
I'd much rather just have some on hand. I carry two types of cordage when I go into the woods. The first is tarred bank line, which is my go-to for most things. Tarred bank line was news to me until I read about it over at Everyday Marksman. I really recommend you go read Matt's thoughts on the stuff. He convinced me to give it a shot because you get much more cordage in the same amount of space.

Like Matt, I also keep some 550 cord (aka paracord) in my kit. Paracord is just better for certain tasks. As Matt points out, again echoing Dave Canterbury, paracord is better for constructing a shelter's ridgeline. I keep 25' or so on all of my packs and survival kits.
A quick pro-tip: don't count on gutting all your 550-cord and using the inner strands for much unless you end up in a long-term survival situation. These very thin inner strands are tough to work with and not very strong on their own. They're great at turning into a tangled mess. I'd much rather have tarred bank line than try to work with 550-cord guts.
Stakes and Snakes
While you can certainly make tent stakes in the wild, it is way easier to have a few with you. Again, if the decision has been made for you to stay in the woods overnight do you want to have to start looking for the ideal wood from which to make stakes? I certainly don't. I carry the MSR Mini Groundhog stakes. They are extremely lightweight, take up almost no space, and work wonders. They can usually be pounded in my a rock.

Aside from my stakes I also carry a couple "snakes," aka bungee cords. A couple bungees can make really quick work of tightening up a corner or ridgeline. Instead of having to tie a knot that you can then tighten, the bungee does the work. Also, if another corner of the shelter loosens up, the bungee will self-tighten.

A couple bungee cords and a few tent stakes take up very little space but greatly reduce the time and effort required to build a shelter. I can generally throw up a shelter with these two items in 5-10 minutes. It would probably take me that long to find appropriate branches and carve a stake or two.
Incidental Shelter Materials
You may have some incidental shelter-building materials in your pack and not even realize it.
Trekking poles are great shelter supports. They can be used as a ridgepole in a pinch but they are even better when used as vertical shelter supports. This allows you to make a standalone shelter without basing your location around trees to which to tie your shelter, though the resulting shelter might not be quite as sturdy.
Many hikers pack duct tape in some form or fashion, whether in a pre-packaged, miniature roll, or wrapped around Nalgene bottles. Regular readers know my favorite tape is Gorilla Tape. Duct tape, or even medical tape from your first aid kit can be used to help with shelter building. It can reinforce tie-down points, patch holes, soften the sharp ends of broken branches, or even be twisted up to serve as cordage.

Get creative. That space blanket might not be needed as a blanket much as a roof over your head. Many first aid kits come with a space blanket - consider how it might be most effectively used. Look at all your equipment this way. In fact, when you find yourself in an emergency situation it's not a bad idea to pull out all your stuff and take a quick inventory.
Natural Shelter Building Materials
Don't forget that you also have natural materials at your disposal. Natural materials have some benefits, but also some disadvantages. Though it is possibly to construct a shelter completely from natural materials it isn't terribly realistic in an emergency. Let's go back to our shelter-building scenario. With nightfall and rain closing in, do you really want to build a shelter with nothing but natural materials?
I certainly wouldn't, and I probably have more experience than most. Don't neglect natural materials, however. Though the waterproof sheet is the linchpin of the wilderness survival shelter, it isn't all there is to it. You're going to need some additional materials. Use what nature provides you.
Standing Trees
Standing trees can serve as the basis for your shelter and can offer some tremendous advantages. A tree can offer the very structure of a shelter with only very minimal modification. Pines, spruces, firs, and other conifers, with horizontal branches low to the ground, are excellent for this.

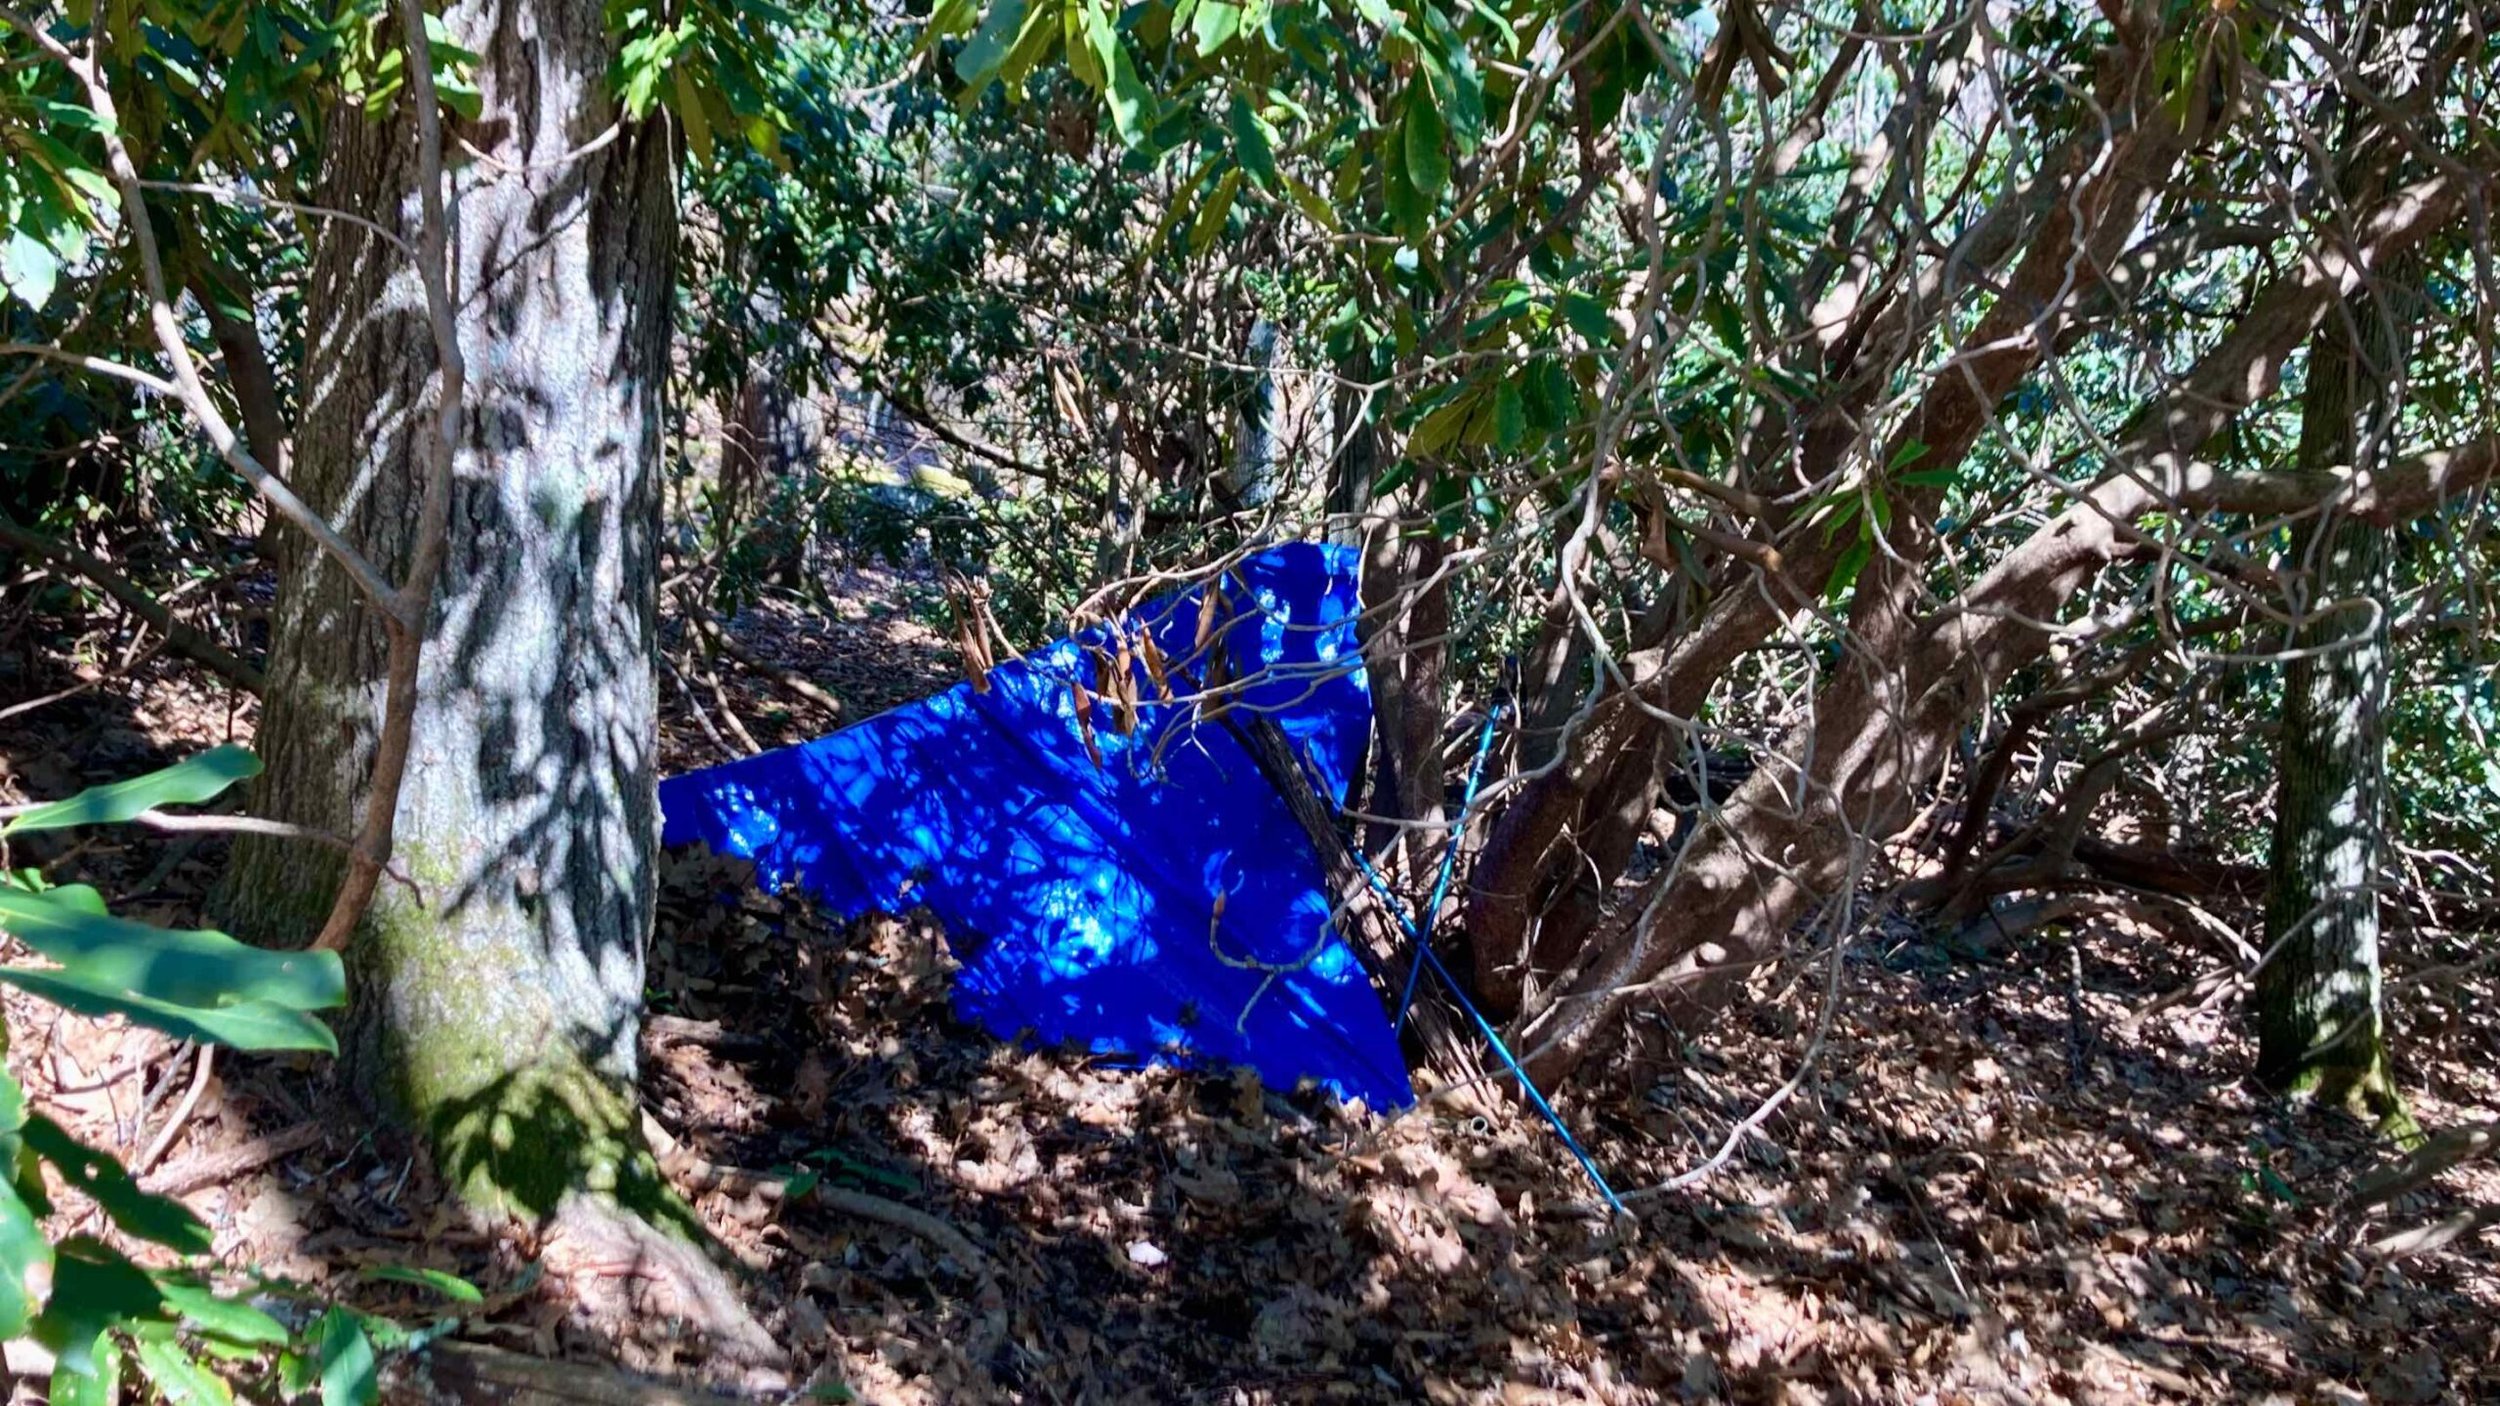
I selected the tree in the above photo for a shelter site. Though the area below it wasn't perfectly level it wasn't terrible. Had I actually planned to stay there I could have worked to level it up by digging the high spots and padding the lows with boughs. The tree provided low branches, and it provided a preexisting shelter in the form of live branches.

I quickly threw a tarp over a low branch. I staked one side down, then moved to the other side and used stakes and bungee cords to tighten it up. This shelter took less than five minutes to construct. It is taut and sturdy. It already has a thick layer of balsam fir branches and needles above and around it. These will act as a wind- and water-break in a storm. Finding something like this is almost a perfect scenario.
Heavy Bushes/Brush
Heavy bushes and brush can also serve as a form of pre-built shelter. The stand of rhododendrons below is a good example. This stand of rhodo appeared pretty out of nowhere in otherwise open woods where we were hiking. These are evergreen, and known for being very dense.

Once inside the thicket there are some open areas that are still surrounded on two or three sides with live vegetation. There is also excellent existing structure from which to start building a shelter without starting from scratch.

The photo above doesn't do this thicket justice. This thicket feels is dark and calm and felt like a refuge. The heavy rhododendron leaves won't stop wind and rain, but they will give you a much better shelter than a tarp strung out in the open.
Wood
I'm not going to beat this one to death because it has already been addressed under the 4 Ws section. If at all possible, though, you want to construct your shelter near a source of both deadwood (for fire wood) and standing wood. Standing saplings make outstanding structural supports for shelters. They are green and strong, and can be cut to make a ridge poles, vertical supports, A-frames, or other structural members.
Not everything need be live; dead wood can play a role in shelter-building, too. Dead branches can be used to begin filling in gaps in a shelter's roof and walls. Solid, dead branches can even be used as your main structural elements. Even if you're using a tarp, you can reinforce your shelter with a layer of dead branches leaned against the ridgepole to help secure the tarp. They can also provide some structure for holding a layer of insulating leaves over your tarp.
Leaves and Pine Boughs
Leaves and pine boughs can plan a tremendous role in your shelter-building efforts, too. Because they are bulky they provide insulation - both on your roof and in insulating you from the ground. Generally leaves are easy to find in the woods, though they will often be damp at best. Nice, thick layers of leaves can be piled on top of your shelter roof - even a tarp roof - to provide additional insulation. Unfortunately deep layers of dried leaves can be difficult to find under a foot of snow, so you shouldn't depend on them if you live at altitude or in an area that receives heavy snowfall.
Fresh pine boughs are just about the best possible material for bedding, provided they are in good supply. In thick layers they provide a nice, springy surface and keep you off the cold ground. And they smell nice, which is an added benefit. If pine boughs are in short supply put down a very thick layer of leaves first, then cover them with the few pine boughs you can find. If you are sheltered under an evergreen tree like the balsam I sheltered under above, don't steal its boughs! They are already providing protection for your shelter. Take boughs from another tree instead.
Rocks
Rocks can also be useful, generally as weights or anchors. They can weigh down a corner of a tarp or you can even tie a guy line off to a large rock. Something I commonly use heavy, soccer-ball-sized rocks for is to hold my tent pegs down in soft soil. Another great use for smaller rocks is as a weight to throw a line over a high branch.

If you are in an area with massive rocks you may be able to find overhangs or even small caves in which to seek shelter. Use caution and ensure these are not already occupied. Also use caution with fires in caves. Heat from a fire can cause large pieces of rock to "calve" off and fall on you.
Rock Overhangs
Rocks can create some pretty awesome shelters. This does come with some caveats, however. First, you should check carefully to ensure that some other animal hasn't already occupied the spot in question. This includes bears, hornets, and everything in between. Even mouse poop can be dangerous to you by transmitting hanta virus. Approach carefully and search thoroughly before bedding down.

Second, you want to be really careful about building fires under rock overhangs. Sheets of rock can "calve" off due to the heat and crush you. If you are going to build a fire there are a couple steps you can take to make it as safe as possible. Build it near the entrance, and stay near the entrance yourself. Build the fire as small as possible - enough to warm yourself, but not enough to substantively heat the ceiling. Know a bit about types of rocks and avoiding building a fire under limestone, sandstone, or shale, which are really prone to this behavior.
Hollow Logs
Sometimes nature provides you a whole shelter, albeit not the most comfortable one. A hollow log can provide a great shelter for a single night, giving you a place to get out of the rain, and a very small space to insulate. If you have a shelter kit you can use your tarp to seal off the end to preserve heat and prevent water infiltration.

Crawling in the middle of damp, rotten log might not be the most appealing proposition. It's probably full of bugs and grubs and worms and whatnot. But if the alternative is sleeping out in the open get over your fears and use this shelter! Don't count on finding shelters like this. In several weeks of hiking this was the first suitable hollow log I ran across. They aren't as common as survival books might make them out to be, so don't neglect your shelter-building skills.
Shelter Styles & Shapes
The shape of your shelter has a lot to do with its ability to keep you warm and dry. I'm not going to cover every shelter under the sun - just a few simple ones.
The Plow Point
This is one of my favorite. This shelter offers protection on three sides. If you build the door facing away from the wind, or against a windbreak like a big rock or tree, it's pretty cozy. Keeping this one low to the ground helps minimize the impact of wind. This one is pretty easy to construct from natural materials, too.

If building with a tarp the plow point shelter works best with a square tarp...but square tarps are kind of hard to find for some reason.
The A-Frame
The A-frame is generally quick and easy to throw up. All one has to do is drape a tarp over a branch or ridgepole and stake down the sides. It has the notable disadvantage of being wide open on two sides.

The A-Frame is great for summertime shelters when you just need a roof, or for building a temporary roof to shelter you from a quick thunderstorm. It would be very hard to keep warm in an A-Frame in cold weather.
The Lean-To
This is maybe my least favorite shelter. I loved this when I was a kid and only slept outside when it was warm and dry (mostly). The lean-to is incredibly fast and easy to erect. It also has the advantage of creating a big, usable space. However, it is completely exposed on three sides. You can cover the sides, either with additional sheeting or natural materials, but the front is still wide open. If you do use a lean-to, you'll probably want to use it in conjunction with a fire at the front.

This shelter can work reasonably well when a simple roof is all that is needed. If you're in a very hot environment and just need protection from the rain it can work, again assuming rain doesn't blow in from one of the three exposed sides. For cold-weather (or even moderate temps without proper sleeping gear) I would favor a plow-point over the lean-to.
The Bottom Line: Practice, Practice, Practice
Building a shelter isn't as easy as I anticipated when I started this article. It's easy to imagine the wonderful, cozy, warm and waterproof shelter you would build in a survival situation. It's much harder to actually get out and do it. So much depends on site selection, which depends on where you are when you need a shelter.
If you are a hiker, hunter, mountain biker, or anyone who recreates in the woods, I strongly recommend learning how to build a shelter. More than that I recommend practicing until it's comfortable to you. Practice until you know what you can do with the materials you carry. Practice until you understand the limitations of the stuff you carry - you may realize that small tarp isn't quite the extravagance you imagined it to be.
Learn your knots. When hiking start looking for potential shelter sites. As with anything you want to be good at, practice, practice, practice - I really can't say it enough!
