Like most gear guys I like the ideas of bug-out bags, I.N.C.H. bags, get-home bags and EDC bags. Unlike most gear guys, I strongly dislike the inefficiencies these bags create. I’ve combined all of my various “bags” into a single backpack that is full of real-world, high-probability gear. There’s no AR pistol, no gas-mask, and no Mountain House meals, but stick with me and I think you’ll see the logic.
This article contains affiliate links.
EDC Part 0 | EDC Part 1 | EDC Part 2 | Part III
Since something is way more legit with a name, I came up with a name for my unique brand of pack: the All-Purpose Everyday Carry (APEC) Bag. Let’s get into the concept of the APEC Bag (right up front I’m going to say it: I don’t really expect this name to go anywhere, I’m just poking fun at the tendency to name everything).
Inefficiencies of the BOB/INCH/GHB et. al.
The variety of “bags” in the preparedness community is pretty cool. I really dig the concepts, and I truly do appreciate that people have spent so much time thinking about these things and refining concepts. With unlimited cash and time I would have one of each of these (hell, probably several of each of these), kitted out to the nines, stashed all over my region, and ready to go. Reality is a little different.
First, to be effective, these bags have to maintained in “ready” condition. Gear in them has to physically be in them. That means you have a lot of resources locked up in these bags. There are any number of “hard goods” like tools, weapons, sleeping/shelter items, etc. All of that stuff costs money. There are also perishables: food, batteries, medications, etc. that – for many of us – sit there, forgotten, and go bad for want of use. Having stuff in a “break glass in case of emergency” state is extremely inefficient.
Another inefficiency is that – and keep in mind my sample is skewed toward those who post about their gear on the internet and may not be completely accurate and unbiased – a lot of BOB/INCH/GHB/EDC bags are loaded up with extremely low-probability items. There are an awful lot of guys out there toting around bags heavily weighed toward unlikely scenarios: disassembled rifles, axes, bushcraft supplies, and MREs. The odds those things are going to get used is minuscule. I know – better to have and not need and all that, but that arithmetic means we’re going through life without a lot of stuff we probably need for mundane situations.
Mission Drives Gear…
I started re-imagining the “all-purpose bag” a few years ago. I’ve carried any number of bags before. When I commuted and had to bring a laptop to work I carried a sling bag. When I commuted and didn’t have to bring a laptop to work I carried a very small backpack that contained lunch and maybe a jacket. All of these bags were put together without a ton of thought. I’m sure they were fairly efficient for their purpose, but they didn’t give me much added capability.
A couple of years ago I decided I wanted to cover down on some deficiencies. I decided to build a bag with three hard criteria:
- cover down on my realistic, day-to-day needs,
- prepare me (equipment-wise) to deal with realistic emergencies, and
- be modular and adaptable to evolving needs.
What I ended up with was a bag that is part bug-out bag, part get-home bag, and part EDC bag that is constantly in use. As a negative this means, necessarily, that sometimes things (food, water, batteries) run low. As a positive it also means there is almost zero risk of something expiring or going bad. My gear is constantly in use, so occasionally things are taken out of the bag and occasionally things get broken. On the other hand, nothing in the bag is sitting around dry-rotting, and I’m putting my hands on everything in the bag occasionally.
Is the APEC Bag the perfect bag to bug-out with? No, but it’s pretty close. When you consider that “bugging out” is unlikely to mean living off the land while making forays into enemy camps and much more likely to mean un-assing the area for up to a couple of weeks to stay in a hotel, with friends or family, or some combination thereof. Is the APEC Bag the perfect get-home bag? Again, no but it’s still not bad – it has some food, water, first aid, defensive items, and some light clothing and shelter.
All of that means it is a very efficient bag. Very little is “locked up” in it. Instead of “breaking glass” in case of emergency, I mostly keep doing what I’m doing in regards to this bag. It’s a bag that I don’t forget about using because I’ve never used it. It’s a bag whose contents I don’t forget about because I haven’t opened it in six months.
Building The APEC Bag
First, realize it won’t be perfect for anything, but it will be good enough for almost everything except extreme outlier scenarios. Optimized solutions that approach perfect in one context are likely to completely fail in another. I don’t want to carry a 65-liter backpack with sleeping bag, Jetboil stove, and tent to work. Likewise, I don’t want to bug-out with $400 Italian leather attache´ case.
What does your “day-to-day” look like? My day-to-day sometimes requires commuting into an office. Sometimes I work from home, and sometimes I’m traveling. Regardless, I have the ability to keep a backpack with me. It doesn’t look terribly out of place in my environment. You may or may not be able to get away with carrying a backpack, and if you do it may be larger or smaller than mine. If you have to go through a metal detector every day it might have far less stuff than mine. There are a lot of variables, and you need to decide what makes sense for you.
What are realistic emergencies? I admit I might have skewed a bit toward unrealistic here. The question that kept guiding the construction of by APEC bag was, “if I had had to run out of the house in the middle of the night and could grab this bag…” That drove me toward a few items that might not have made it in otherwise. Realistic emergencies for me – and probably most people – are things like medical emergencies, vehicle breakdown, loss of utilities, loss of wallet or keys. They aren’t “cool” emergencies, but they’re more likely to happen to you than an EMP so severe it means you don’t have to finish paying your mortgage. Prepare well for the realistic and discard the extreme outliers.
Make your pack modular and adaptable to evolving needs. I am a big fan of “inception packing.” Inception packing means that your bag is full of smaller bags. For example, my APEC Bag has ten main modules: Electronics, First Aid, Food/Water, Clothing, Hygiene, Inclement Weather Gear, Backup Wallet, Admin, Repair/Survival, and Remove-Before-Flight. Any of those can be pulled out or replaced if not needed; for example the Remove-Before-Flight module gets pulled out before I travel by commercial air. There is sufficient space in the pack that any of them can be beefed up as needed; before a hike I might add an additional warming layer.
Be disciplined! This wasn’t on my original list of criteria because it doesn’t relate to the bag, it relates to YOU. We had an adage in the military: if you buy a big ruck, you’ll fill it up. If you buy a pack that has a little extra room, avoid the temptation to stuff it full of, well, stuff.
My APEC Bag
I originally planned to write the concept and my execution of the concept in two parts. Ultimately I decided that my execution could serve as a good demonstration of the concept, so I’m making this a single, long article. I’ll talk about the bag first.
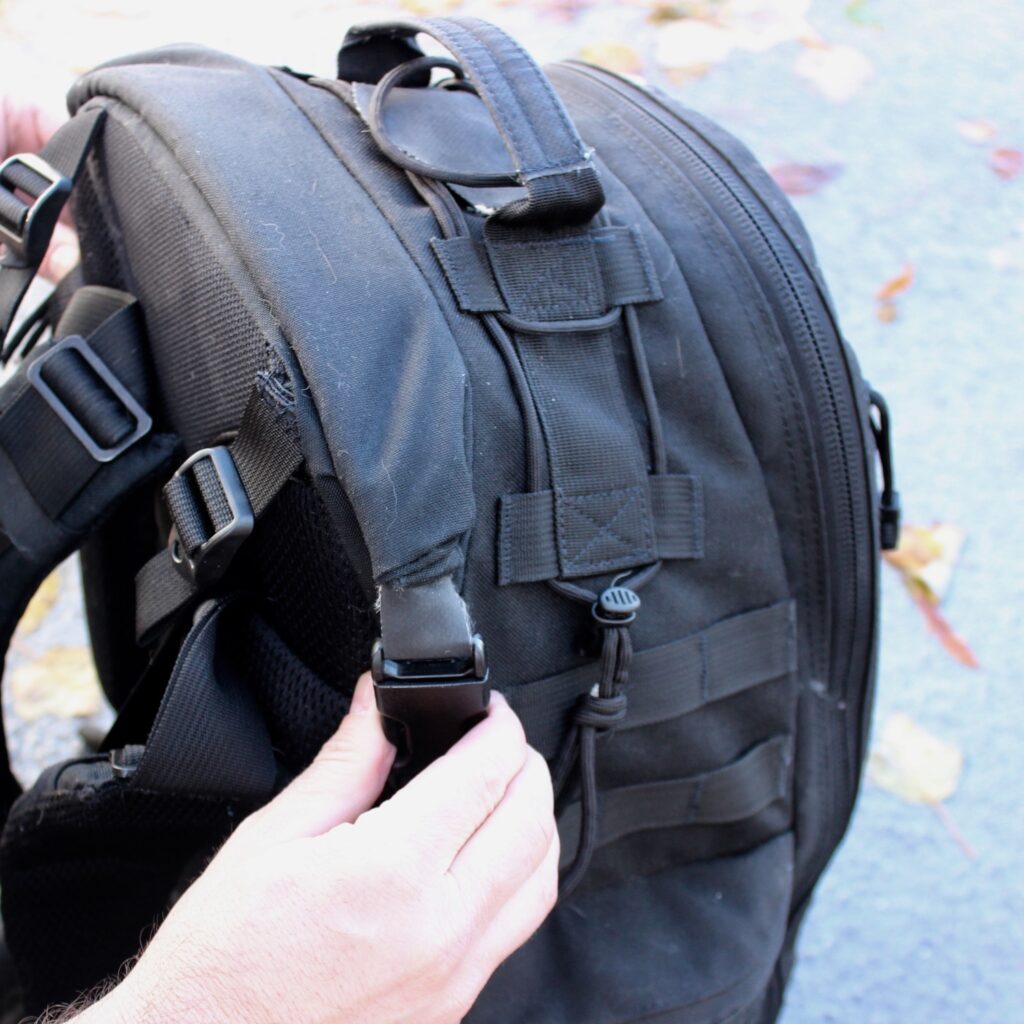
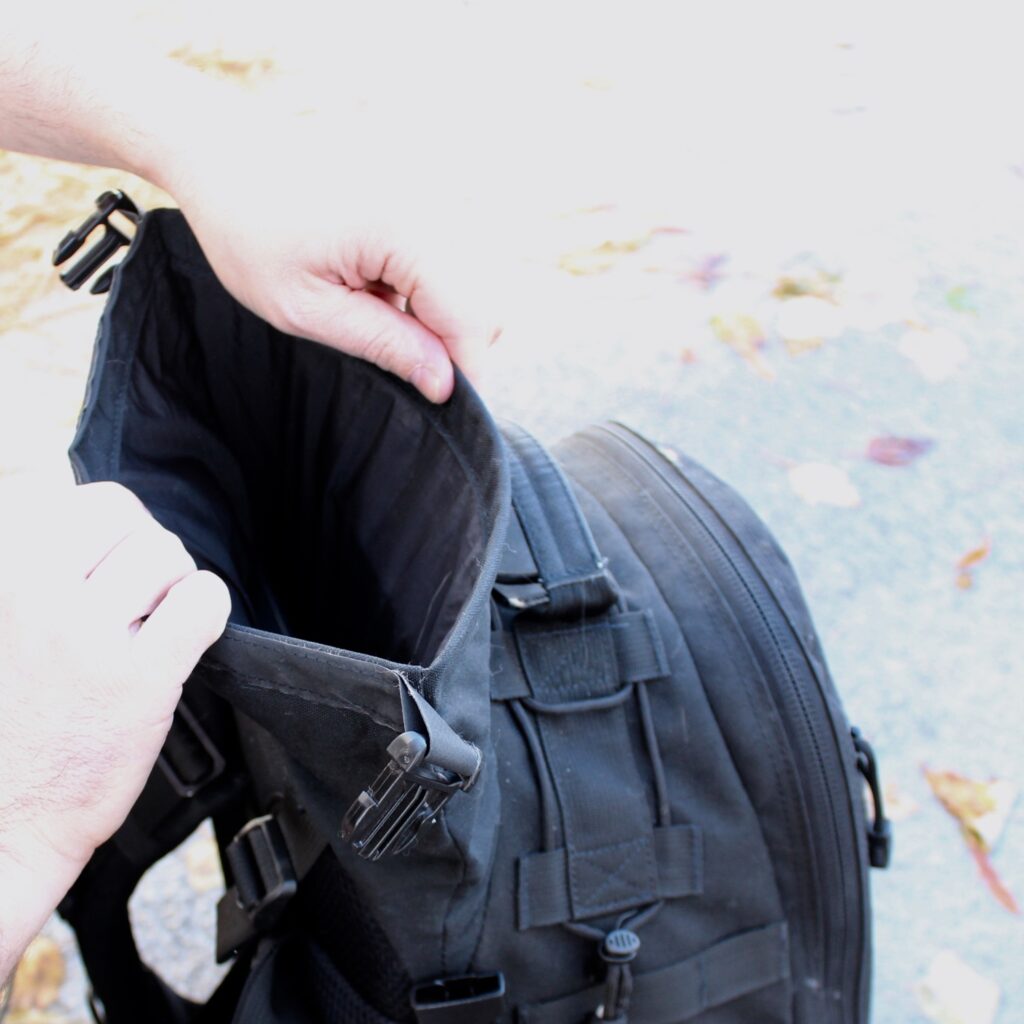
Unfortunately the bag itself is no longer made. Correction: it is, but with some significant updates that would make it no longer suitable to my needs. The pack I have is the Triple Aught Design FAST Pack, purchased in late 2017. I purchased this bag after weeks of careful research. there are some things I love about it and some things I don’t like.
First, one of my primary criteria in buying a pack (at the time) was a dedicated laptop sleeve. I was transiting airport security six to ten times per month. Being able to remove my laptop without unpacking my bag was pretty important. The fact that the laptop sleeve is somewhat weather-resistant is a pretty big plus, too. I’m not doing extreme sports with my laptop, but I do make my living with it so it makes sense to protect it.
The other thing that I really, really dig about this pack is the two external water bottle pockets. Each is large enough to hold a 32-ounce bottle of water. The positioning of the pouch holds the bottle approximately halfway in and halfway out of the pack’s main bag. This preserves space inside the main compartment while not making the bottom of the pack super wide. It also leaves the water bottles accessible from the exterior of the pack.
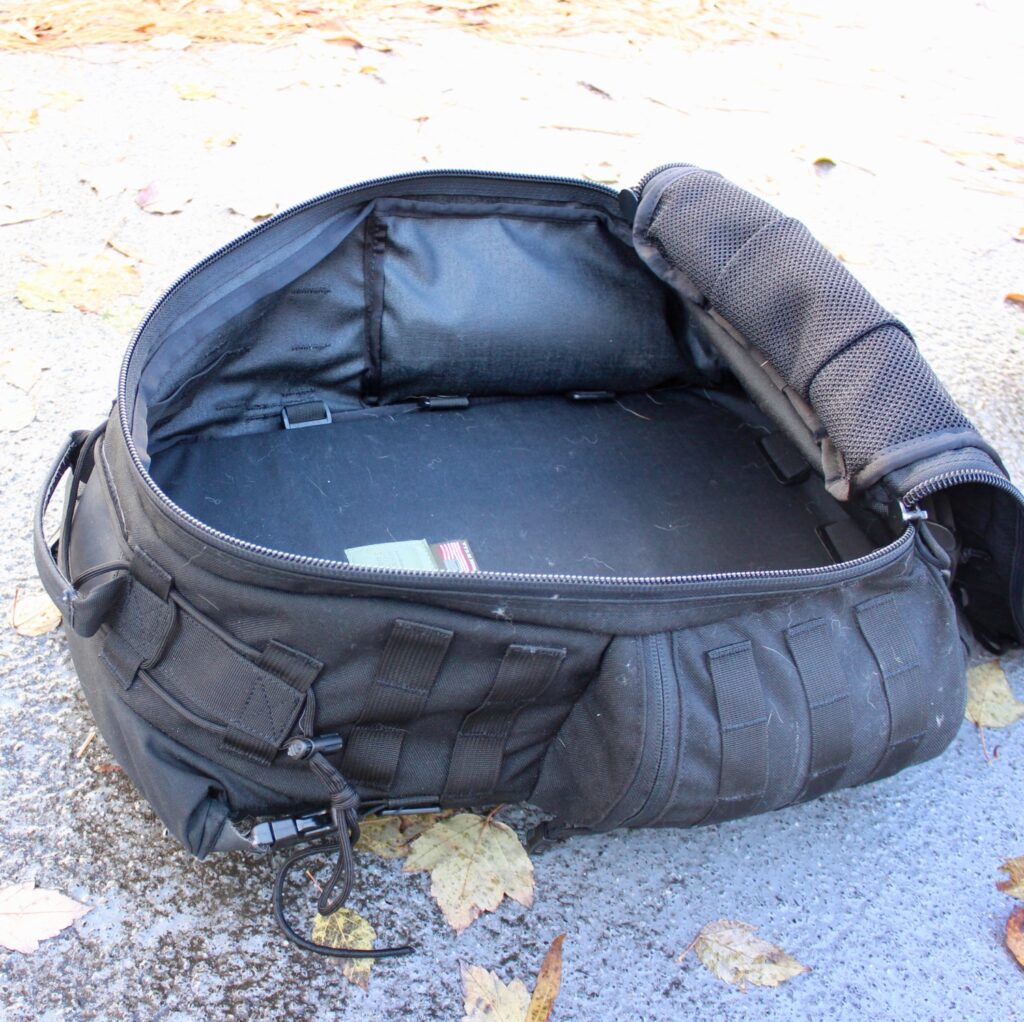
Unfortunately both of these features are absent from newer versions of the FAST Pack. On the newer version (which costs just as much, by the way) the laptop sleeve is completely absent. The water-bottle pockets are inside the pack body, meaning you have to eat pack space for your water bottles. I truly don’t understand the desire to “update” a design every year.
Now, there are a couple of things I dislike about this pack. First, I wish it didn’t have so much fucking MOLLE. I wish this for two reasons. First, it makes an already heavy pack heavier. It’s added weight for a feature that I’ve never used and will probably won’t use. Secondly, it makes this bag scream “TACTICAL!” I do have a grey rain cover in the the pack. Aside from keeping the bag dry, I would probably slip it on to minimize the look if being “low viz” really became a concern.
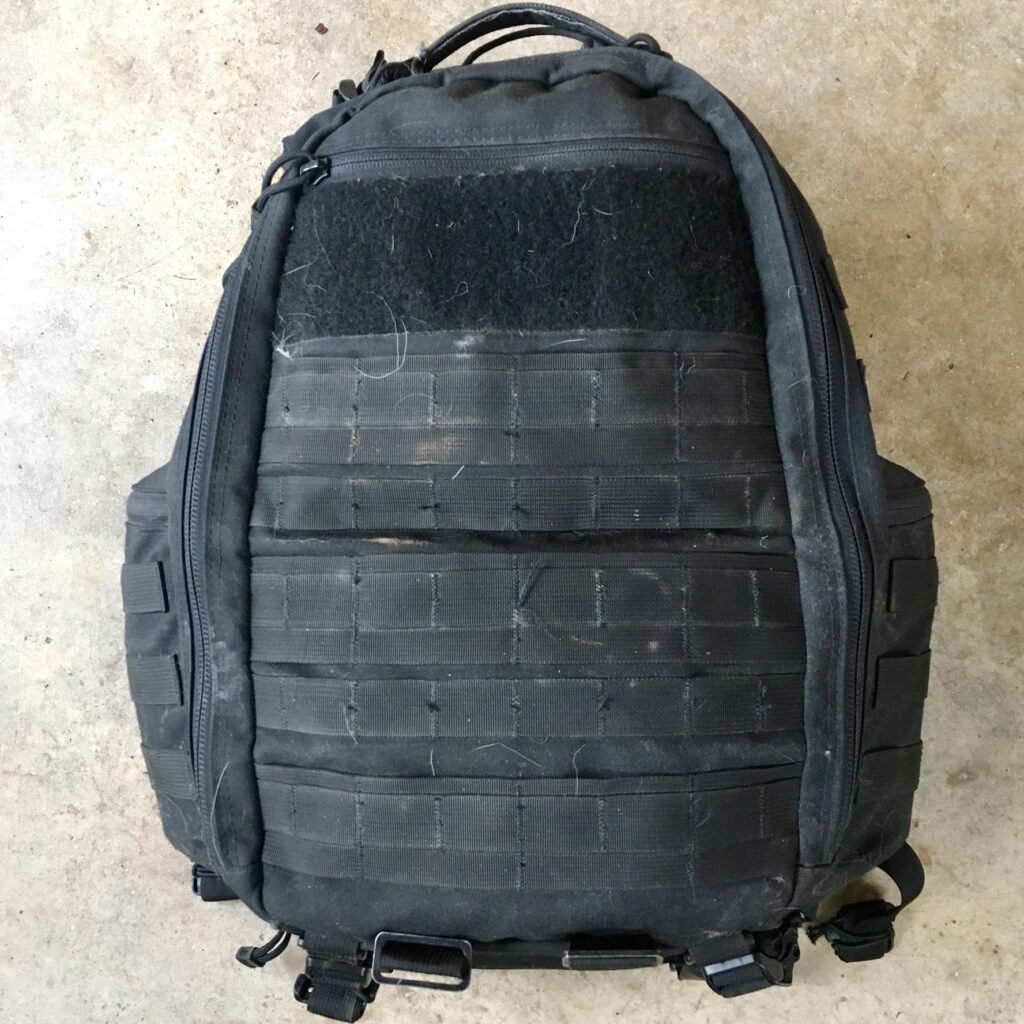
Anyway, I’ve had mine for over two years now. I have literally thrown it in the car almost every single time I have left the house. I’ve covered hundreds of foot-miles with it on my back. It has traveled abroad with me half a dozen times. In fact, I took it as my only luggage for a ten-day trip to Iceland and Ireland. My only problem is that the shoulder strap tension straps began to pull loose. A local gear shop repaired these for a very reasonable $15. Yes, I paid a lot for this bag, but I feel like I’ve gotten ten times more out of it than most people get out of a bag at any price. And hopefully it has many more years of use left in it (I’ll keep repairing it until it can’t be repaired any more).
Bags Within Bags
As I mentioned earlier, my bag is modular and I think modularity is a hallmark of a solid APEC bag. Some of the interior bags are cable bags from my photography days. Some of them are one-off bags I’ve accumulated over the years, some are REI packing cubes, and some of the are just Ziploc bags. I really, really like this system of “inception” packing.
This allows you to immediately find the thing you’re looking for by grabbing the module that contains it. It prevents small items from scattering everywhere if your pack zipper busts. It lets you pull one module out and replace it with another if your mission changes. And it keeps everything really nicely organized.
I will go through the rest of this post, module-by-module. The modules here aren’t organized in any specific order – they are just in the order I felt like writing them in.
Module 1: Backup Wallet
In any sort of emergency – from the mundane to the extreme – very little is more important than being able to access money and prove your identity. I keep a backup wallet in my APEC Bag. It contains:
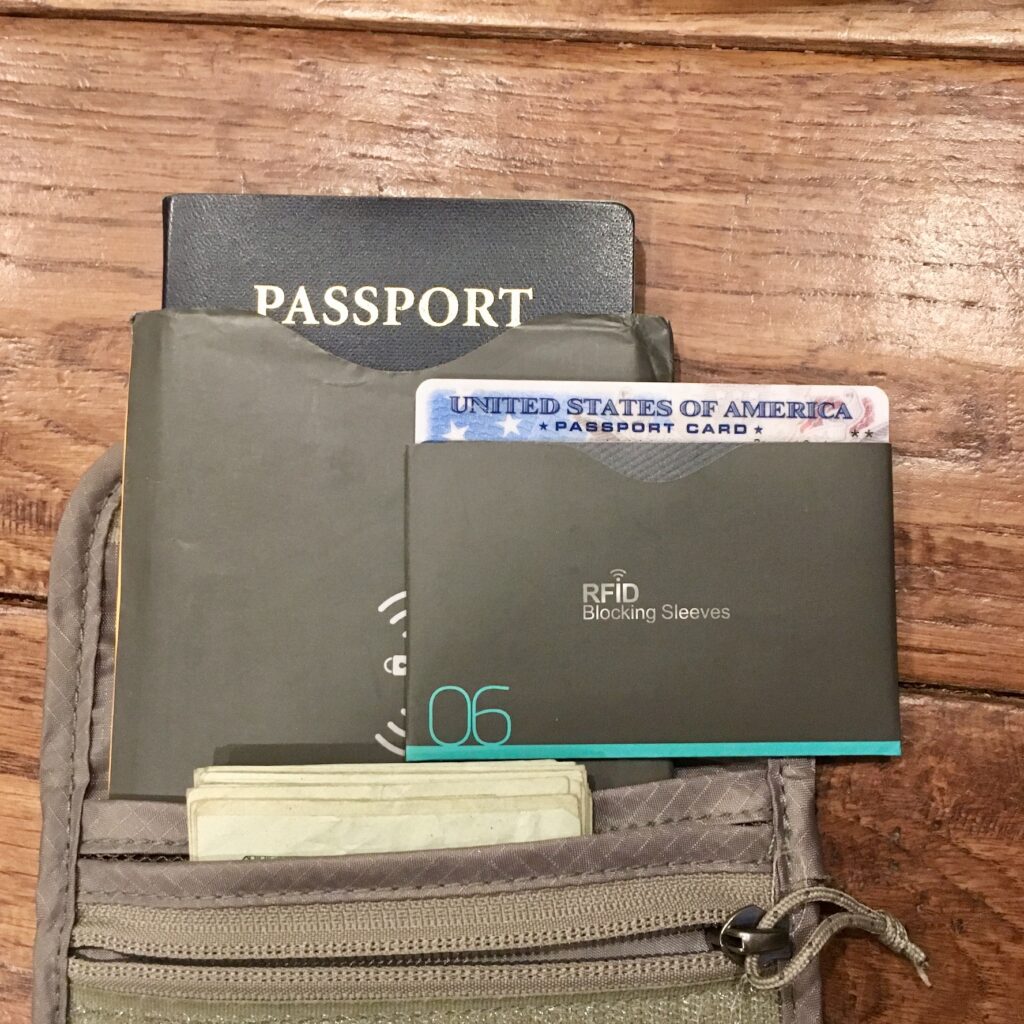
- Passport OR Passport Card/Global Entry Card: this serves as a federally-issued identification. Even better, it does not have your home address on it. In the even you lose your bag someone won’t be able to show up at your home unannounced with the spare key that is also in your bag.
- ATM Card: There is a difference between an ATM card and a debit card. An ATM card cannot be used to make point-of-sale purchases – it can only take money out of an ATM. I recommend carrying an ATM card for this purpose rather than a debit card; if your debit card is stolen it could be used for purchases without your PIN. I also recommend contacting your bank and making sure you know your PIN, and that you have an elevated daily withdrawal limit of at least $5,000.
- $1,000 cash: There are very few short-term problems that $1,000 won’t solve. Your car is broken down? You need a place to stay? You need to move yourself from Point A to B? There’s often little substitute for cash. I know, I know – you can’t eat money, but there are about 500 incremental steps between where we are now and the point where money is worthless. It would be silly to ignore all those intermediate points on the spectrum and focus only on the extremes. Carry some cash. A thousand bucks seems like a lot? Save $20 out of each paycheck and you’ll be halfway there in a year. Best part: this isn’t money spent. It’s still there if you really need it. I’ll be honest – I would probably focus on this before I bought more gear.
- Spare keys. I keep a spare house key, spare car key, and spare key that fits certain padlocks. This is really cheap insurance – cheaper than paying a $115 lockout fee to a locksmith.
I keep all of this stuff in a RFID wallet. With the RFID capability of passports, NFC connectivity of car keys, etc. I think this is really important. I can’t find the one I have (nor do I really love it) but I like the look of this one, and have some familiarity with the brand. I also use these RFID-blocking sleeves for all my cards in both my regular wallet and the backup wallet in my APEC bag.
This is a super, super mundane item. I contend it’s probably one of the most important items you can have in an emergency that you’re actually likely to face. This stuff is also pretty good during life’s mundane situations; I had to use the ATM card from my pack when my regular one died the morning we set out of Thanksgiving vacation last year. I’ve used the money to make unplanned purchases, and I’ve used the house key when I loaned someone my car.
Let’s look at another “reality check” module:
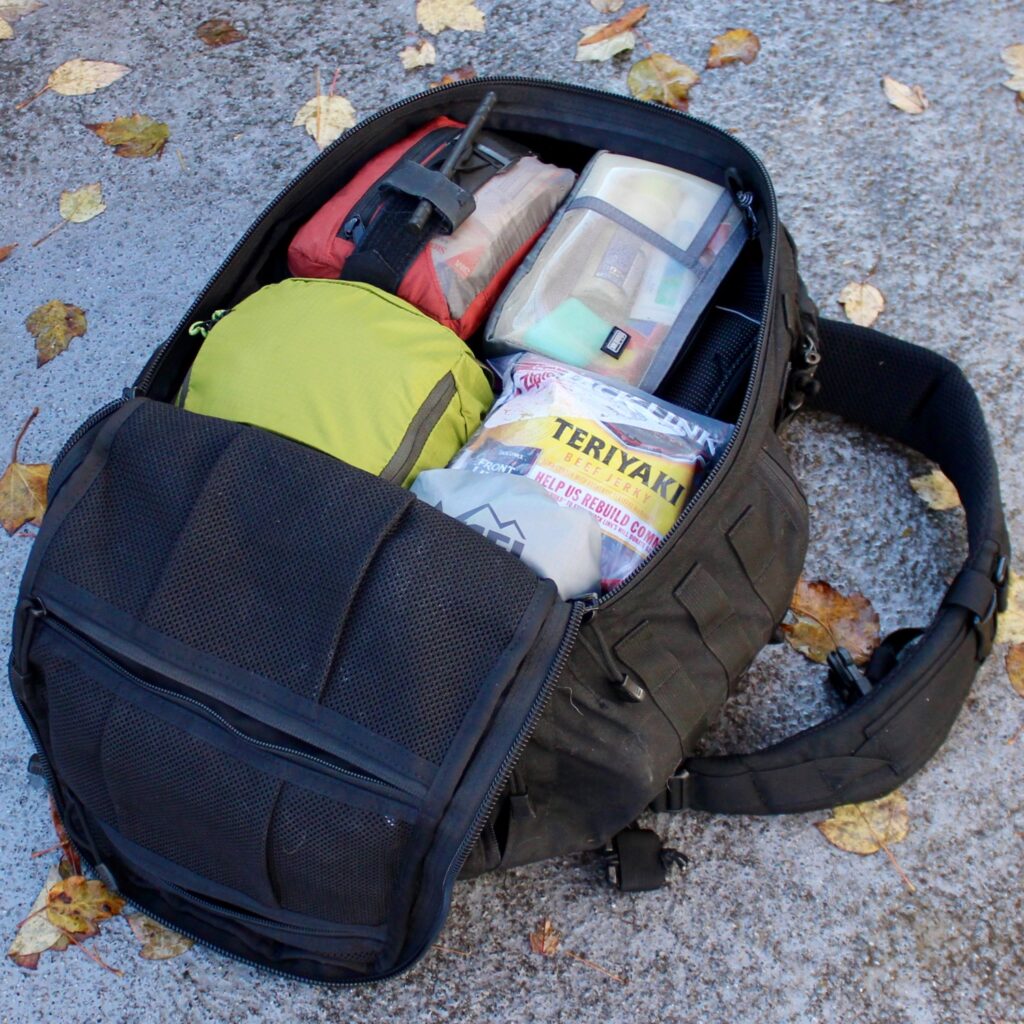
Module 2: Food & Water
Any survival pack will contain food and water. Usually I see them containing some sort of highly optimized survival food: Mountain House meals, MREs, lifeboat rations, etc. That’s cool and all, but there are some problems with this model. First, these foods are expensive. Secondly, they’re optimized for factors like long-term storage (MREs) or light weight (Mountain House). Thirdly, these foods aren’t the stuff any of us normally eat (and if, like me, you’ve eaten MREs in excess of 30 days in a row you’ll never want to see one again). Finally, some of them require special preparation like the addition of boiling water, and they usually have to be eaten all at once.
Instead of a bunch of “capsule” foods, you’ve probably already guessed I like to pack stuff that actually gets used and rotated. You are getting the full “honesty” mode here: you’re seeing what is in my bag right now. It’s not completely full because I ate some of the stuff out of my pack in class last night.
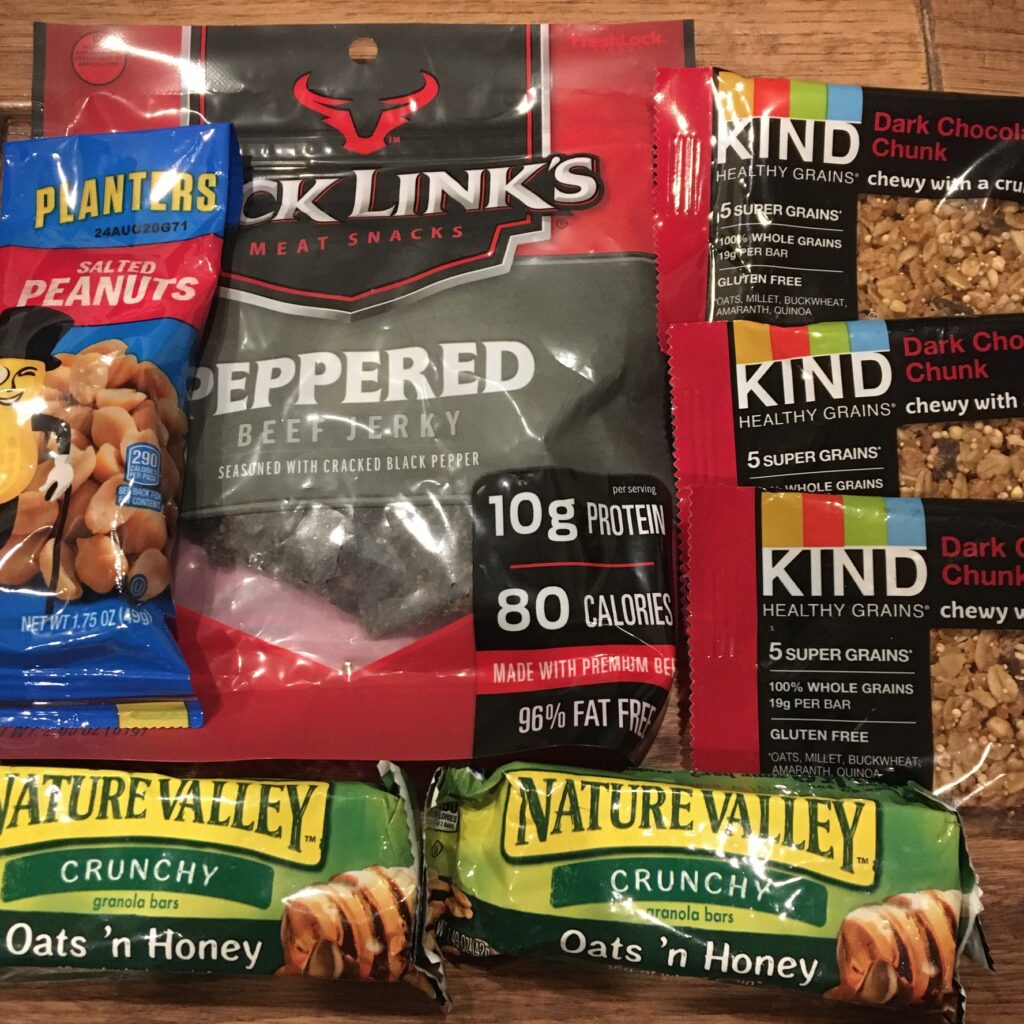
Instead of freeze-dried emergency meals, here’s my normal “ideal” loadout:
- 2x 3-ounce packs of beef jerky,
- 2x – 4x Kind granola bars, varying flavors
- 2x Payday bars
- 2x – 3x single serve packs of peanuts, cashews, or almonds
Does this have the calorie density of a 3-day box of Mountain House meals? No, it does not. But am I really going to build a survival fire and boil water on the side of the highway if a snowstorm keeps me there four or five extra hours? What about if I get stuck in the Denver airport at 2 am? What if I’m just sitting at work and need a snack? No, and probably neither are you. Survival food becomes “precious” and we can become reticent to use it.
The other thing I commonly see with EDC packs and bugout bags is a shockingly small amount of water. Here’s a tip: if you have more rounds of 5.56 in your daily carry bag than ounces of water, you might want to reassess. I have seen all sorts of “bugout bags” that feature three or four guns. . . and one 16-ounce bottle of water.
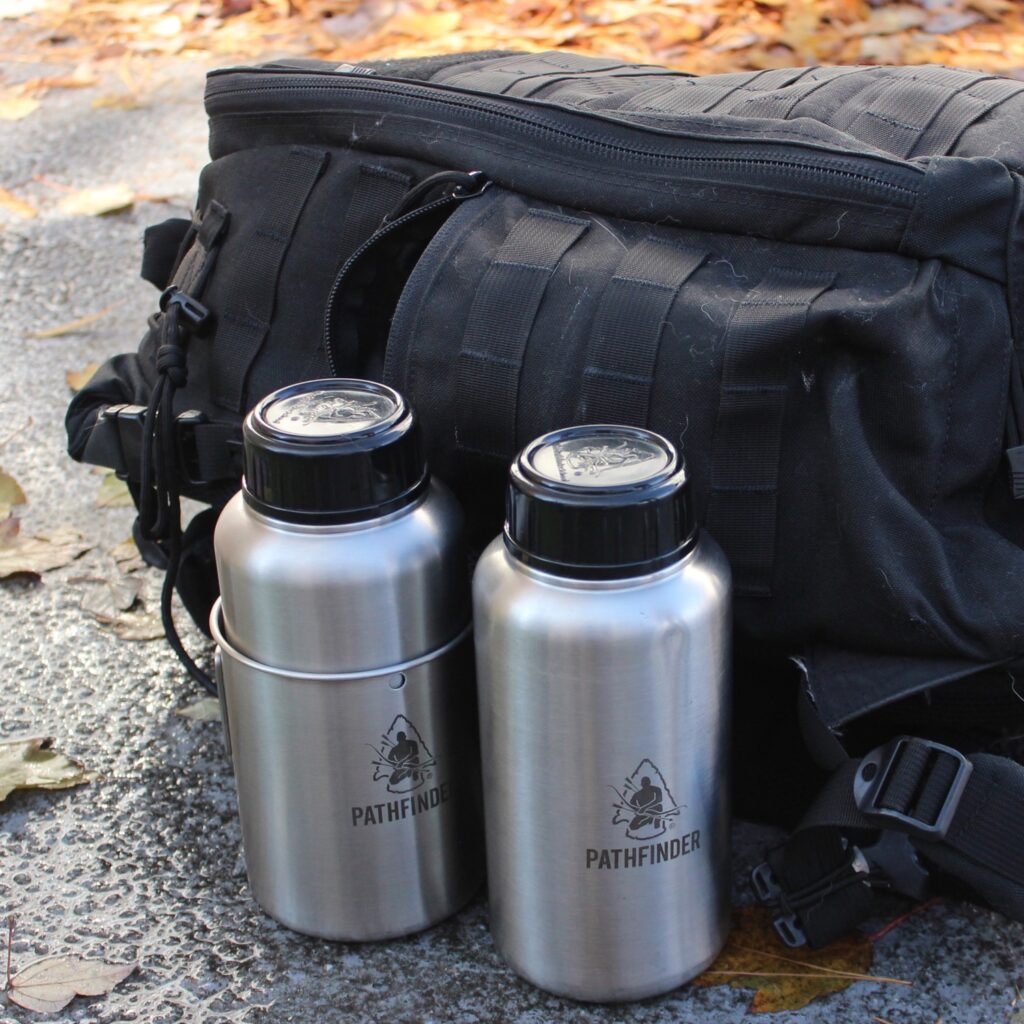
I think a quart of water is the absolute minimum you should have on hand at any given time. I think a half-gallon is even better. I carry two 32-ounce bottles. Here’s how I run them: I drink out of one. Before I open the other, I fill the first one up. This means I’m never down to less than a quart. Before I leave work, I fill both up. Before I leave home, I fill both up.
There’s another reason you might want a quart bottle. Most of your purification tablets are dosed to work with a quart of water. Most of them have a mouth that is sized to fit water filters. The wider mouth makes them easier to fill in shallow streams. You can function-stack even further by using single-wall, stainless steel bottles so you can boil in them.
Since this is an “all purpose” bag, and not a dedicated survival bag it does not contain a water filter. It does, however, have some water purification tablets. They’re inexpensive, very small, and weigh next to nothing, making carrying them an easy decision.
Module 3: Inclement Weather Gear
I carry some inclement weather gear in a REI packing cube. There’s not much in here; a lightweight, waterproof rain jacket, a hat, some gloves, and some thin, Merino wool bottoms. The jacket isn’t much, but combined with the wool sweater I normally wear during cooler weather (wool warms even when wet, but doesn’t block wind) it’s a pretty decent combo. Even in the summertime I have this module in the pack. It’s nice to be able to throw on the jacket if I get caught in a summer shower, and the gloves and hat take up minimal space.
Module 4: First Aid
I’m going to cover this one in a separate article. Generally I believe that if you have training you’ll know what gear you need, but I’ll go through my kit…just not in this post.
Module 5: Electronics
This is a big module. Here’s why: your phone is your lifeline. If you have a plan to keep your AR up and running but not a plan to keep your phone up and running you have some misplaced priorities. Your phone provides you with communications to emergency services, friends, family, and airline customer service, a resource for directions and map studies, weather and news reports, allows to you to make hotel, car, and airline reservations, allows you to hail ride-sharing services, investigate food options, provides entertainment in the form of books, music, podcasts, movies, gives you a way to store huge volumes of data in a compact form-factor. . .
Sure, in the apocalypse your phone won’t be terribly valuable. But in the 500 different degrees of “bad” on the spectrum between here and there, your phone a huge benefit in about 499 of them. My phone is definitely a thing I want to keep operational, so that’s where we’ll start with the electronics bag, most of which supports my phone. The bag is from BagSmart. I can’t find the exact one on Amazon, but it’s similar to this one. Here’s what’s in it:
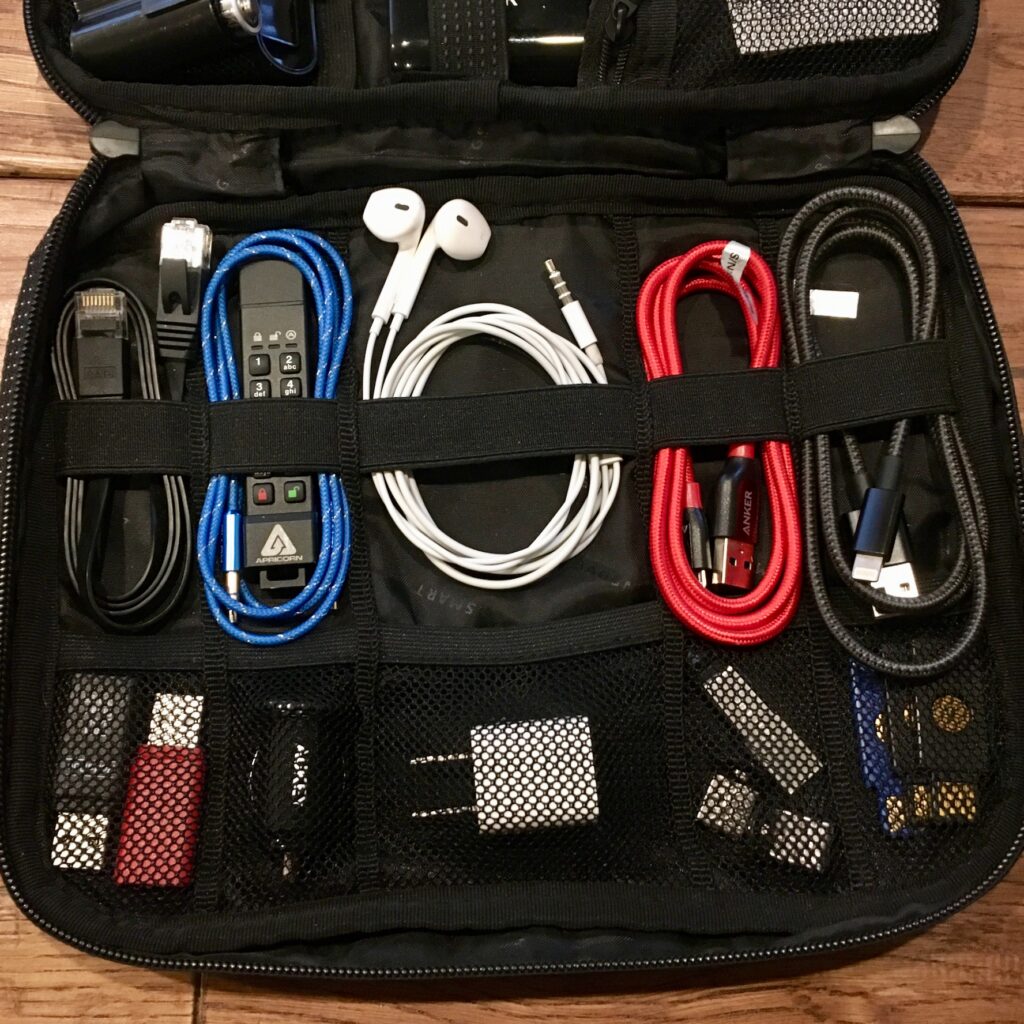
Top row, right to left:
- iPhone charging cable, different color than micro USB for quick identification
- Micro USB cable for charging battery pack, use as a loaner, etc.
- Spare ear buds
- Aux cable (so I don’t have to USB my phone a rental car, allowing it to pull data from my phone)
- Apricorn SecureKey hardware encrypted flash drive (review here) containing critical files securely, but accessible from any computer without specialized software or administrator privileges
- Ethernet cable, in case the wired connection is better than the wireless.
Bottom row, right to left:
- Yubikey security keys
- Misc flash drives
- 110 to 5v USB charger (to keep my phone charged)
- Anker 12V to dual USB charger (allows me to charge phone and battery pack simultaneously from a single 12V port)
- Port-A-Pow Data Blockers (allows me to safely charge from a USB port without transferring data – highly recommended for anyone who travels)
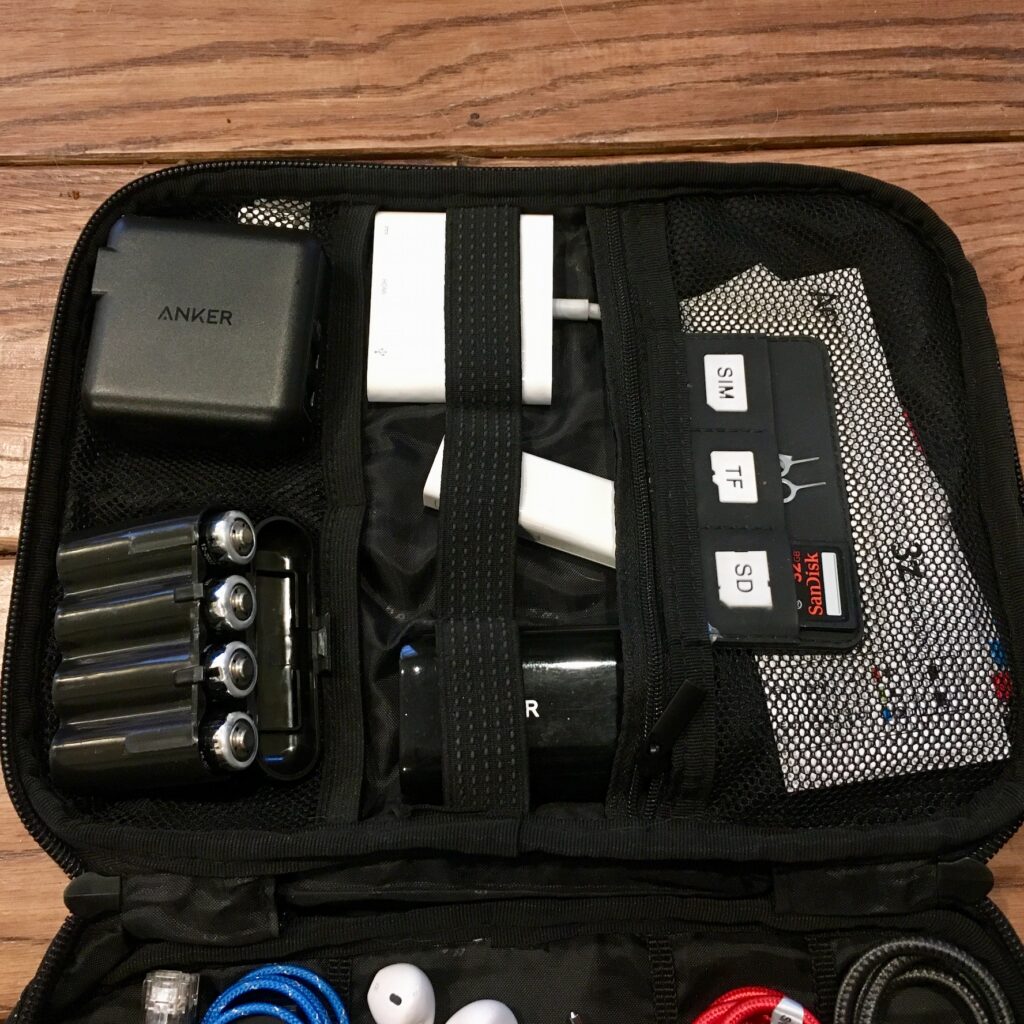
The top of the bag doesn’t have a whole lot in it. Basically just the following, in no particular order.
- A couple dongles for my work Macbook
- An Anker dual-port 110 to USB charger. Why the single and dual-port USB charging bricks? I’m glad you asked. Perfect world, when traveling, I’ll keep both my phone and my battery charged at all times. I’m constantly searching for power until I get where I’m going (I’ve been laid over, diverted, re-routed, returned to point of origin because of in-flight mechanical problems, emergency landed. . . I don’t want to begin any of those situations with my phone at 18%. The dual-port brick lets me charge both at the same time, maximizing efficiency. But when the airport is super crowded I might not be able to fit that into a plug, so I keep the single in the bag. And to be honest, the single is what I use 99% of the time in day-to-day life.
- 4x AA lithium batteries in a plastic case
- An Anker battery pack. I don’t think that model is made any longer and after five years this one is about shot. I will probably replace it soon with something like this (I really like Anker products, apparently).
Module 6: Remove-Before-Flight
One conundrum with an all purpose EDC bag is flying. Do you leave the entire bag behind? I don’t like that idea – every day means every day. Do you risk having ammunition or other contraband in it? I also don’t like that. . . Do you simply not permit ammo/knives/etc in your EDC bag? I came up with what I believe is a completely original idea: the remove-before-flight module.
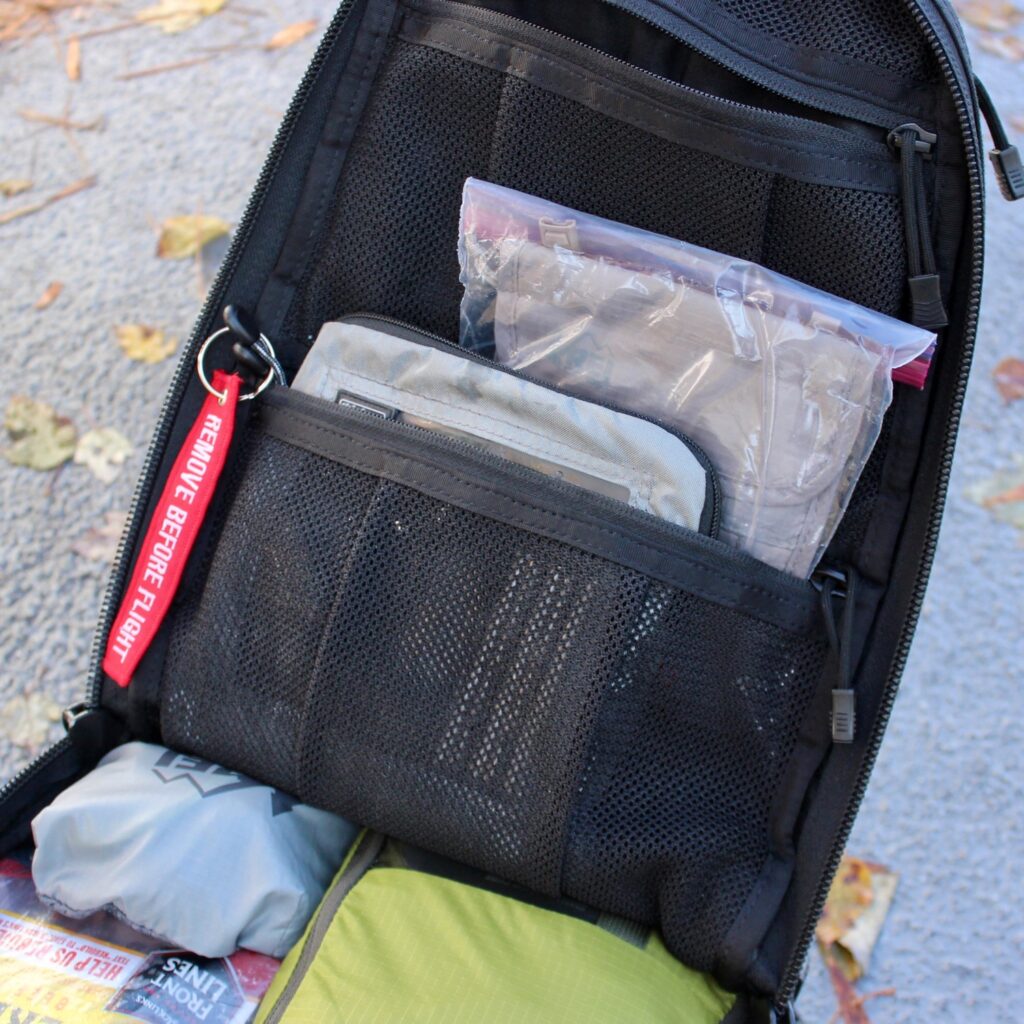
This is nothing more than small bag containing my contraband items. It has a bright, red “Remove Before Flight” tag that hangs into the the interior of my bag and is visible even on a cursory check. Mine contains the following items:
- Gerber multi-tool with driver bits,
- Spyderco Tenacious
- Fox Labs Mean Green pepper spray
- Spark-Lite, my favorite sparking fire-starter
- Lifeboat matches (might drop these soon, they’re getting damaged)
- Two pistol magazines, 18 rounds 9mm Federal 124-gr. +P JHP
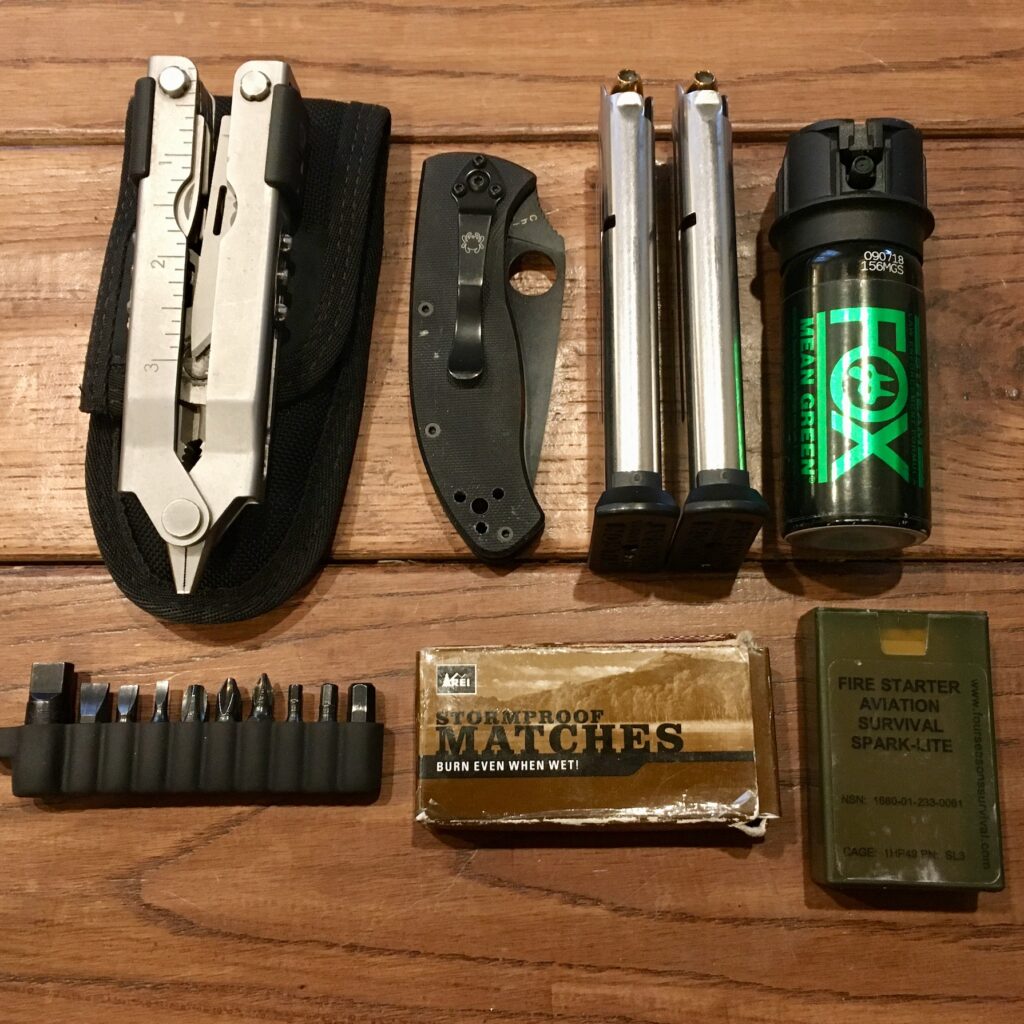
The Gerber Multi-Plier and fire starting tools are additional capabilities, while the knife and pepper spray are to replace mine if lost, damaged, or I had to run out of the house naked in the middle of the night.
With all my sharps, ammo, and chemical irritants in this bag there is very low likelihood something will be forgotten in the pack when I get to the airport. I simply remove this entire module. It is zipped up tight, keeping all it’s contents segregated. This system has worked extremely well for me.
Module 7: Repair/Survival
This is probably the smallest module in the pack. It is in a Ziploc bag, and fits into the top pouch on the inside of the front panel. If I’m being honest this is probably the module I’d miss the least because everything in there is is fairly low-probability. On the other hand, it’s very small and hardly noticeable.

The “repair” portion of this module is as follows:
- Sewing kit (taken from a hotel),
- 6x 12″ zip ties
- 15′ 550 cord
- 10′ Gorilla Tape (wrapped around the center plastic thing from a roll of dog poop bags)
- Gear Aid Tenacious Tape (the black square above the bandana; this stuff is super cool and does an amazing job repairing small holes in nylon gear like coats and tents)
The survival portion contains, well, not much.
- Suunto A-10 compass: not the best compass but not terrible either. This is probably the most used item in here.
- Large bandana: can be used to filter water, as. face mask, a cravat…
- 2 mil contractor trash bag
Module 8: Clothing
This module is packed in a REI Medium packing cube. It contains one copy of the uniform I wrote about a few weeks ago. Additionally it contains an extra pair of Smartwool socks, a thin, long-sleeved, merino wool top, and an Patagonia belt. The belt had been pretty much retired and takes up minimal space so why not. Pretty much everything I need to clothe myself except shoes. This module may not be terribly useful for most of you. This has come in incredibly handy for me on work trips, as I related in the uniform article.
Module 9: Hygiene
This module is pretty sparse, but it’s definitely enough to get by on. It’s packed in a Think Tank Cable Managment 10 bag. There’s a pack of wet wipes, a toothbrush, toothpaste, floss, and a small bottle of Dr. Bronner’s Magic Soap (peppermint), and a small thing of my hair gel. If I’m being honest, when I travel the toothbrush gets replaced with my real, electric toothbrush and I throw in a comb. Even without the mods is perfectly usable as-is.
Module 10: Admin
The final portion of this is one that I’ve been working to trim down to bare bones: the “admin” pocket on the front of the pack. It’s a flat pocket, and immediately on the other side of the panel is the Repair/Survival module, so there isn’t much room to begin with. I like to have a few things in this pouch because it’s quickly accessible from the exterior of the pack.
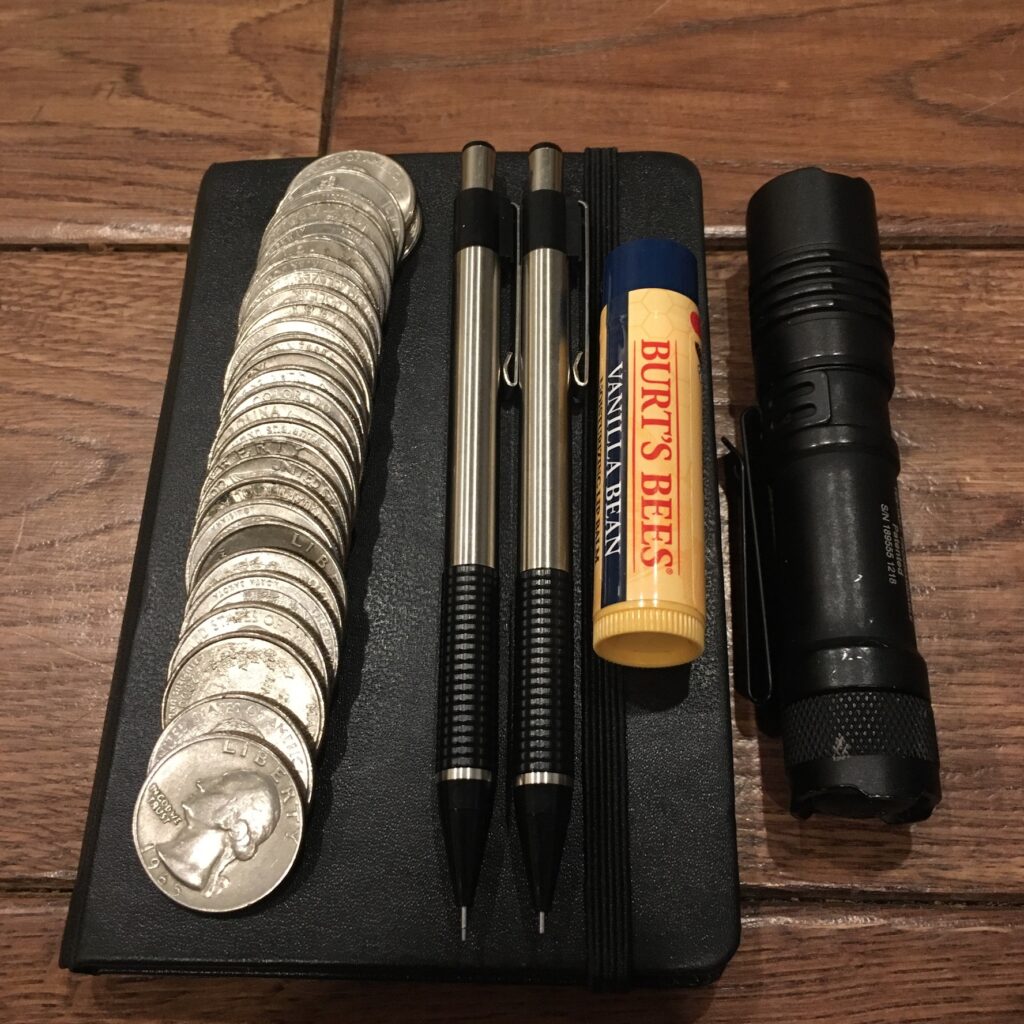
There isn’t much in here, except a few things I like to keep conveniently located:
- Small notebook,
- 2 pencils,
- 2 pens (both of mine are missing somehow),
- lip balm of some sort,
- Petty cash, including $5+ in quarters (for living off vending machines at 2 am at the Denver airport, paying parking meters, toll boths, etc.)
- Streamlight dual-fuel flashlight
Deficiencies?
I honestly don’t see many deficiencies in my pack. For all purpose, everyday carry it does very well. The one thing I may think of adding is a small set of lock picks and bypass tools. But let me caveat that! I’m adding those because they bring massive potential to me. I have the training and skill to use them extremely effectively.
Which kind of speaks to all of the stuff in this pack; I wouldn’t recommend toting around a bunch of stuff that you either don’t know how to use or haven’t trained to used well (the possible exception being medical gear that someone else could use on you). Before adding something to your pack, your EDC, your car kit (coming soon), whatever – what capability does it bring? Is that capability potential capability or is it actual capability because you can employ that tool effectively?
I know it’s an ego blow, but that water filter or that flint and steel set don’t actually mean shit unless you have learned how to use them and practiced.
Closing Thoughts
So anyway, that’s my pack. It’s not going to be perfect for anyone except me. I hope that gives you some things to think about beyond, “ooh, I need to add one of those!” I hope it provides a little insight into my thought process in building a bag.
Stay tuned – I still owe you guys the articles I mentioned in my on-body EDC article. I also have my vehicle EDC stuff coming up, and plenty of other cool stuff!