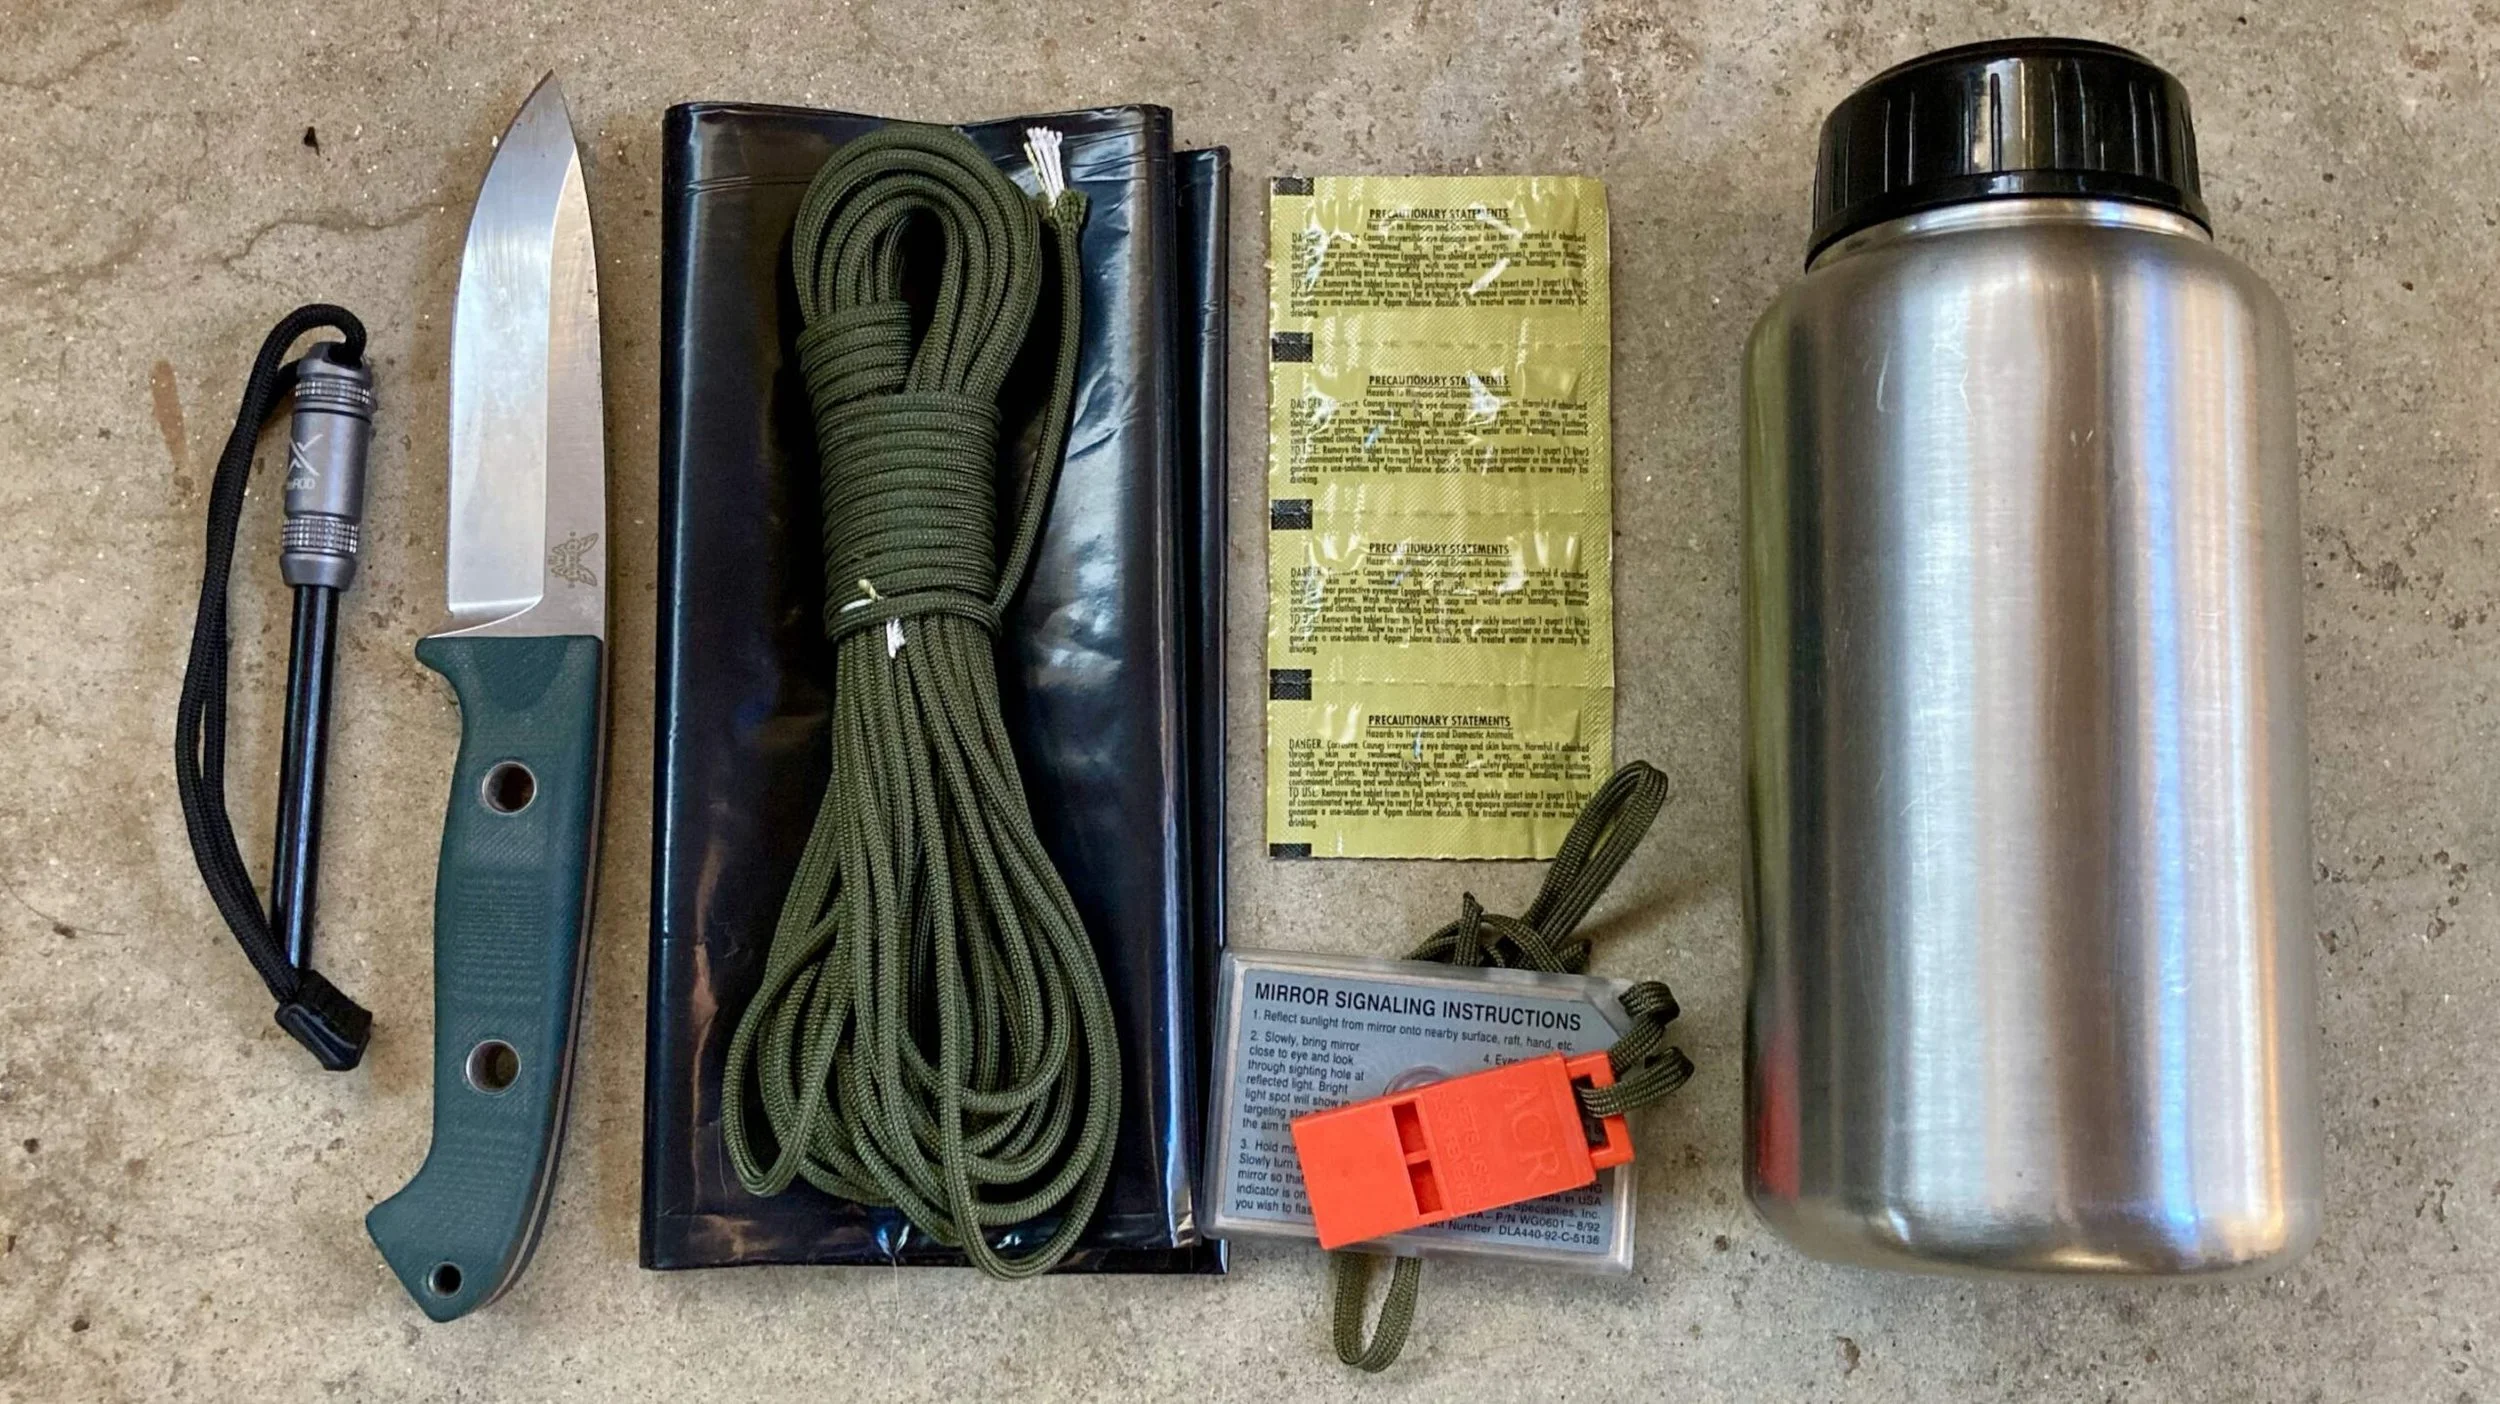
The Bare Minimum Survival Kit
Survival kits come in all shapes and sizes, from the junk contained in the handles of those 80s "survival knives" (if you're old enough to remember them definitely check out that video...or even if you're not) to Altoids-tin kits to backpacks full of stuff. My last article on wilderness survival covered a very strong survival kit. Today I am going to discuss the bare minimum "stuff" I would want in the woods.
This article contains affiliate links.

The Concept
This article is largely based off two things. The first is the target audience at my upcoming wilderness survival class. When they step into the woods they are carrying a 25-30 lb pack...but it is full of medical gear. There's not a ton of room for them to add personal survival gear. I wanted to come up with something that I could legitimately recommend that these folks carry while carrying a pack full of stuff for someone else.
The second thing this article is based off of is a conversation I had with a friend recently. We were discussing the extent to which skill and experience can replace equipment. Skill and experience are extremely important, and I'd take both over equipment any day. However, there are things that skill and equipment can't replace. For example, no matter how skilled and experienced you are, you probably aren't going to make a container in which to boil water in a short survival situation. Nor are you going to flint-knap a knife blade, or quickly and easily erect a waterproof shelter.
In thinking about my minimal survival kit I've thought long and hard about the things I can quickly and easily substitute, replace, construct, or do without. I've tried to get this list down the fewest possible items that still drastically increase my odds of staying alive if lost in the woods. As I alluded to in the previous paragraph, they are things that are not easily fabricated or found in the wild.
Here goes my bare minimum survival kit. The items listed here are in their order of priority. The first item listed below (a knife) is the first item I would acquire if putting together such a kit. It is also the last item I would go into the woods without. The items selected here are also based on satisfying the survival priorities I laid out in the previous article on Wilderness Survival: namely, thermoregulation via fire and shelter, and water. There's not much in here about long-term bushcraft projects, snaring animals, fishing, or really anything other than staying warm and hydrated for a few days.
Bare Minimum Survival Kit: Knife
The first and foremost item in any true survival kit should be a fixed-blade knife. I love my folders and the times I've been without one since I was a kid are truly few and far between. The longest period spent without a knife in my pocket since the age of 8 or 9 was the three months of Marine Corps boot camp. Otherwise - unless flying - there's a folding knife about my person. Unfortunately, the more I come to work with knives in the outdoors, the more I come to realize that a folding knife is not what I want to find myself holding in a survival situation (I mean...I'd still want it, but I'd hate to be limited to it).

The uses of a knife are many. For many of those uses a folder is sufficient - cutting cordage, making tinder, etc. But for many of the chores for which you really need a knife - chopping down a small tree for a ridge pole or processing firewood, for instance - a folder just isn't going to answer the mail. Folders are sometimes called "strategically-broken fixed blades" and I agree with that assessment. At the heart of a folder, a pin holds the blade to the handle. Under hard use it will eventually break, wear out, or tear out of whatever it is affixed to in the handle. A fixed blade on the other hand is much more durable and robust.

When choosing a fixed blade demand a knife with a full-tang. I talked about that a bit in my last article; the knife should consist of one, continuous piece of steel from tip to tail. To break a knife with a full tang you literally have to break the steel in two. Your fixed blade should be of a decent size but not so large you won't carry it (the problem with my Becker BK-10). It should be comfortable to use and be of good quality, and that's really about it. After my last article I purchased a Benchmade Bushcraft 162 and so far, really love it.
Bare Minimum Survival Kit: Fire-Starter
The next item on the list, and an item that I'd definitely rather not do without is a fire-starter. Fire satisfies or contributes to a number of survival priorities. It can signal (via light or smoke), warm, boil water, cook food, provide light, offer security, entertainment, and a huge morale boost. Fire is incredibly important, and as my friend pointed out: how easy would most SAR missions be if people just sat down and built a big-ass fire?

For a bare minimum kit I'll choose a sparking device over a consumable, flame-producing device like matches or a lighter (though there's honestly not a reason I couldn't have both). Though matches and lighters are easier to use, they are also extremely vulnerable to physical damage, moisture, etc. And they are extremely finite in the number of fires they can light. A good sparking device is waterproof, robust, has no moving parts, and has the potential to light thousands of fires.

The downside of sparking devices is difficulty of use. Fire is created when heat is applied to something delicate enough to be brought to its ignition point by said heat. Material that will light with a spark must be much finer than material that will light to a flame, so much more care must be made in tinder preparation. At night, when you're cold, and it's raining is not the best time to be learning how to find natural tinder. In fact, under the best of circumstances finding natural tinder can take a lot of time and energy.

So I STRONGLY advocate some sort of fire-starter with built-in tinder. Having tinder with you greatly simplifies the process of starting a fire. The magnesium block is an excellent fire-starter with a built-in supply of tinder. To use it one scrapes a pile of magnesium shavings off the block. Once the pile is sufficiently large lay a spark to them, and they'll go up in a flash. They burn very, very hot (5,400 degrees) but go quickly so have your other, larger tinder ready to roll.

Another option is fire-starters that store more traditional tinder. I've recently become a big fan of the exoTAC fireROD (I love exoTAC's products but hate their punctuation). It has a large, hefty ferro rod, and a chamber for the storage of a couple Tinder-Quik tabs.

Another one of my favorite fire-starters is the Spark Lite. It has a striking wheel similar to a cigarette lighter and comes packaged with about 10 Tinder-Quik tabs. The package holds a lot of tinder, but unfortunately it's more fragile than a ferro rod or magnesium block.

Why do I advocate so hard for tinder? Having tinder can reduce your time to a working fire from hours to minutes. It can also significantly boost your chances of success. Sure, it's cool to imagine finding the perfect tinder in the wild but again, when it's wet, cold, you're tired and hungry, you're just going to need a fire. Having some tinder makes that goal much more attainable.
Bare Minimum Survival Kit Contents: Water Bottle
The next thing that would go into a bare minimum survival kit is a water bottle. Water is imperative to life. With just mild dehydration you can become lethargic, dizzy, and confused. Your body loses its ability to cool itself and you risk severe heat-related injuries like heat stroke. With more severe dehydration your blood will begin to thicken, causing your heart to work harder. Digestion will slow to the point of ceasing. The electrolytes that your heart depends on (sodium, potassium, calcium, et al) can become imbalanced enough to cause lethal cardiac arrhythmias. Water is non-negotiable.

I believe a container for water is also non-negotiable in a survival kit. They allow you to purify water, drink your fill, and carry some with you between water sources. I've talked about my water bottles (the Pathfinder bottle) many times before but I'll quickly reiterate. First and most importantly, you want a single-walled, stainless steel bottle. This will allow you to boil water in your bottle. Boiling is the fall-back water purification method because it's always an option. Though you probably could boil water in a plastic bottle (Les Stroud has done it) you probably don't want to. Stainless is better.

You'll also want a bottle with a wide mouth. It's much easier to fill a bottle from a shallow source if the mouth is wide. Most wide-mouth bottles also happen to fit most water filters on the market. Finally, your water bottle should hold 32 ounces of water (or a unit divisible by 32, like 64). This is because water purification tables are designed to work in a quart of water. Filling the bottle to the top and knowing you have 32 ounces takes all the guess work out of determining how much water you have.
Add-On Item: Water Purification Tablets
Though I don't think it's absolutely necessary for a bare-minimum survival kit (you can always boil, after all), some water purification tables would be a wonderful thing to have. I like love the idea of being able to boil water - I really do. However, how many of you have tried to boil water over a fire? More importantly, how many of you have tried to boil water over a fire in a really narrow container like a water bottle?
Here's the problem: the base of the bottle is narrow. You have to have at least two or maybe three rocks (or something) upon which to position the bottle above the fire. This is a balancing act. This means you end up with precious little space under the bottle for the fire itself. You can get a fire going under there but it's going to be a small one and you're going to be constantly feeding it, probably for half an hour or more. The bottle is also very tall relative to its width, meaning it's likely to fall over, forcing your to start over.

Then once your water has boiled, guess what? Yep, you have to let it cool before you can drink it. You definitely don't want to put hot stainless steel to your lips. This means boiling water has the added difficulty of time - it's going to take a good hour and a half to get a quart of water to drink. That sucks.
On the other hand, with tablets you can fill your bottle, drop in a tablet, and 30 minutes later be quenching your thirst. This is also much safer - there's no risk of dumping a quart of boiling water on yourself. Boiling water, as I said before, is a fall back option. You can do it if you really have to. Before that day comes you should get out and learn exactly what goes into boiling water over an open flame. It's harder and more time consuming than you might think.

Katadyn Micropur MP1 tablets are a bit expensive (~ $20 for 30 tablets) but are awesome. Ten tablets will purify two and a half gallons of water - probably ample water for three days in most environments. Ten tablets also takes up almost no space and weighs next-to-nothing. You'd have a hard time convincing me to leave these out of my kit.
Bare Minimum Survival Kit: 550 Cord
Cordage is hard to improvise. You can make cordage but it is definitely a skilled, long-term bushcraft project, and not something you're going to do in the dark when you realize you aren't going to walk your way to safety that night. I recommend having some cordage. I (like everyone that spent five minutes in the military) prefer 7-strand 550 cord. I would have at least 25 feet of 550 cord. Currently I'm carrying closer to 50' of 550...and if you have the space 100' wouldn't hurt. It's hard to have too much cordage.

Matt Robertson over at Everyday Marksman turned me on to a really viable alternative, though: tarred bank line. Seriously, go read that article. I haven't worked with tarred bank line yet, but I certainly will. Tarred bank line is thinner than 550 cord, allowing you to carry a much longer length in a much smaller package. Yes, we all know that 550 can be broken down into its individual filaments but honestly it'd be nice just to have thinner cordage to begin with.
Bare Minimum Survival Kit: Plastic Sheeting
This one is again borne out of experience: it is very, very hard to build a waterproof roof from natural materials. Though I love the idea of building an A-frame with nothing but a foot-thick layer or spruce boughs over some big-ass strips of birch bark...it's probably not going to happen in the two or three days that is realistic for most survival scenarios. Building a shelter from entirely natural materials is also very time consuming. In the very best of cases we're talking about a couple hours of mucking around in the woods. With a strong plastic sheet and some cordage you can put a waterproof roof over your head in just a few minutes.

Having some plastic sheeting makes the process of shelter building much, much easier and faster.Personally, I like contractor trash bags. They're cheap and tough. Currently my kit contains a 42-gallon, 2-mil thick trash bag. I recently cut it down one side and the bottom to see exactly how large a sheet it would provide. It's not awful; it runs 5' 4" in length and just shy of 4' in width. That won't build a palace by any means, but it will give you something to sit under, out of the rain. When not strung up as a freestanding shelter it (or two or three of them) would make an excellent waterproof liner for a natural A-frame roof.

One of these bags doesn't take up a ton of space or weight much. I definitely consider this a non-negotiable. I'm considering the purchase of some larger, 65-gallon bags (though possibly slightly thinner, 1.5 mil bags to save on packed space) to provide a slightly larger roof area.
There are also a bunch of other potential uses for a contractor trash bag. It could be used to haul gallons of water, collect rainwater, as a poncho, or a flotation device (that's why I leave my intact in my pack. Also, I'd probably try to tie it into three or four discrete air chambers if I were intending to use it for flotation, making a longer bag even more important.). If you can find an orange one (I've not had much luck), it could be used to as an air panel, too. The contractor trash bag has absolutely earned a place in my bare minimum survival kit.
Bare Minimum Survival Kit: Signalling
I have traditionally given very little thought to signalling. I've always been of the mindset that if I were to get lost, I'll be fine until help manages to find me or, more likely, I self-recover. That's a really dumb way of looking at things, and reflects the hubris of youth. As I get a little older and wiser (and see the results - sometimes good, sometimes tragic) of SAR operations, I realize the value of signalling. In a bare minimum survival kit I would want at least two methods of signalling: one auditory and one visual.

The preferred visual signal is the signal mirror, no question about it. I would get a good one, with a glass (rather than stainless or plastic) reflective surface. Practice with it. Understand how it works. The auditory signal of choice is the whistle. After having worked with all the whistles in my previous wilderness survival article, I have come to prefer the ACR whistle. It is the most compact and is just as loud as the others. It's plastic so it won't freeze to your lips, and it's pea-less so there's nothing to jam up and hinder operations.
I have the mirror and the whistle on a 550-cord necklace. Should I become lost and desire rescue this would go around my neck for ready access at a moment's notice. It would stay there until I was safely recovered.
Packaging
Knife, fire-starter (with tinder), water bottle, water tablets, 550 cord, trash bag, mirror, and whistle. That doesn't sound like much. In the right hands those tools could go a very long way, though. In the hands of even the modestly trained they could literally be life-savers. To be truly effective, though, these tools must actually be carried. I've given a good amount of thought to that, too. What I came up with at home, with stuff I already own, was a small fanny pack. It has plenty of room for the stuff in this article, except for the water bottle.

Since the water bottle is by far the largest and heaviest item in this kit, I think the container should be based off the bottle. So I'm on the hunt. I'm looking for a sling-type bag that can hold a 32-ounce bottle, and has small pouch for the other items listed here. I found this one on Amazon, but I'm not sure I want to commit to it. This one from Self Reliance Outfitters looks pretty awesome, but it looks maybe a tad bigger than I want to commit to (but that might be a good thing?). We'll see.
I appreciate you guys sticking with me. The blog has taken a hard turn into wilderness survival topics lately...and honestly that was sort of the purpose of this blog: to allow me to talk about whatever struck my fancy. I hope you guys are getting something out of it and enjoying!

