It recently occurred to me that in over five years of running this blog, I’ve never given step-by-step instructions for setting up or using a virtual machine (VM). It is likely that a lot of you already use VMs don’t need a tutorial. If that applies to you, please share this with a friend who does. It is equally likely that some of you could use step-by-step instructions. This tutorial will cover creating your first virtual machine.
The instructions provided where are conducted on a macOS host, but will work on Windows, as well.
Virtual Machines
Virtual machines (VMs) give us a pretty tremendous capability. A virtual machine is a virtual computer, running inside your normal operating system. The operating that is installed natively on your computer is called the host operating system. The host operating system is pretty vulnerable because it is exposed to all manner of threats. You can reduce this threat surface by conducting some of your especially risk activity in another operating system.
A virtual machine provides this second operating system without requiring separate hardware. It does so by borrowing some of your computer’s hardware resources (RAM, processor, and hard drive space) and using this borrowed hardware to run a separate operating system. The second OS is called the guest operating system.
Why would you want to use a virtual machine? Most importantly, it offers a tremendous layer of malware protection. Let’s say that you set up a VM for internet browsing. You visit a site and inadvertently download an infected file. That’s not great news, but it’s not the worst, either: if it is able to execute, it will still be inside the confines of the virtual machine. Your host operating system will still (probably) be safe, and the malware can only access what is in the VM.
A virtual machine even offers you the ability to go back in time by using snapshots. You can roll the virtual computer back to a time before it was exposed to malware. This means that even if your VM does get infected, it’s not that big a deal; if you’re using good snapshot practices it will only be infected for a portion of that that one session. I’m not going to cover snapshots in today’s post, but I will in the near future.
What You Need
It doesn’t take a lot to build and run a virtual machine. You’ll have to download a couple things, and follow these instructions. That’s about it. Here is what you will need:
Hypervisor Software: A hypervisor is the software that enables a VM. It is installed on your host operating system. The hypervisor borrows a portion your computer’s hardware and allocates it in such a way that the guest OS is able to install and run.
![]()
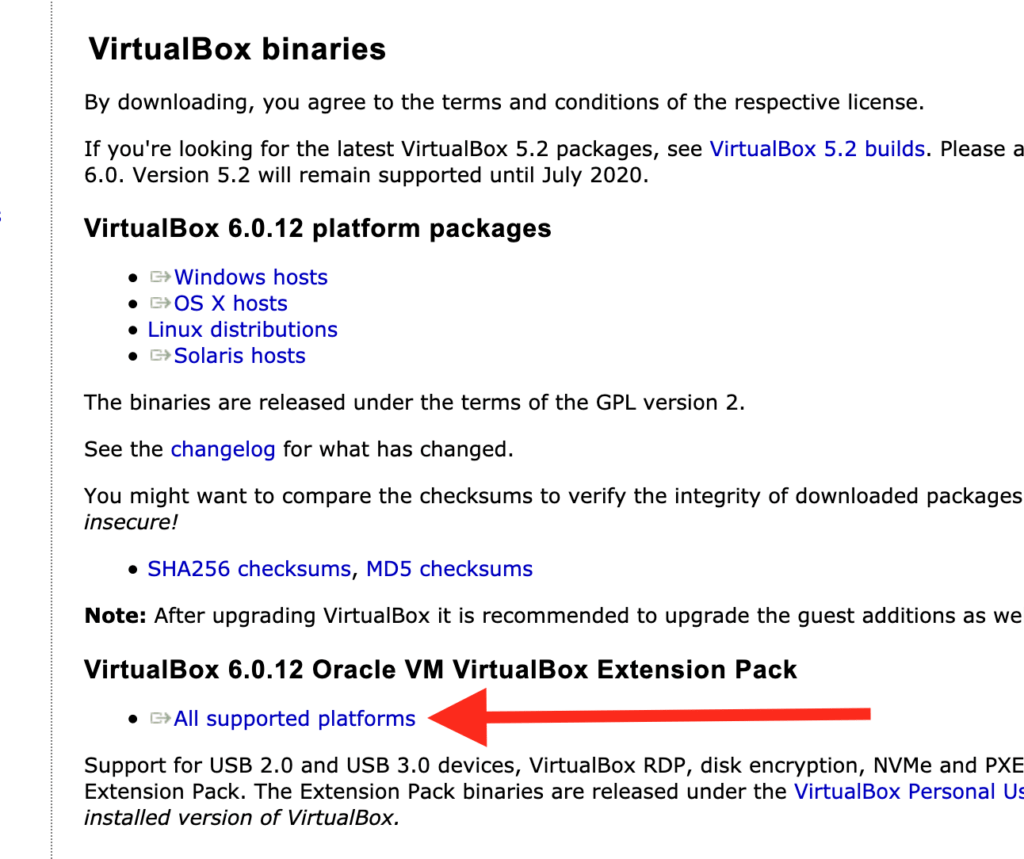
The hypervisor that we will use for this tutorial is VirtualBox. VirtualBox is free and open source, and runs on Windows, macOS, Linux, Solaris, and OpenSolaris hosts. Download VirtualBox here.
After you have downloaded VirtualBox, also download the VirtualBox Extension Pack for “All Supported Platforms”. The extension pack provides some additional functionality not native to VirtualBox, like the ability to work with USB 2.0 and 3.0 protocols. Install the Extension Pack AFTER you have installed VirtualBox.
Guest Operating System .iso: The next item we will need is an operating system file. VirtualBox can run a number of operating systems including Windows, Linux, and BSD. If you are using a Mac, it can also run macOS. For our purposes here we will use a Linux distribution called Ubuntu.
![]()
![]()
Ubuntu is fully free and open source as are all Linux distributions. It is extremely GUI-driven, and a very easy, entry-level Linux. If you would like to use another variant of Linux feel free to do so, but be mindful that the instructions in the tutorial below may not match up perfectly. You can download Ubuntu here.
At this point you should have:
- Downloaded and installed VirtualBox,
- Download and run the VirtualBox Extension Pack, and
- Downloaded the Ubuntu .iso file.
Setting Up a VM
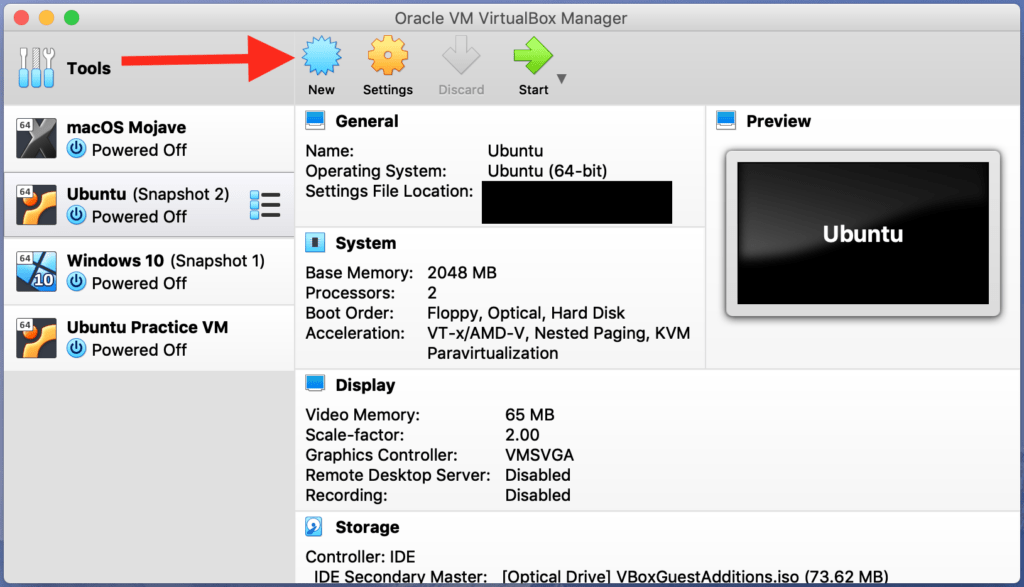
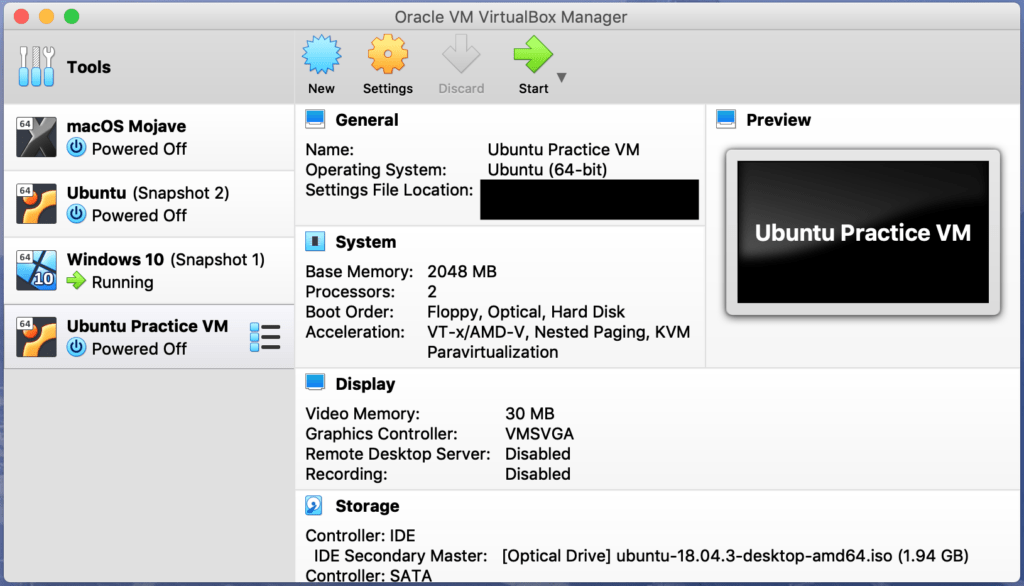
Open VirtualBox and click the “New” badge. Disregard the list of VMs in the left column in the image below. In your brand new instance of VirtualBox this column will be empty.
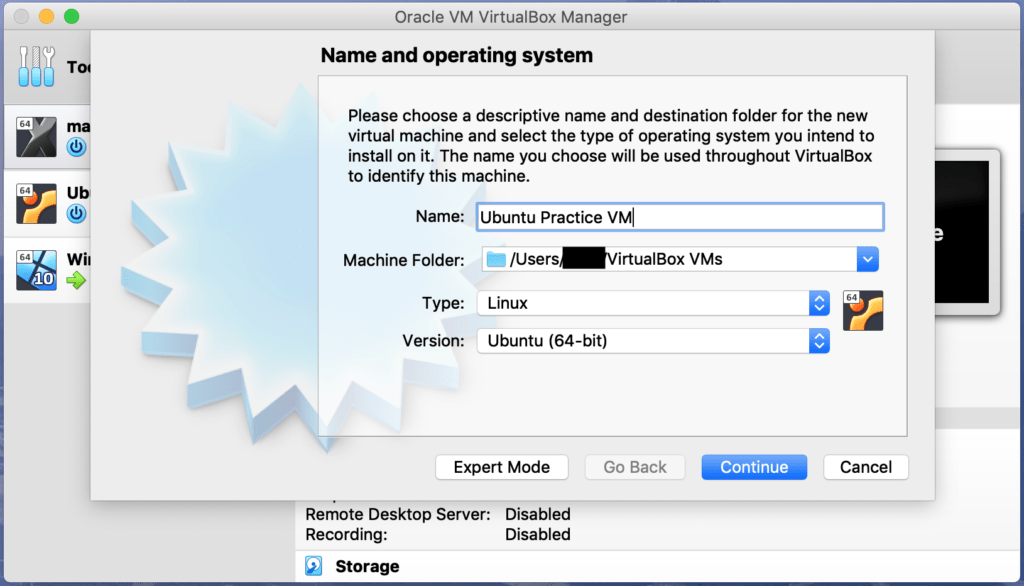
A new dialogue will appear, asking you to name the VM and choose its operating system. If this is your first VM I recommend naming it “Ubuntu Practice” or similar.
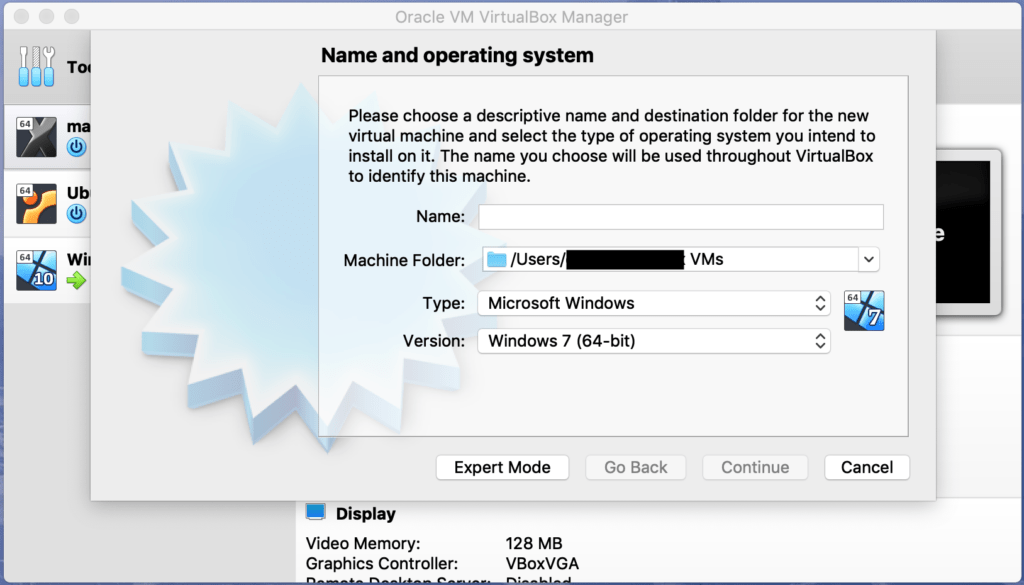
Be sure you take the time to select the correct operating system in the “Type” and “Version” drop-downs! If this information is incorrect the VM likely will not run. For our purposes the type will be Linux and the version will be Ubuntu (64-bit). Click “Continue”.
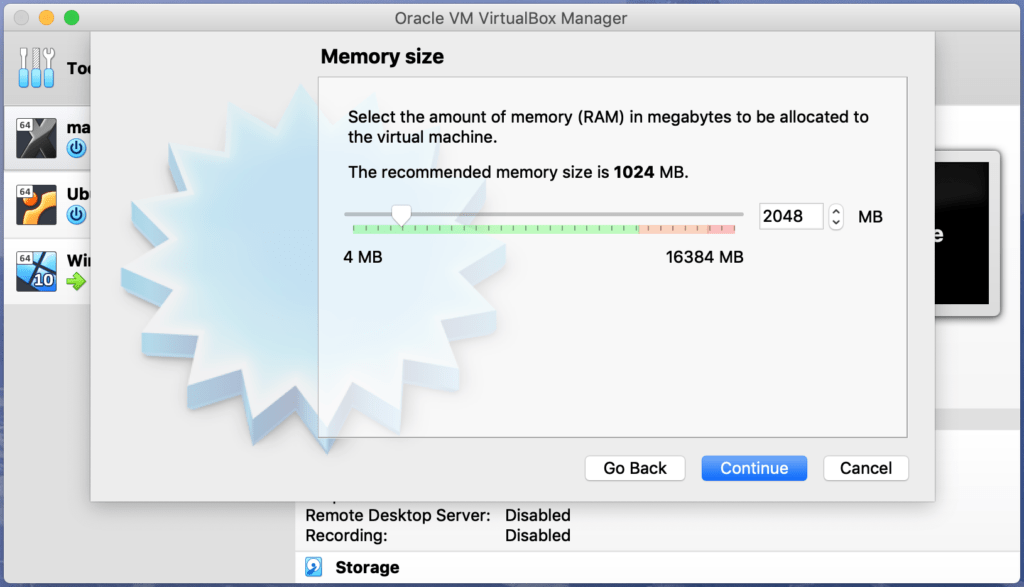
Next, select amount of RAM you are willing to allocate to the VM. If you have enough available RAM I recommend giving the guest OS at least 2048 MB. For Ubuntu this is twice the recommended amount; more will help keep your VM running smoothly. Keep in mind your host OS also needs RAM, so don’t overdo it. Click “Continue”.
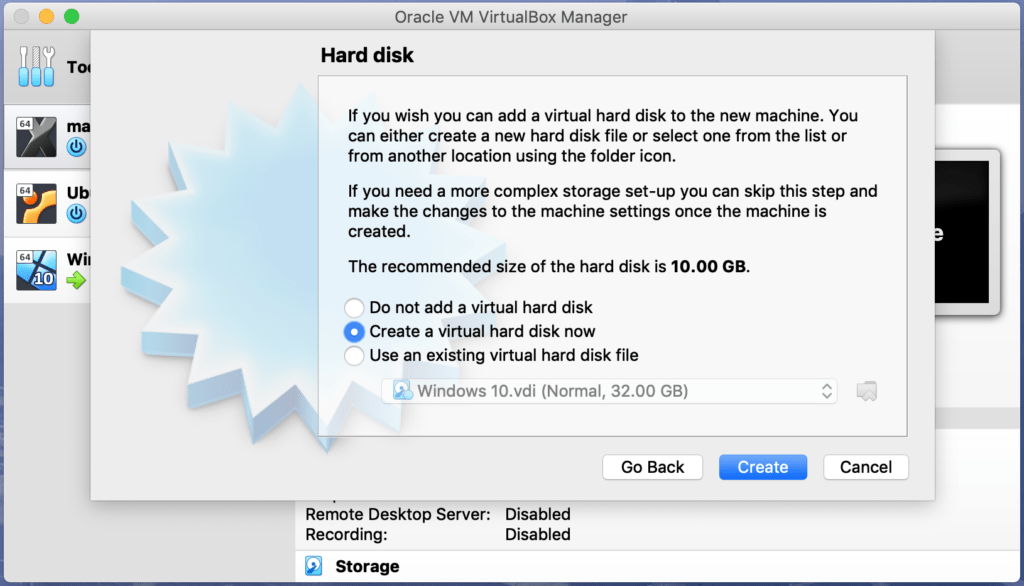
On the next screen you will be prompted to create a virtual hard disk for the VM. This is where the VM’s files, including any modifications you make, or any files you save to the VM, will be stored. Ensure “Create a virtual hard disk now” is selected and click “Create”.
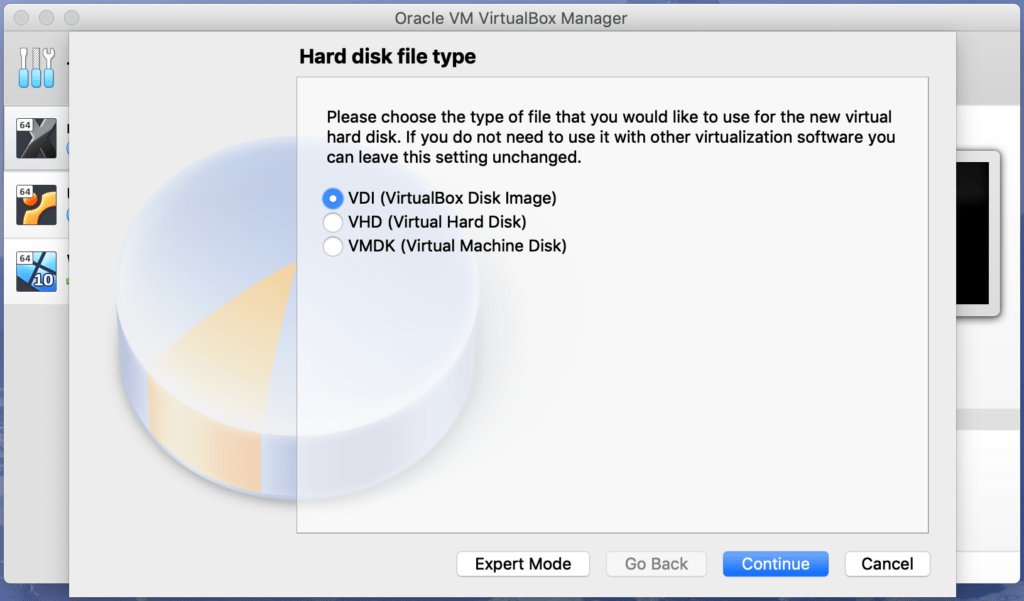
The next screen prompts you to choose the type of hard disk. This pertains to how the disk is formatted, and what platform(s) it is optimized for. VHD and VMDK allow your virtual machine files to work on other hypervisor platforms. For our purposes we will only be working in VirtualBox, so we will choose VirtualBox Disk Image (VDI). Click “Continue”.
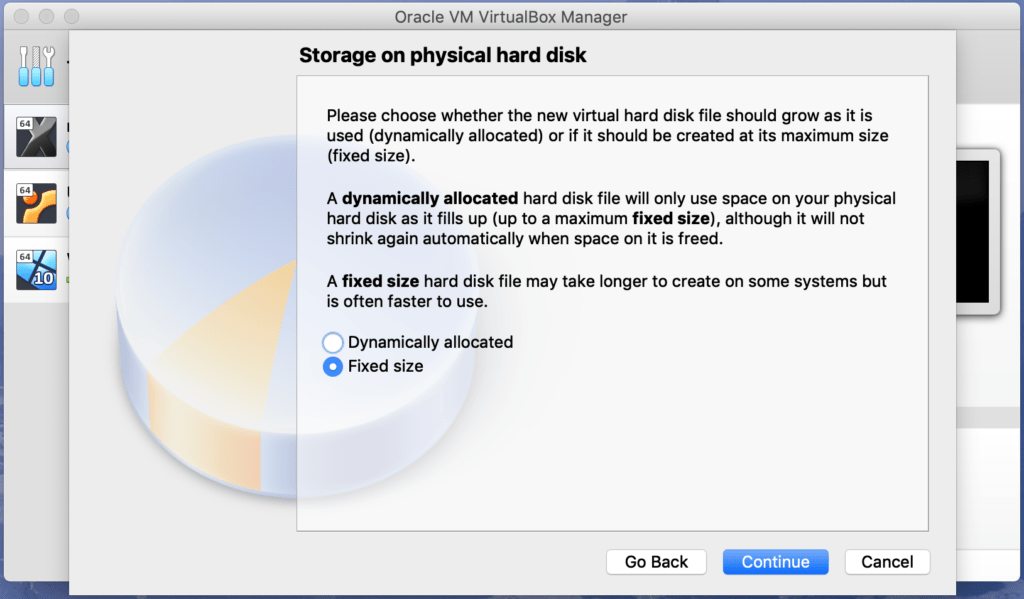
The next screen gives the option of “Dynamically Allocated” or “Fixed Size”. Dynamically allocated means that the entire disk is not written, and space is only consumed as needed. If you have limited disk space this might be the best option for you. Generally I prefer Fixed Size. It takes slightly longer to create but I view this as a very modest up-front investment. In return I get a faster VM. Additionally, we will eventually encrypt this VM and fixed size is more secure than dynamically allocated disks when used with encryption. Select Fixed size and click “Continue”.
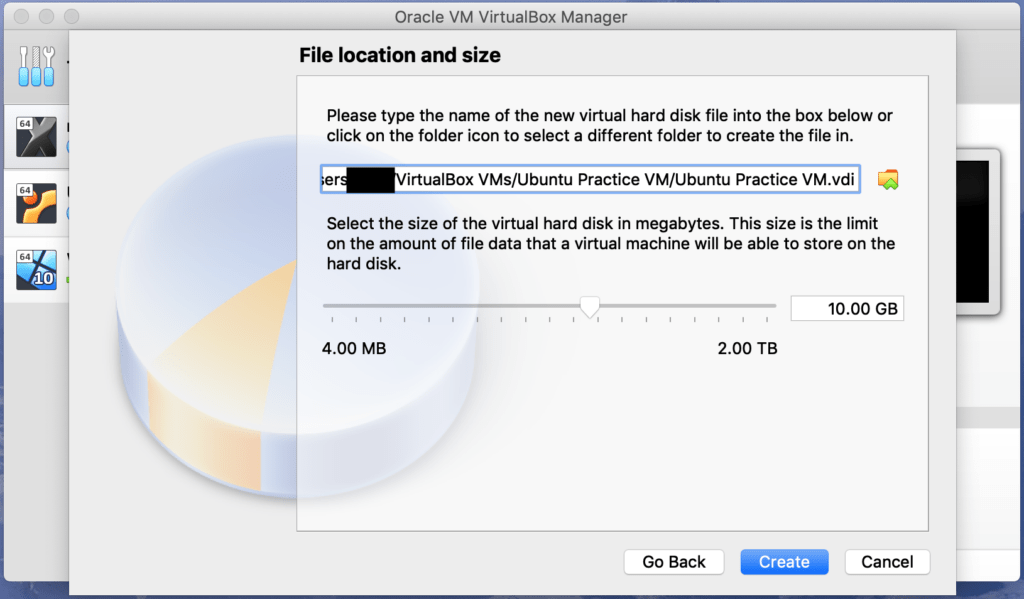
Finally, you will be asked to select the size of your VM’s hard drive. The recommended size for Ubuntu is 10 GB. For this practice VM you probably don’t need to go any larger. Click “Create”.
Once the hard disk is created the setup dialogues will disappear and you will be back at the VirtualBox interface. At this point you are almost ready to boot up your new VM. There are still a couple of additional steps we want to take before starting, though.
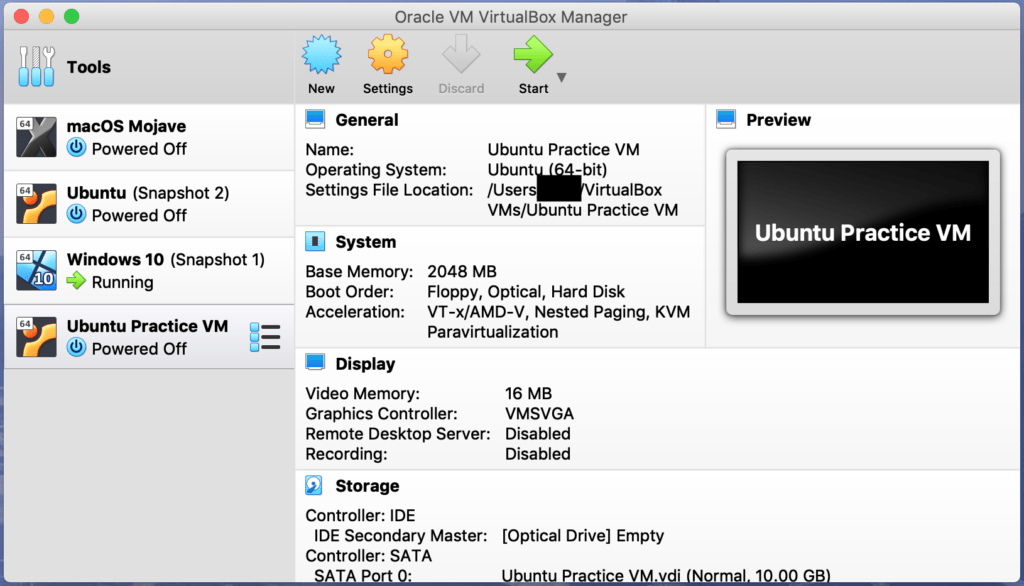
First, ensure your new VM is selected (if it is your only one, you can skip this step). Click the orange “Settings” icon. A new Settings dialogue will appear.

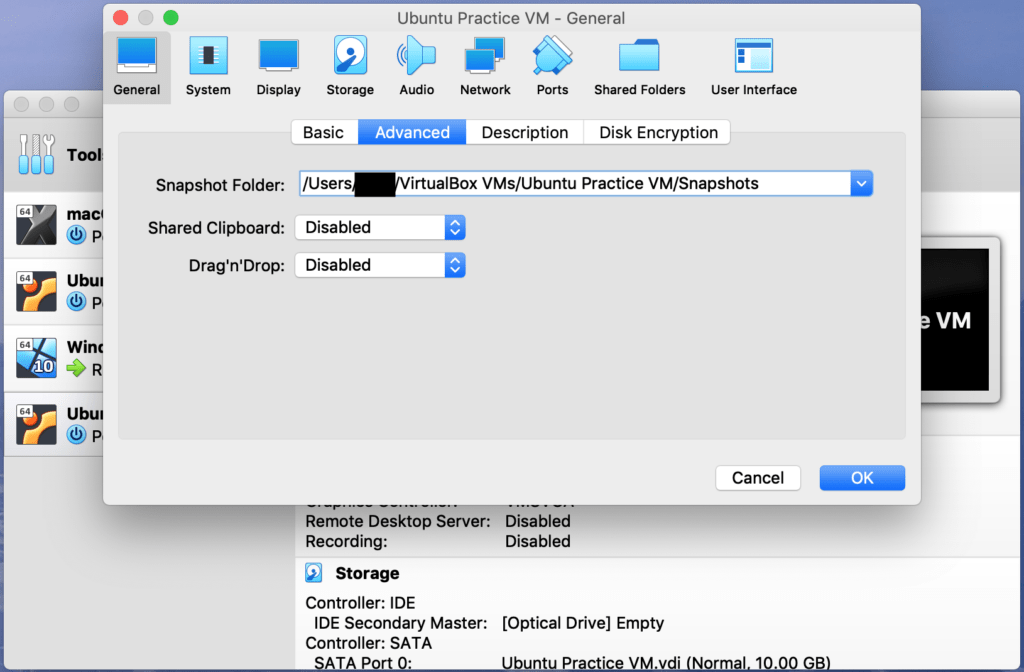
This dialogue will have several icons across the top (macOS) or down the left side (Windows). The first icon (General) will already be selected when the dialogue opens. Within this menu click on the “Advanced” tab.
There are two very important settings here: Shared Clipboard and Drag’n’Drop. Both of these should be Disabled when we are working in the VM. These functions allow a pathway between the host and guest operating systems. If malware gets on your virtual machine, it can use this to jump out of the VM’s sandbox and onto the host OS. The options in the drop-downs for both of these settings are:
- Disabled: any sharing between the two OSs is disabled. This is is the default, and the way you should normally be operating.
- Host to Guest: This unidirectional setting allows you to transfer clipboard contents or files from your host operating system to the guest, but does not allow transfers from the guest to the host. This is the ONLY option other than “Disabled” that you should consider.
- Guest to Host: This is optional permits transfer from the more exposed guest back down the host. Unless you have very compelling special circumstances, you should never enable this setting.
- Bi-Directional: This allows unfettered sharing between the two operating systems. NEVER enable this option unless you have very compelling special circumstances.
OPTIONAL STEP: Since this is a security blog I assume that many of my readers are interested in the encryption option. Your VM will still work if you skip this step, however.
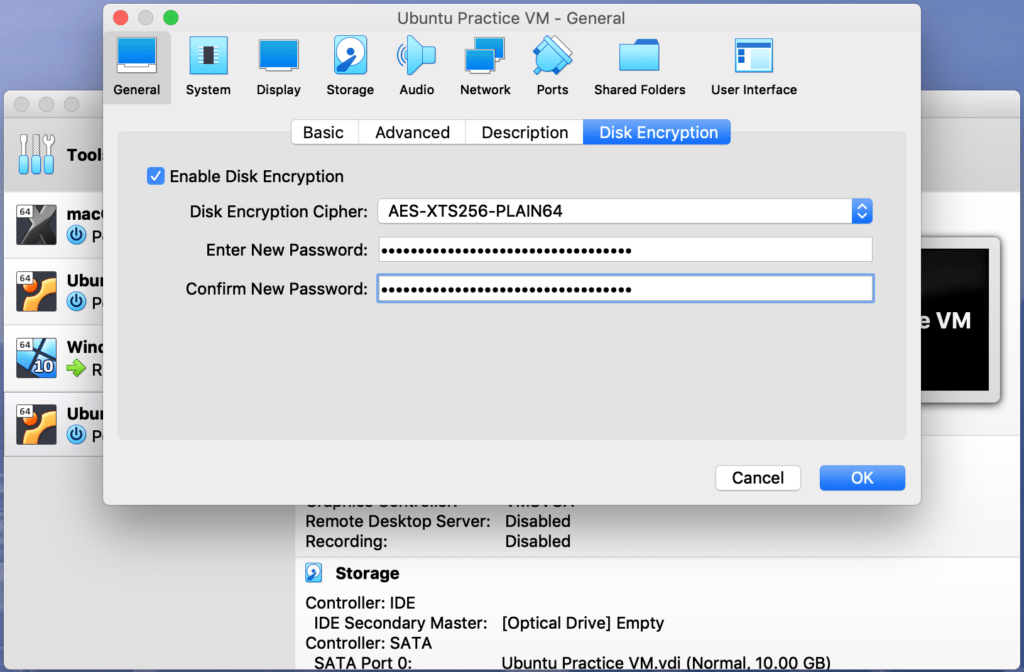
Click on the “Disk Encryption” tab. This allows you to encrypt the guest operating system through VirtualBox. This will secure the entire contents of the VM when it is not in use. However, it will also impose a slight performance penalty and make the VM slower.
If you choose to enable this option check the “Enable Disk Encryption” box. in the drop-down choose either AES-XTS128 or 256. While AES-XTS256 is more secure, it is also slightly slower. Finally, enter your password (twice) and click OK.
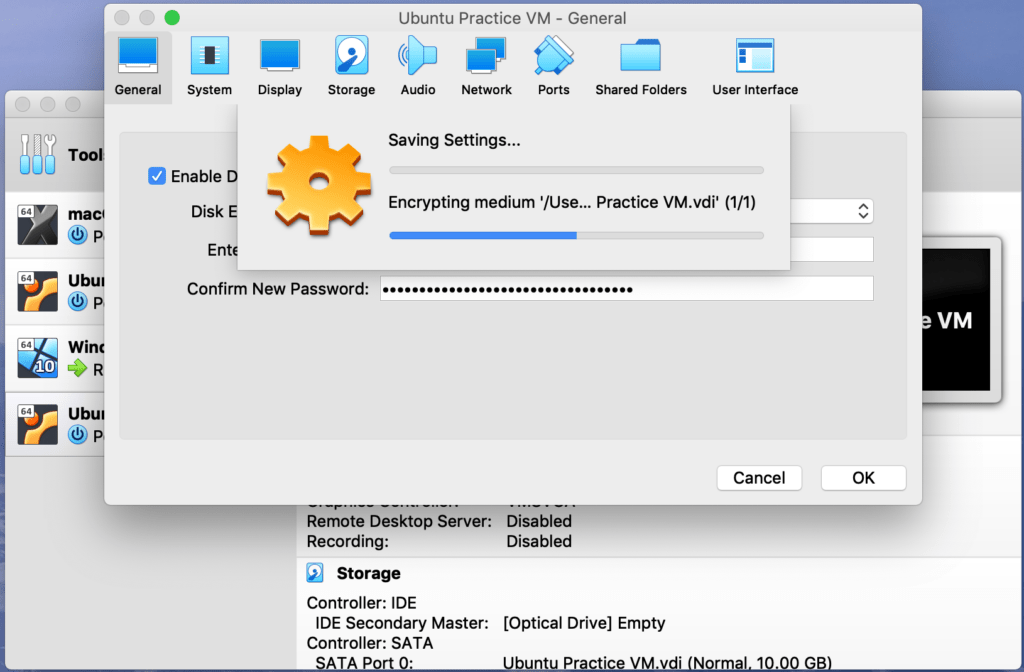
The disk will begin encrypting. This process writes a full 10GB (or more, depending on the size of your virtual disk image) of pseudorandom data, so it may take some time.
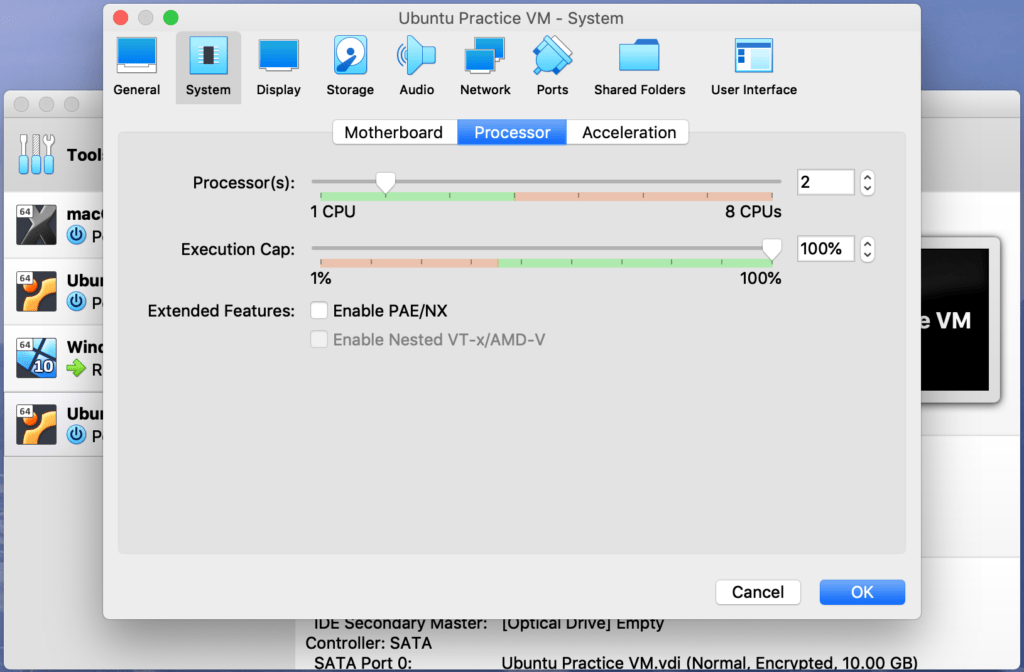
Next, click on the “System” icon. From this menu select the “Processor: tab. Here, you will see the number of available processor cores your computer has under Processor(s). I recommend giving the VM two processor cores if possible. If not, one will work, but more hardware resources means the VM will be faster.
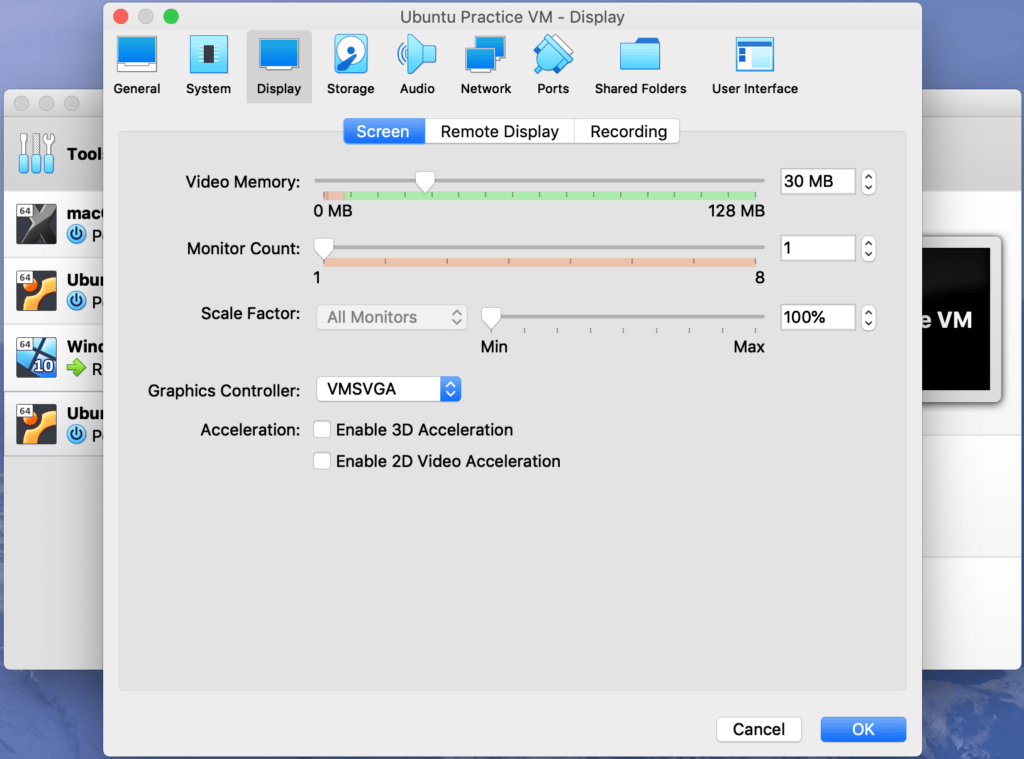
OPTIONAL STEP: Next, click on the “Display” icon. Under the “Screen” tab, take a look at your video memory. I recommend bumping this up a bit from the minimum; for Ubuntu VMs on my Macbook, I generally increase this to 30MB. This additional resource improves the quality of the virtual machine’s display. Your VM should still work just fine if you skip this step, but it may appear grainy or low-resolution.
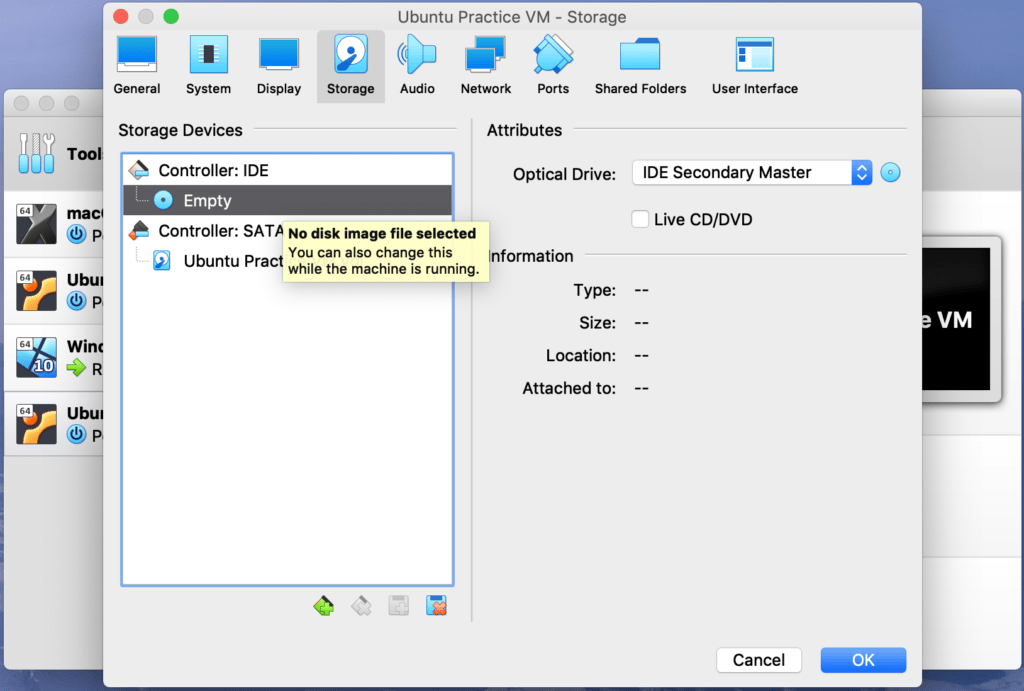
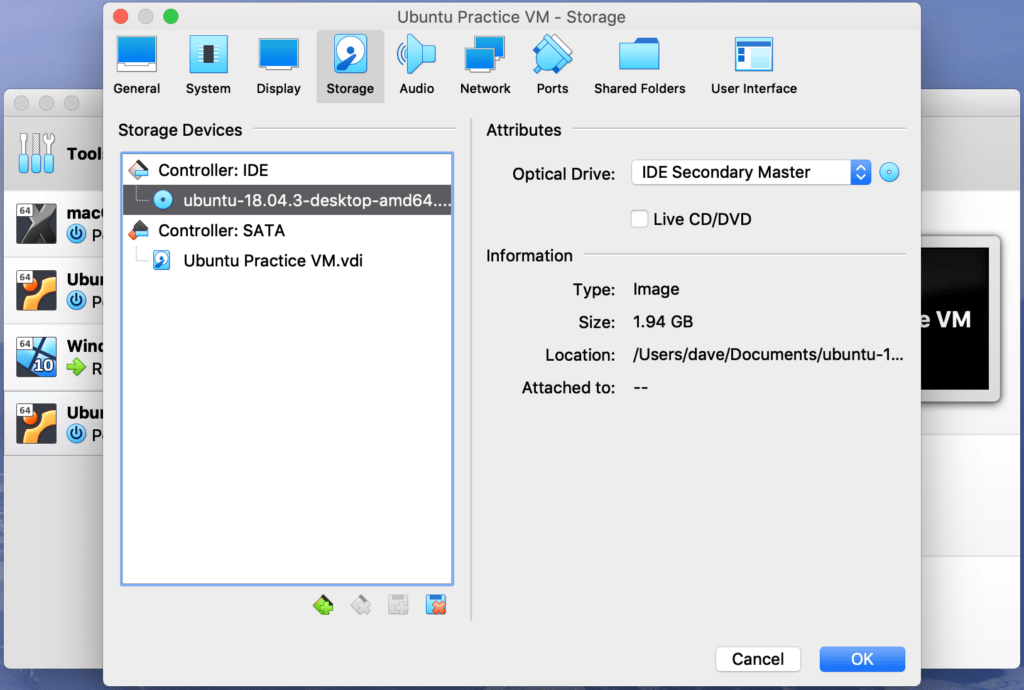
Finally, click on the “Storage” icon. This step is very important: it is where we will direct VirtualBox to retrieve the operating system that our guest machine will run. If you have not already downloaded Ubuntu, do so now.
Take a look at the screenshot below. You will notice under “Controller: IDE” there is a disk icon and the word “Empty”. Click on this line to select it.
Next, come over the right-hand side of the interface. You will see the words “Optical Drive” and a drop-down displaying “IDE Secondary Master”. Beside the drop-down there is a disk icon. Click on that disk and select, “Choose Virtual Optical Disk File”. This should open an instance of Windows Explorer or macOS Finder. Navigate to the location where you saved the Ubuntu .iso file, and double-click it.
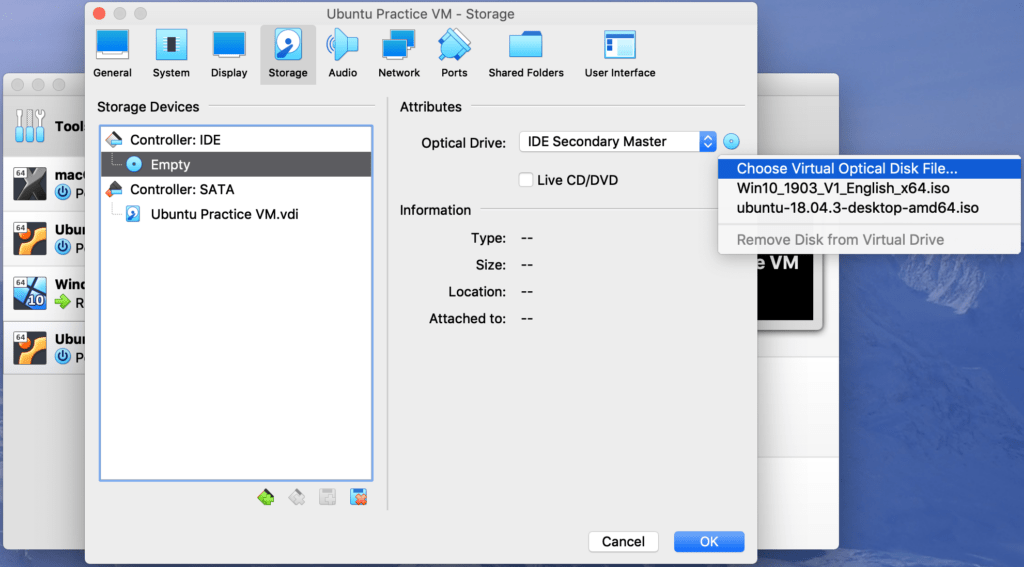
On the left side of the screen, you should now see “ubuntu-18.04.3-desktop-amd64…” under “Controller: IDE”. This indicates that the operating system has been mapped by VirtualBox. Click OK at the bottom of this dialogue; it should close.
You are now back in the main VirtualBox interface, and we are now ready to start the virtual machine we have just created. To do so, simply click on the VM’s icon in the left hand menu, and then click the green “Start” arrow. Your machine should launch.
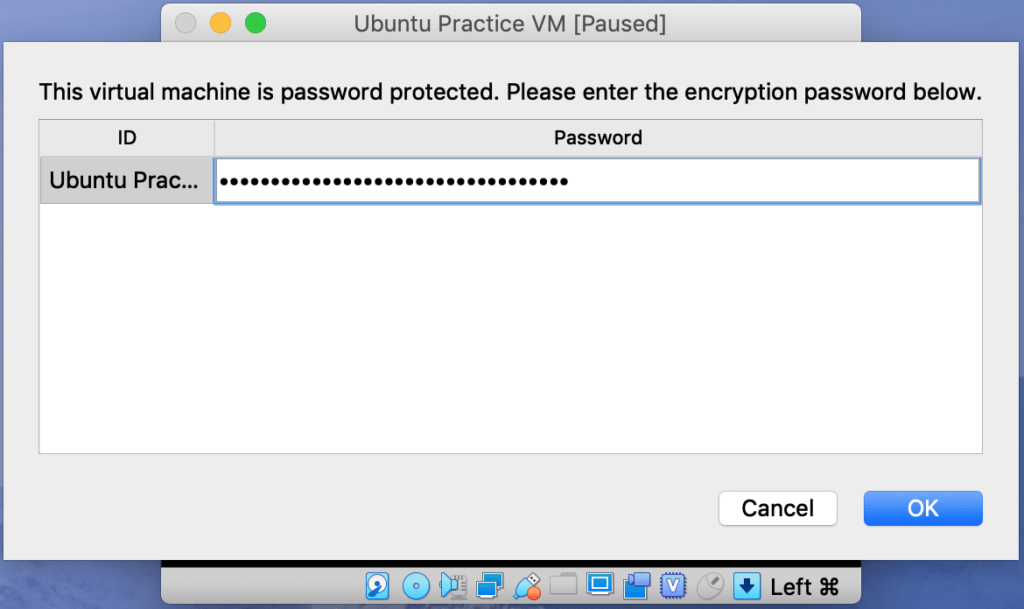
If you encrypted your virtual machine you will be prompted for a password before it will boot up. At this point retrieve your password and enter it.
We have now created and launched a virtual machine. In the next part of this mini-series I will walk through the setup steps that are unique to Ubuntu in VirtualBox. In the meantime, it would be a good idea to delete this VM and run through this process several more times.
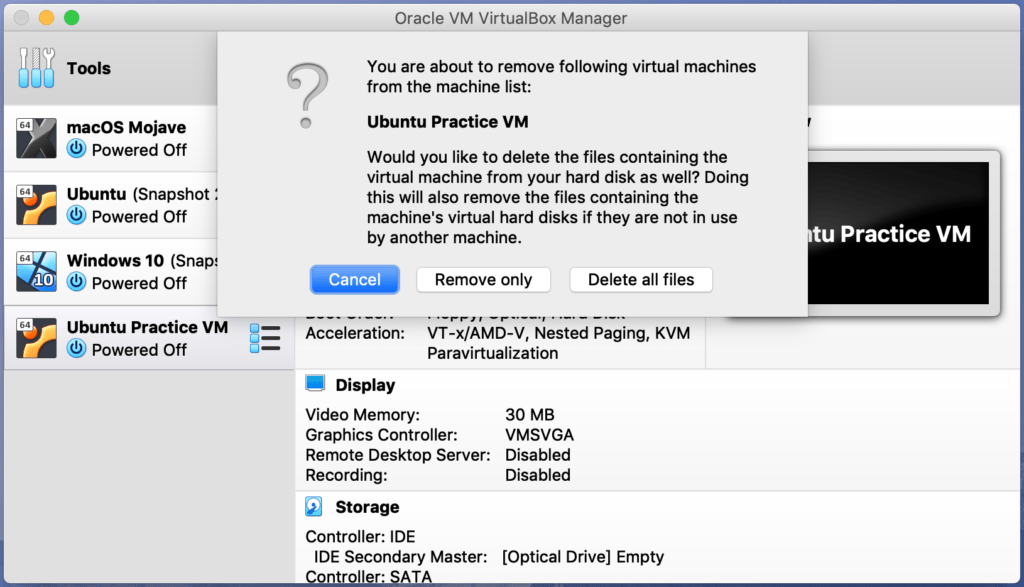
To delete a VM, right click on it in the left pane and select “Remove”.
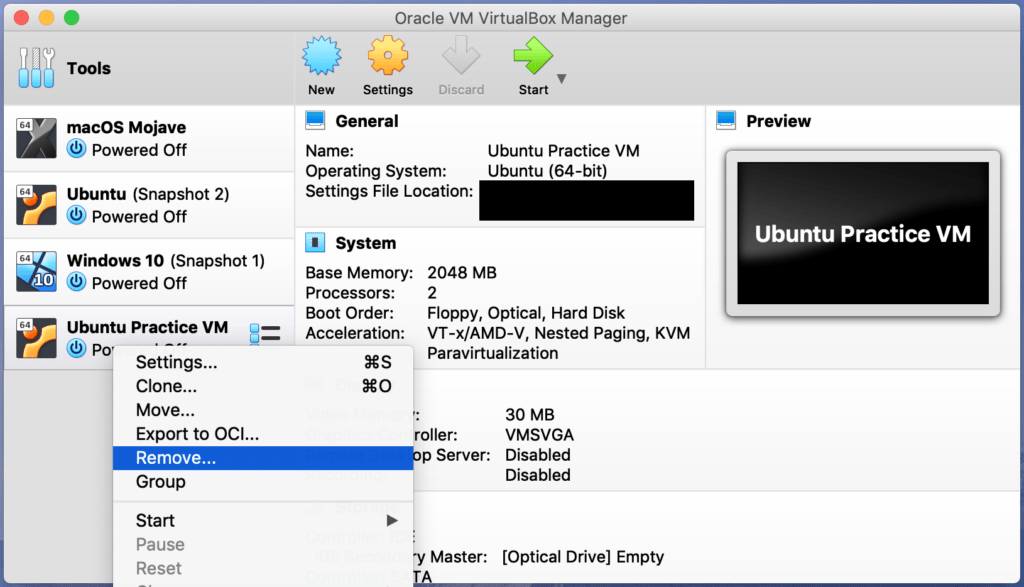
A new dialogue will appear with the options to cancel, Remove Only, or Delete All Files. I recommend selecting “Delete all files“. This will delete the virtual hard disk you created earlier, and prevent it from eating up space on your computer’s hard drive.
Stay tuned!

Image Attribution: VirtualBox Logo By Oracle Corporation – This image may be found in VirtualBox 4.2 for Windows hosts, GPLv2, https://commons.wikimedia.org/w/index.php?curid=24112652
Ubuntu Logo By Canonical Ltd. – http://design.ubuntu.com/wp-content/uploads/logo-ubuntu_no%C2%AE-black_orange-hex.svg, Public Domain, https://commons.wikimedia.org/w/index.php?curid=18296544