I enjoy doing gear layout photo spreads. That may be obvious from my recent paramedic jump bag article, my various EDC articles, etc. Today I’m going to answer a reader query about what is carried on a typical SAR operation. This is my search and rescue (SAR) pack dump.
This article contains affiliate links.
Most of you are not SAR team members. However, this pack is a pretty good representation of a robust, all-purpose, outdoor survival pack. Many of you won’t need some items in here, like the climbing harness and hardware. At least 90% of my SAR pack’s contents is just personal survival gear, however. I carry this pack every time I go into the woods and it is an excellent survival kit. Hopefully you find something of value from my search and rescue pack dump.
Search and Rescue (SAR) Pack Dump
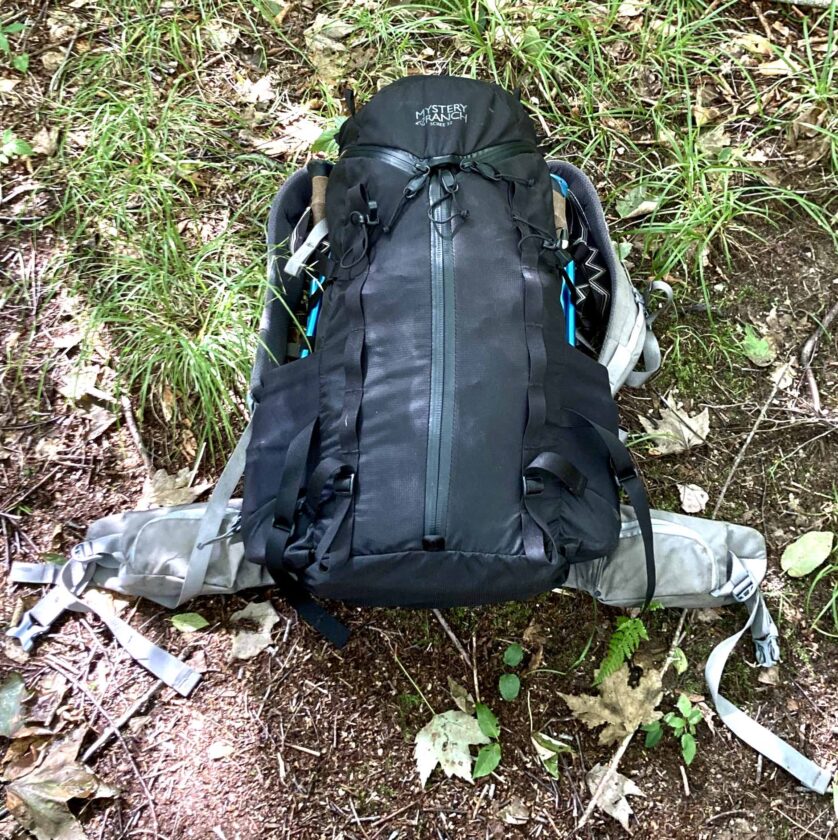
The pack itself is a Mystery Ranch Scree 32. If you’re interested in the pack, I did a full review of it several months a go. I have used the pack on several SAR ops now, as well as about a hundred miles of personal hikes and stand by everything I said in the review. Let’s get into the pockets, starting with the outside. We’ll go left, right, and lid, then get into the main body.
Before we get into it, a quick note on redundancy is in order. You guys have seen what I carry in my HPG SAR Kit Bag and know I have some survival stuff in there. You will notice some overlap in my pack – it contains some redundancies, like a second fire-starting kit. This is not an accident. If, for whatever reason, I found myself with only my pack, I still want to cover those really critical items. Though it’s hard to imagine myself saddling up with my pack and not my chest rig, it could happen.
There’s one other minor disclaimer here: this is only (mostly) my personal stuff. There is team gear that may or may not be required on a search and/or rescue like ropes, a Stokes basket, SKEDCO, or even the patient’s pack that I may end up carrying or helping to carry.With that out of the way let’s get into the meat and potatoes of my search and rescue pack dump.
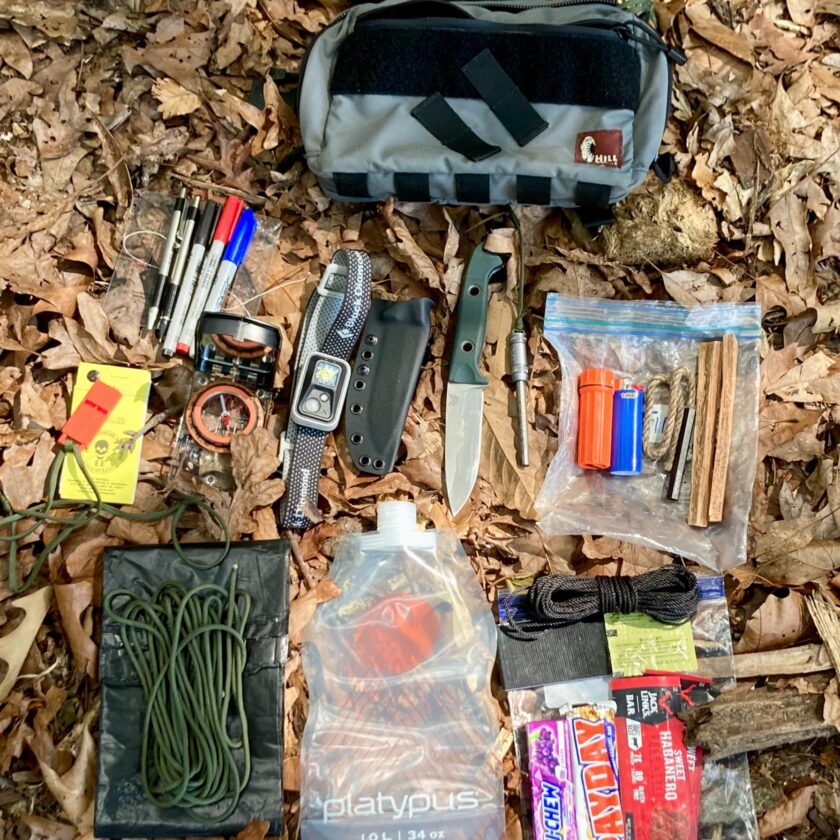
Belt/Side Pockets
The left belt pocket contains a signal mirror and some candy. You’ll notice I carry several packs of Hi-Chew candy. It’s really, really good – sort of the Japanese equivalent of Starburst – and many people in the US have never heard of it. I really enjoy passing out a piece to everyone on my team when we stop for a break on a really arduous hike. On the last search I did I even gave a couple of these to the patient as we were walking out.
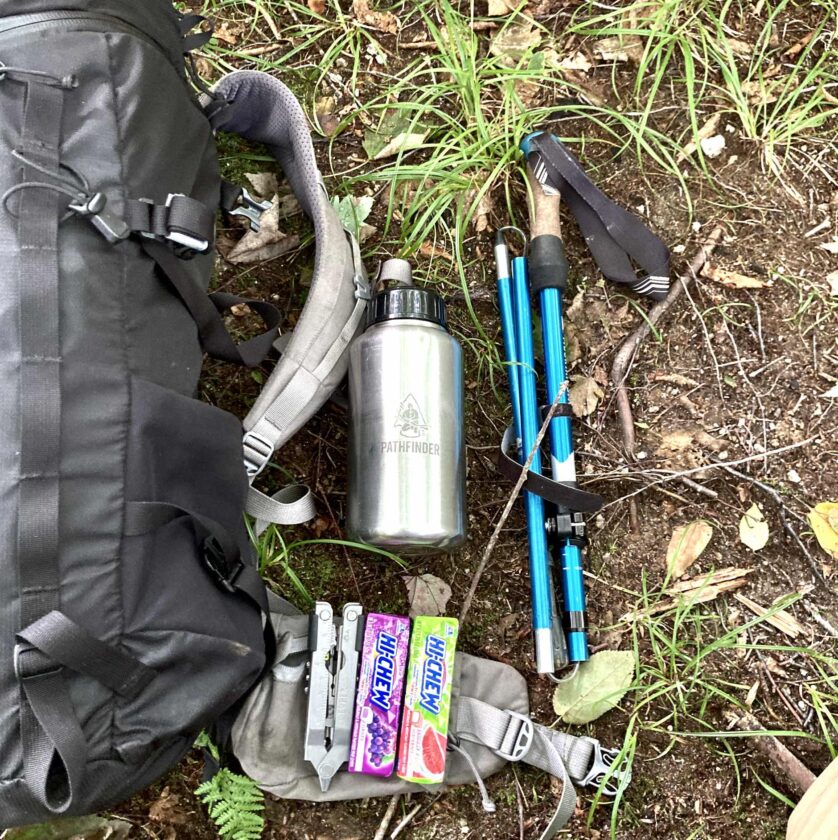
The right belt pocket contains a couple more packs of Hi-Chew (I just restocked) and a Gerber Multiplier. I rarely use the multi-tool but when I’ve needed it it has been really, really handy to have. One item not shown here is a spare car key. It is contained one of these pockets and dummy-corded to the pack. I certainly don’t want to get out of the woods and realize I’ve lost my car key.
I was on a hike when I stopped and took these photographs. Continuing on I realized that I should consolidate all the important, expensive, life-safety stuff into one pocket, and put all the frequently-accessed, easily replaceable stuff (i.e. candy) in another. This change happened as soon as I was back from this hike.
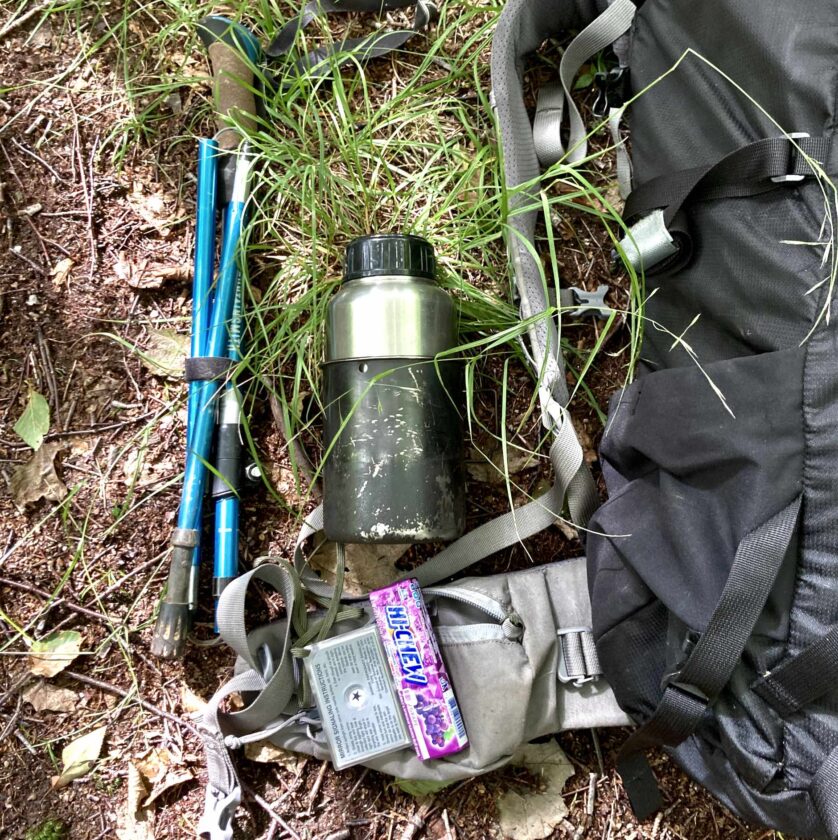
At this point you’ve probably already noticed that my pack also contains two water bottles and a set of trekking poles. The water bottles (and nesting cup) are single walled, stainless steel from Self Reliance Outfitters. I’ve sang the praises of these bottles many times and they have many hundreds of miles on them. The trekking poles are Mountainsmith Halite 7075s. I covered them last year in this article.
Lid Pockets
Let’s take a look in the lid. There are two pockets in the lid. The top one is flat and doesn’t hold much stuff. I use it to store a collapsible dog bowl, since my dog hikes with me a lot. The other lid pocket is much more spacious. It contains a Ziploc bag containing an extra pair of Smartwool socks, a pair of gloves, and a hat. This probably isn’t strictly necessary for summer hiking, but I really don’t change my pack a whole lot from season to season.
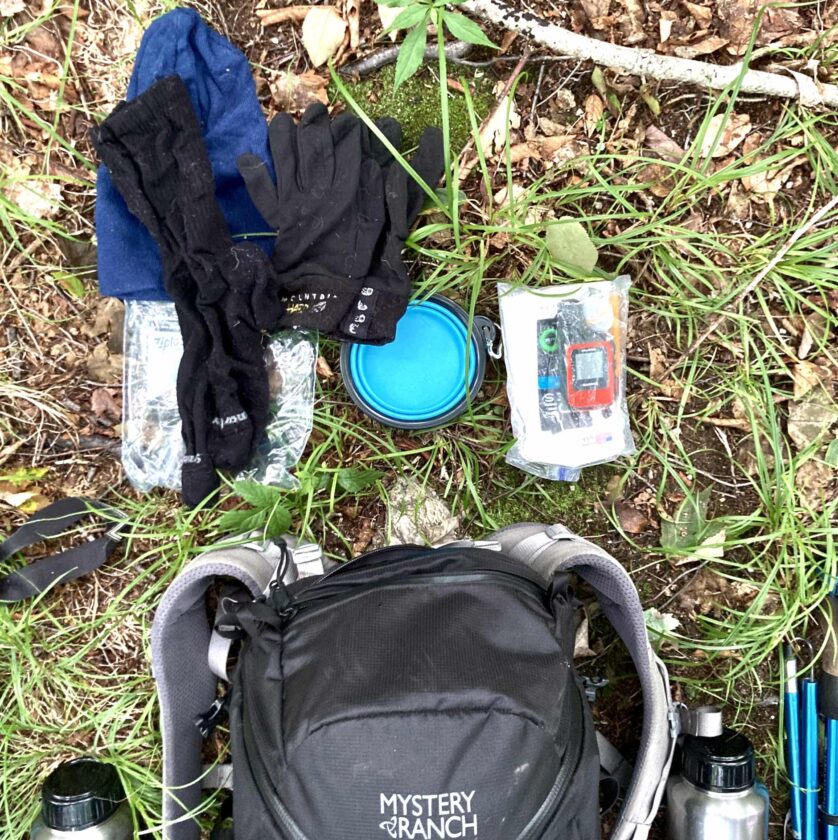
There is also a bag containing some miscellaneous items: a Garmin GPS, some wet-wipes, etc. The GPS might seem like a really important item but it’s a backup navigational tool. I rely on my phone and map/compass as the primary tools I work from. This pocket also contains a Ziploc bag for my wallet and keys. I take them out of my pockets before I step into the woods and secure them in this pouch. Again, I definitely don’t want to get back to my car to discover my keys and/or wallet is missing.
Now let’s get into the heart of the bag – the big main compartment.
Main Compartment
The first things in the main compartment are some items that are important to be able access quickly: a first aid kit and a rain cover. I have covered my IFAK previously so I won’t repeat that here. I have made some minor changes lately to shift from a purely trauma mindset to a wilderness “clinical” model (and lighten my load a bit), but that’s a topic for another time.
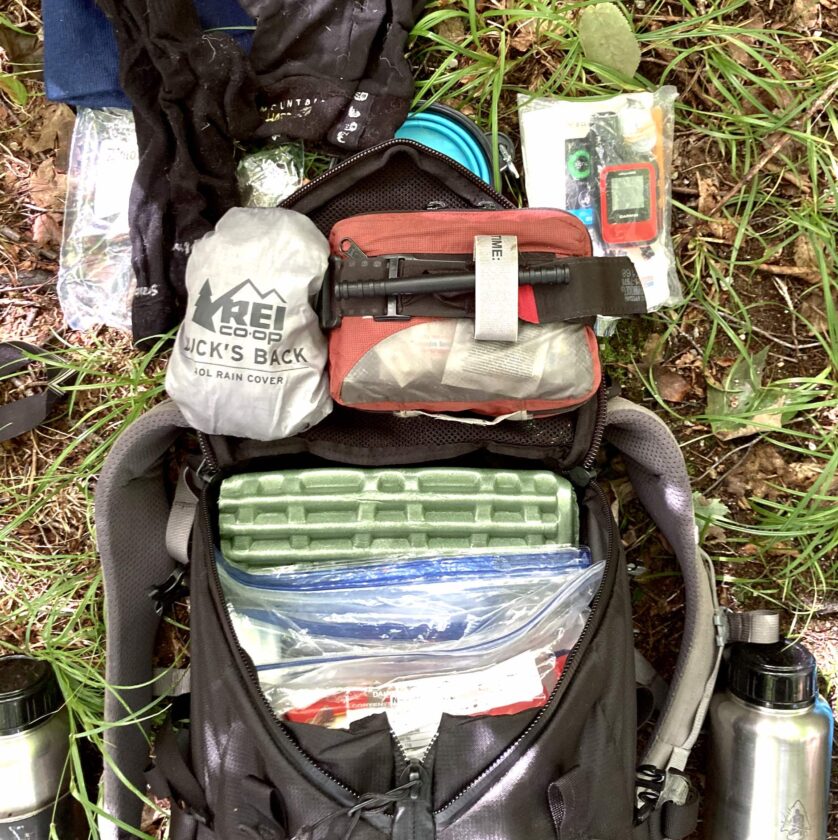
The raincover is a generic cover made by REI. Honestly it’s a little too big for this pack but it works. I’ve used it on several occasions and it’s kept my pack dry. The pack is pretty water-resistant anyway, but during a long downpour I like a little more protection. The rest of the pack is sort of organized with stuff I’m most likely to need toward the top.
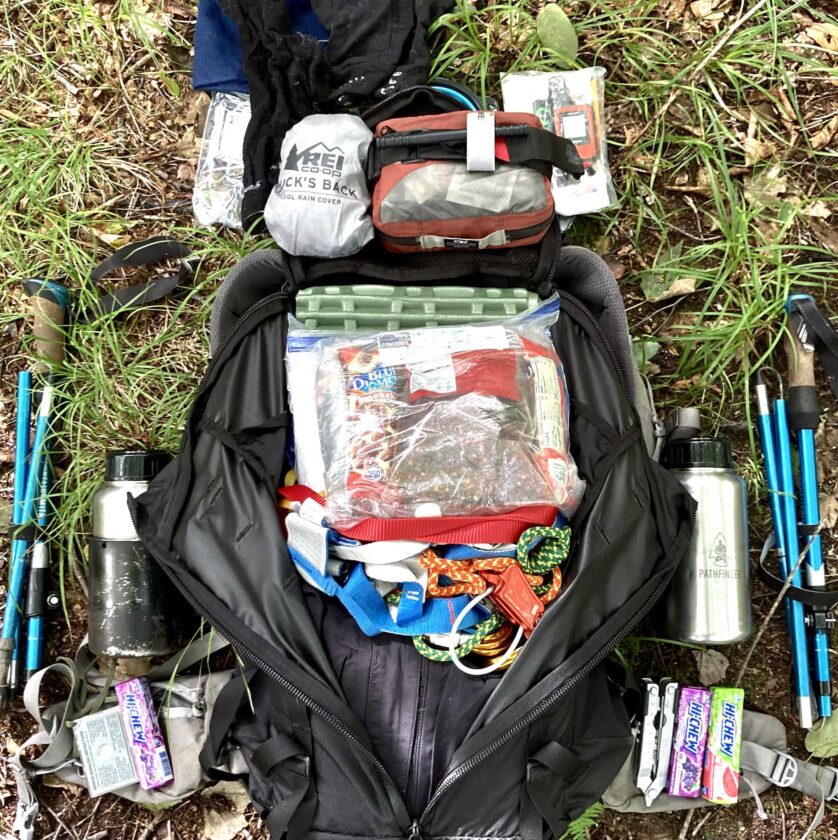
You will also notice that just about anything that can absorb water is in a Ziploc bag. Though this adds a little space and weight it is well worth it. As I talked about in my “how to waterproof a pack” article, a waterlogged pack sucks and ruins a lot of your gear, temporarily or permanently. The exception to this rule is my rope-rescue stuff. It wasn’t in its own bag when I took these photos, but I have corrected that deficiency.
Miscellaneous Bag
I have a 1-gallon Ziploc that is my miscellaneous bag. It contains three smaller, quart-sized bags: shelter, fire, and odds-and-ends. Let’s go through each one.
The shelter bag contains the stuff I need to make a shelter other than my tarp. There are four MSR Mini Groundhog stakes. These things are amazing! They are small, very lightweight, and have amazing holding power for their size. There are two bungee cords, though I plan to replace these with some higher-visibility ones. A bungee cord makes it so fast and easy to get a shelter really taut.
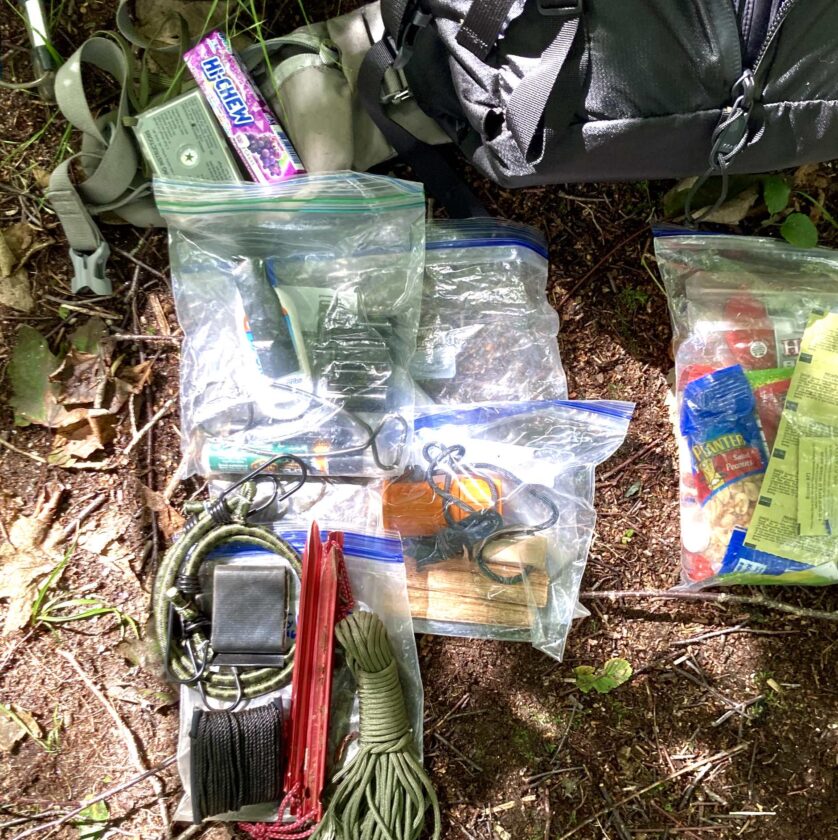
I have some 55o cord, tarred bank line, and 10′ of Gorilla Tape. I would really recommend using a bright color like white or orange for your 550 cord and bungees. The reason is so you can see it and not trip on it, or high-line yourself when you get up to pee at night. The more time I spend building and staying in tarp shelters the more important I realize this is.
The fire kit is a redundancy for the kit in my chest rig. It contains three things: an Uberleben ferro rod, a cannister of UCO Stormproof matches, and some fatwood. This gives me a really reliable tinder, a durable, spark-producing source of combustion, and matches for when all else fails or I need a fire NOW.
The odds-and-ends bag has, well, odds and ends. Currently it contains a small container of sunscreen, a small container of high-concentration DEET bug spray, some spare batteries, an extra flashlight, and my cup hanger. Note that the bottles of liquids are taped shut.
Food Bag
I also keep a 1-gallon Ziploc in my pack as my food bag. I generally keep it pretty topped – we are supposed to ready for 24 hours in the woods. It generally contains a mixture of beef jerky, nuts and trail mix, packs of crackers, and Kind granola bars. I also usually have a couple packs of instant coffee – negligible space/weight, but potentially huge payoff if we get stuck in the woods overnight.
My food bag contains my water purification tablets. They are individually-wrapped Katahdyn Micro-Pur MP1 tabs. I like these because I greatly prefer the post-treatment taste (slightly bleachy) to iodine. The round, tablet-looking items in the kit are compressed towelettes. These things are amazing – they are tiny and weight next to nothing. Dampen them slightly and they expand out to an 8″ square cotton towelette. These are great for cleaning your hands…or whatever.
Rope Rescue Stuff
To be clear, right off the bat, I’m not a “ropes guy.” However, every member of the team has to be ready to get on the rope if needed. Every member of the team also has a little bit of stuff on hand that we can add together to make a decent amount of gear should the rescue turn technical. Here’s what I carry, the standard individual loadout for members of our team:
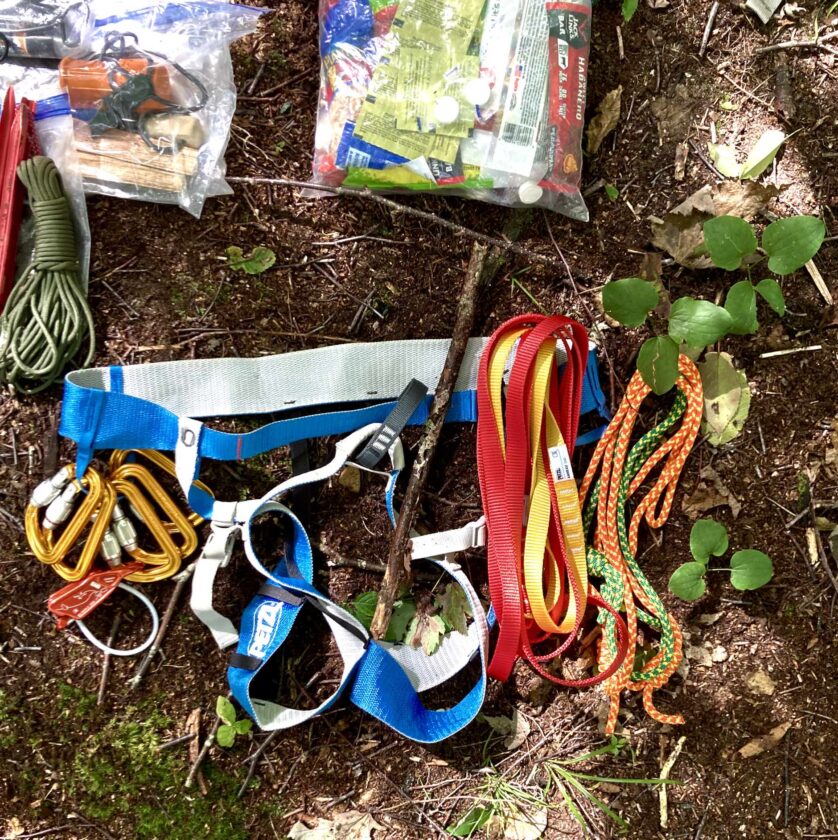
A minimalist Petzl “Tour” harness. If I were a serious climber I imagine I’d want something much more robust than this, but for the intended purpose – safety or quickly getting down to a patient – it’s just fine. I have five carabiners and a Petzl “Reverso” belay device. I have two Petzl “runners” in two lengths, and three Prusik cords. Again, not a ton of stuff but if you add a rope and multiply this by a team of four, you can get some work done.
A couple things are missing here: gloves and helmet. I took my leather Mechanix gloves out and failed to replace them, but that has been corrected by the time you read this. My helmet doesn’t go in the pack; it lives in my car and if a rope rescue is anticipated I will wear it or clip it to the exterior of my pack.
Clothing & Shelter
Moving deeper into the pack is some inclement weather clothing. The first item is a North Face hard shell. I’ve had this shell for 12+ years. I wash it and treat it with Nikwax Tech Wash and Waterproofing detergents and it still sheds rain very well. I don’t have it waterproofed in the pack because if it’s raining that hard, I’ll be wearing it.
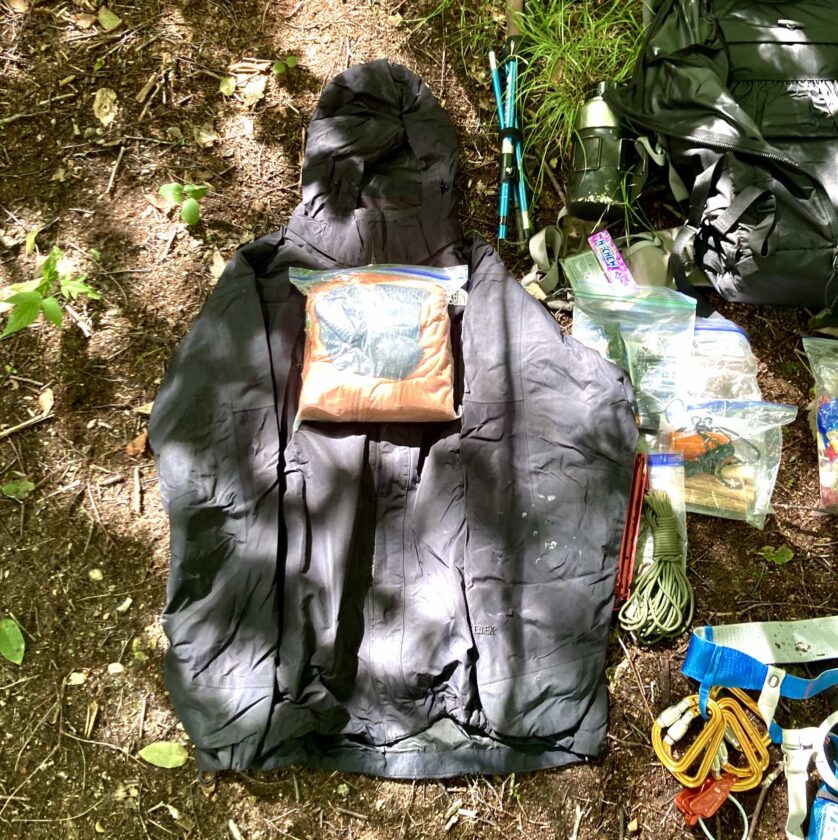
Behind the coat is a Ziploc containing a fleece jacket and another pair of socks. Socks are important. Changing into dry socks can prevent blisters and help keep you warm. The dry fleece is really important, too. Coupled with a rain shell to knock the wind down it can really help to preserve your body heat.
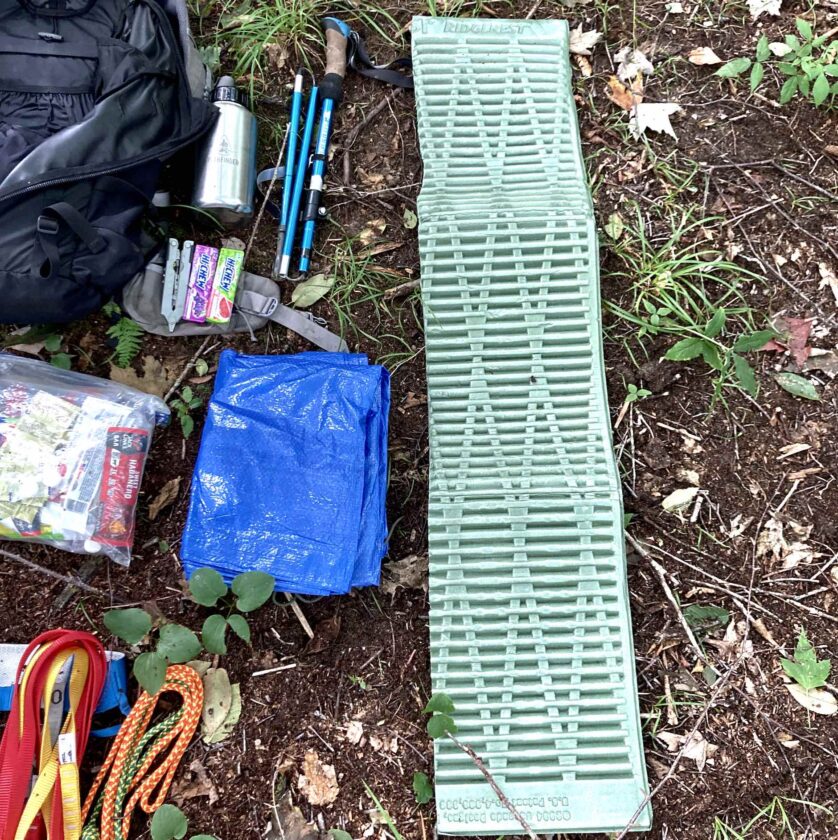
Along the back panel of the pack I have two other items: a cut-down Ridge Rest sleeping pad and a tarp. The sleeping pad is for me if I should end up spending the night out. It will keep the ground from sucking the heat out of me, serves as a comfortable seat, and is important for being able to pad patients in a Stokes basket.
Same with the tarp – it is shelter material for me, but it can also be used to waterproof and insulate a patient. I am currently exploring a replacement for the tarp. This one has been a good tarp, but the grommets have started to pull out of it from use. I am considering a more expensive but (hopefully) more durable Silnylon tarp.
Closing Thoughts
And that is my search and rescue pack dump. I hope you got something out of this, from satisfied curiosity to ideas on how to improve your own survival gear.