Writing about the Helikon Essentials Kitbag recently got me thinking about alternate means of load-carriage. Backpacks are cool, all of us probably own one, but they aren’t the only fish in the sea. Today I’m going to revisit one of my old favorites: the Mountainsmith Tour lumbar pack, an alternative to the ubiquitous backpack.
This article contains affiliate links.
I’m a big fan of my All-Purpose EDC Pack (APEC) but realize it’s not for everyone. Hell, it’s not for me all the time. When I put it together I wasn’t doing very much strenuous hiking – a pretty specialized use-case. There wasn’t that much hiking to be had within an hour or so of the city that I lived in. Now that we’ve moved we’re doing a lot of hiking in addition to the stuff I’ve done with the SAR team.
This little series will be about exploring bag options for various purposes. I have a couple other articles planned, including a sling bag and a chest-pack. If there’s anything you’d like to see me review, let me know! I’ve also reached out to Helikon to see if they’d be interested in letting me review some more of their products.
Mountainsmith Tour Lumbar Pack
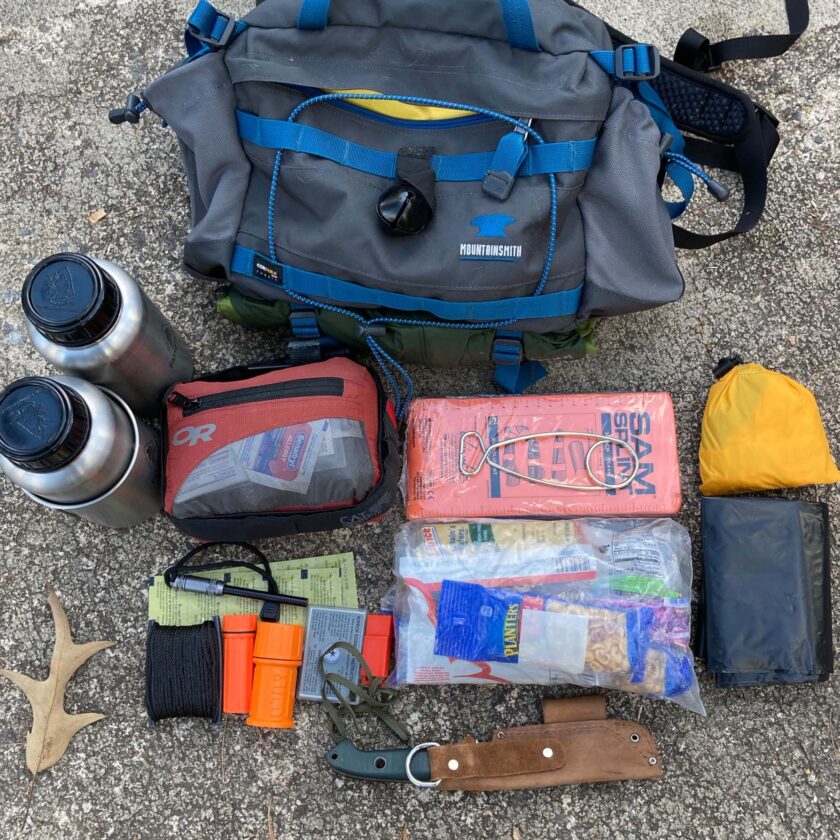
This review owes itself to my exploration of the minimalist survival kit. I decided to assemble such a kit and bought a bag in the process. The bag, while perfect for carrying the basics necessary for wilderness survival, is somewhat less-than-ideal for hiking. So I began thinking about a bag that would carry survival essentials, but also accommodate some other items: a snack, a rain shell or warming layer, an extra quart of water, and a substantial first-aid upgrade.

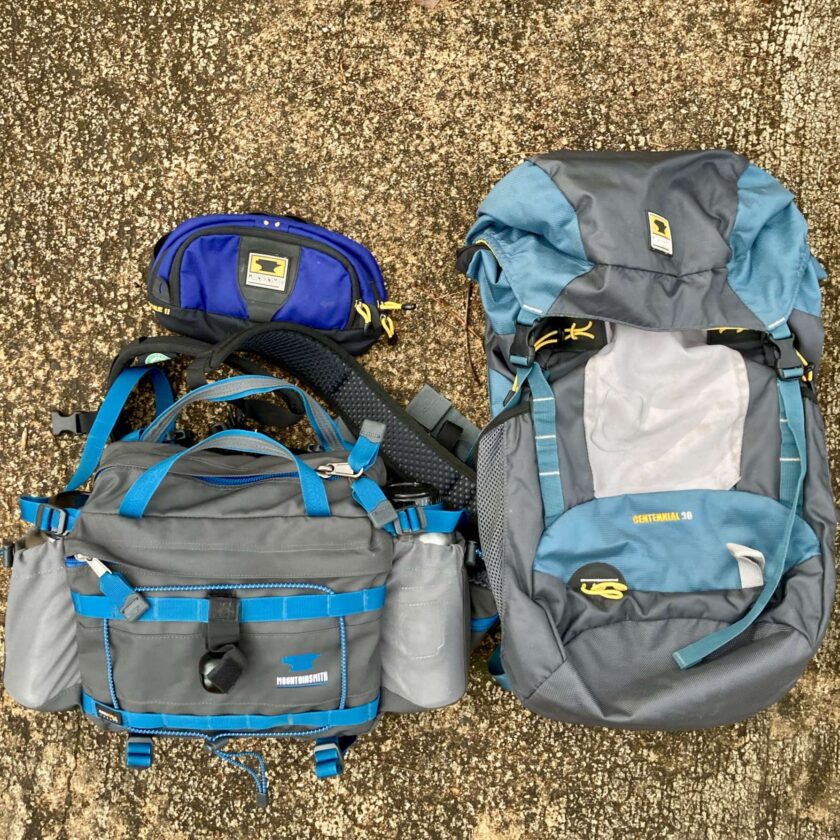
Rather than go out and buy something, I dug out a pack I’ve had for a long time: the Mountainsmith Tour lumbar pack. I own and have owned a number of Mountainsmith products. I currently own a Centennial 30 backpack (discontinued), a Vibe lumbar pack, the Tour lumbar pack (with all accessories I will recommend here), and a set of Mountainsmith trekking poles. Historically I have also owned the Network laptop bag (probably the best laptop bag I’ve ever owned†), the Day lumbar pack, and a Mountainsmith camera bag (exact model unknown). Bottom line: I’m pretty experienced with Mountainsmith gear and I trust it enough to spend my money on it.
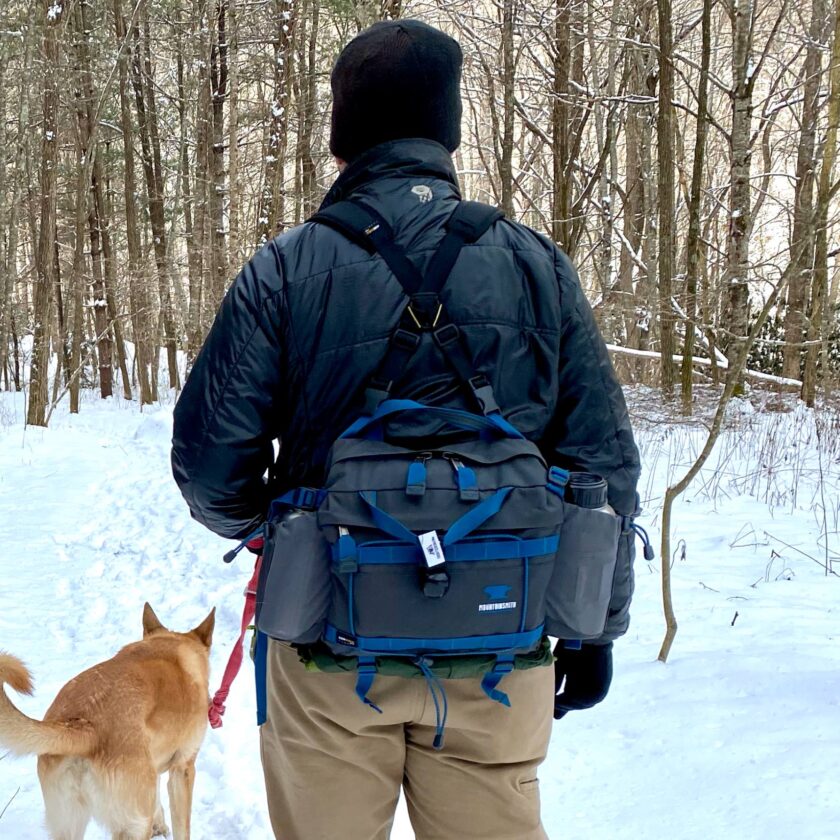
Lumbar packs are meant to be worn around the waist with most of their weight supported on the hips. It’s basically a massive fanny pack, which might not sound terribly attractive but it has some benefits. Because it’s smaller than a backpack it’s – in my opinion – more maneuverable, especially in tighter areas. It’s also much cooler than a pack that covers your whole back. Obviously it won’t carry as much stuff as a larger backpack, but I can pack a pretty decent load into the Tour.
Note on the 2020 Tour: the Tour you will find on Amazon and Mountainsmith’s website will look different than the one you see here. Mountainsmith has redesigned their lumbar series. Though I haven’t personally handled the new ones I have little doubt they are of the same quality and utility as my older model (purchased circa 2016).
Packing the Tour
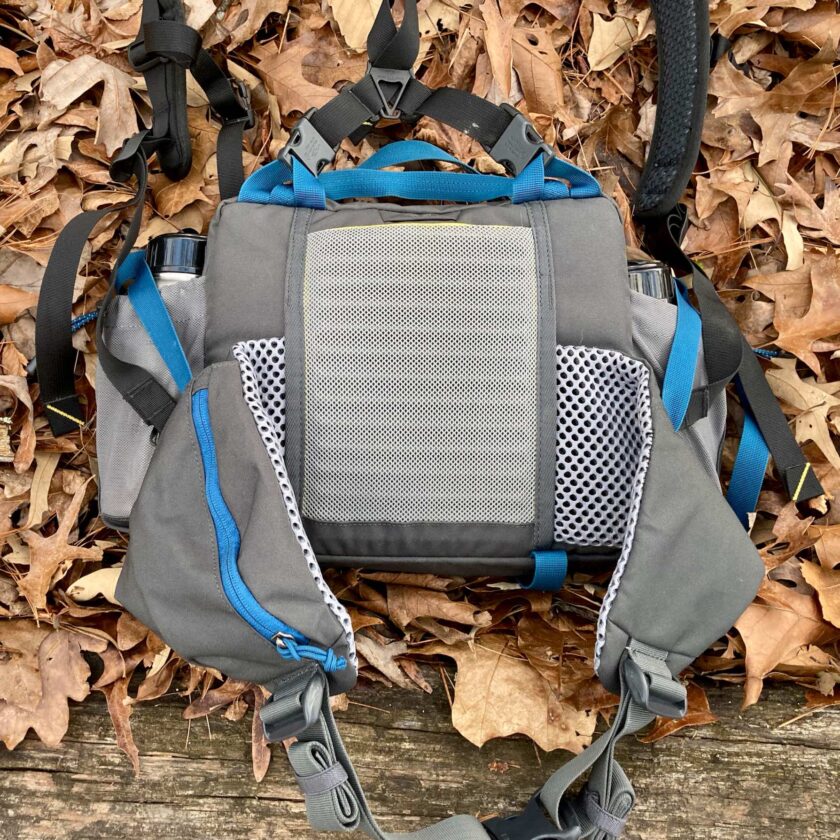
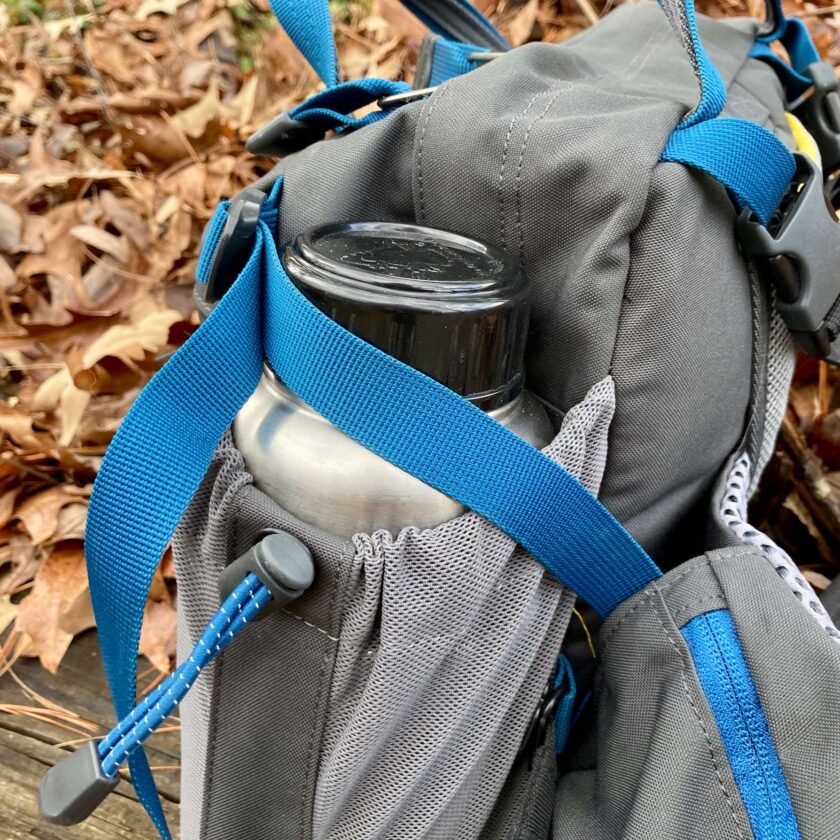
The Mountainsmith Tour is built around a large, main pocket which is book-ended by two water bottle pockets. Each bottle pocket will accommodate a 32-ounce bottle. I was also able to fit my Self Reliance Outfitters nesting cup in one of the pockets. The bottle pockets have a shock-cord draw string that I don’t feel 100% secures the bottles. It’s fine as long as you’re upright and walking, but I’m not sure how it would behave if you had to run, or if you took a serious tumble down a hill. Fortunately there are two tensioning straps that I route around the bottle’s lid, which provides just a bit more security. Unfortunately they tend to slip off when the pack is in use.
The main pocket is my least favorite. It has several sections, but they all eat into each other. First, there’s a main, middle pocket. It has a small neoprene sleeve on the back panel, and a flat pocket on the front. I imagine the neoprene sleeve is for an iPad or similar item; it has an outlet for a headphone cable which is a nice touch. The pouch on the front is great for maps and other flat items, but packing the main pouch full compresses this pocket down to very little.
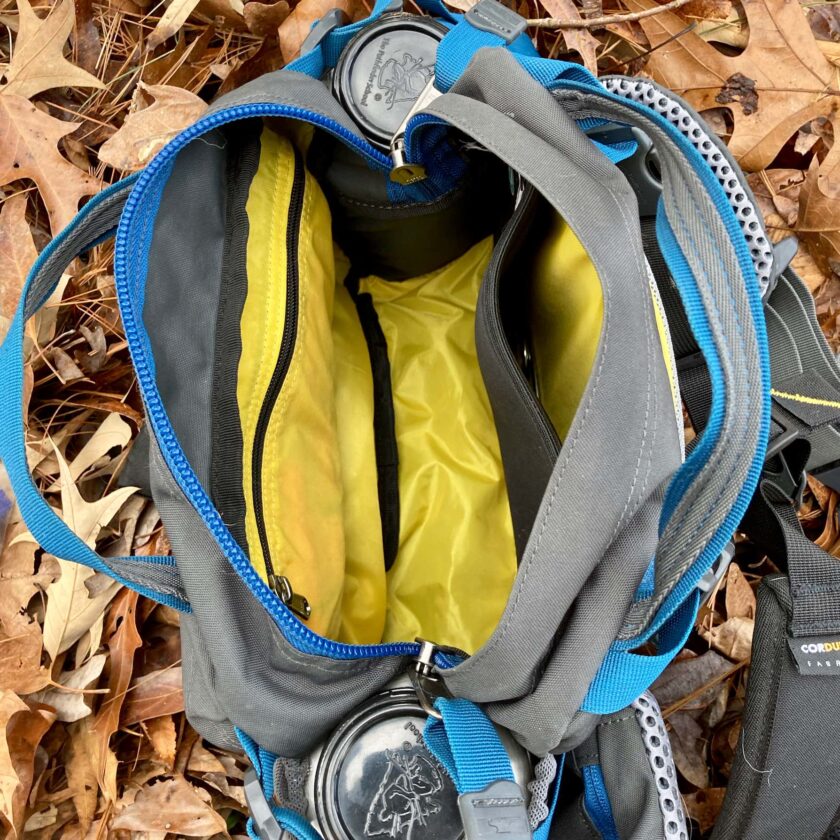
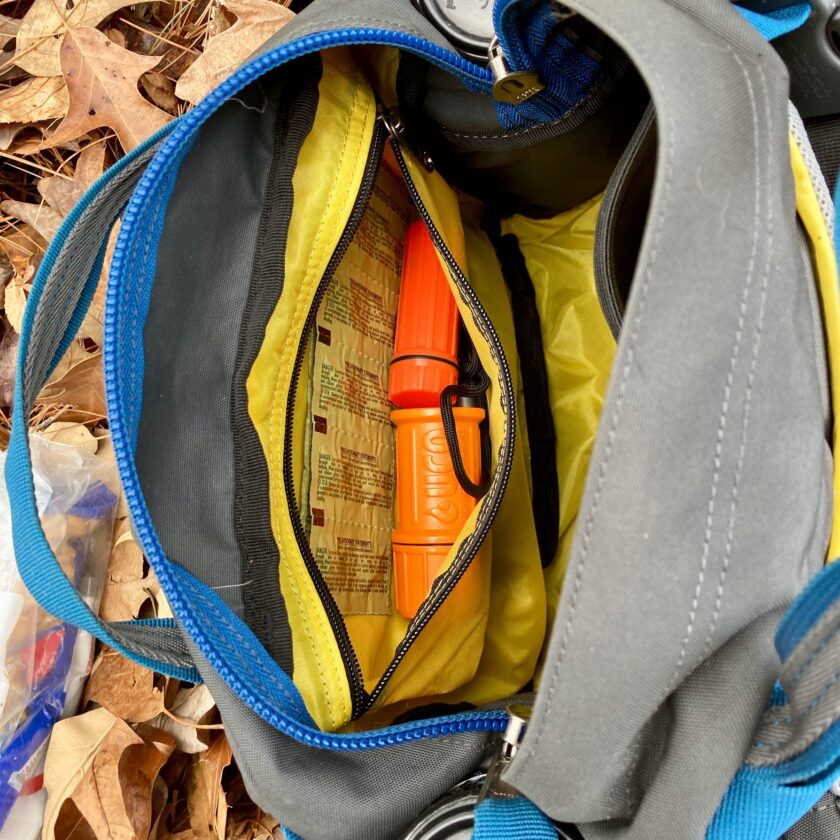
The main pouch also features a small, completely separate zippered compartment called the “Inner Sanctum.” This pouch is intended for the storage of important items. They can be stored separately and, behind two zippers, more securely. This is where I store my fire-starting equipment. There’s also a slot pouch on the exterior back panel. It’s convenient for things like boarding passes but I wouldn’t store anything crucial there during outdoor activity.
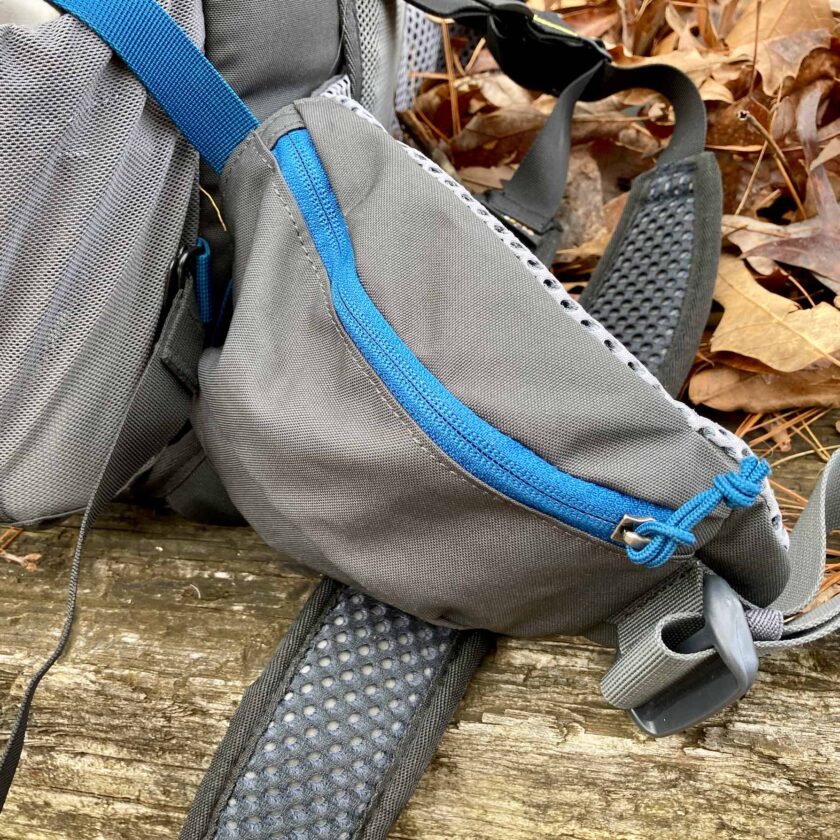
Finally, the right side of the waist strap has a pretty decent pocket on it. I believe it is intended for a cell phone, and honestly it wouldn’t be a bad place to put it. Waist-strap pouches can be hit or miss but this is a pretty good one. I haven’t found the perfect thing to use this pouch for, but so far I’ve kept it stocked with a couple speedloaders.
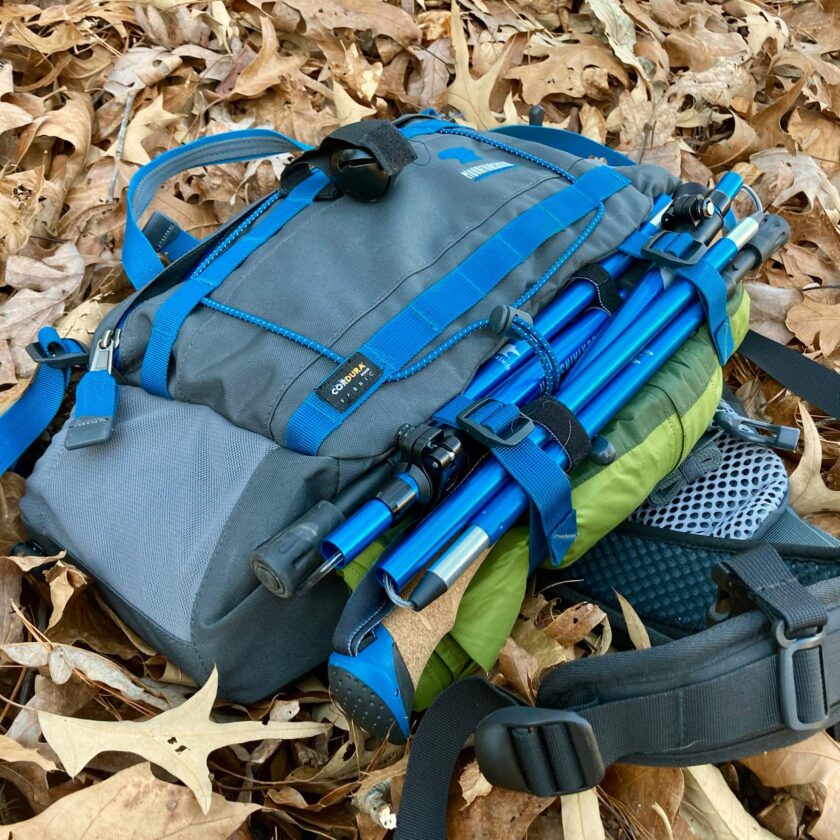
And that’s about it for pouches. The bottom of the pack has two short straps that can affix a jacket or (very) light sweater. I have been using them for a lightweight rain shell, and sometimes my trekking poles. Personally I wish these were just a tad longer, but then I’d probably be tempted to use it for something way too big. The exterior of the front panel also has a shock-cord loop that can be used to affix a small clothing item, as well.
My loadout with the Tour is pretty heavy on emergency gear. I pack my normal first aid kit plus a SAM splint (I consider some orthopedic tools important when reliant on foot travel), two water bottles, a decent bag of snacks, rain cover, fixed blade knife, and emergency gear including cordage, fire kit, and water purification tablets.
Walking with the Tour Lumbar Pack
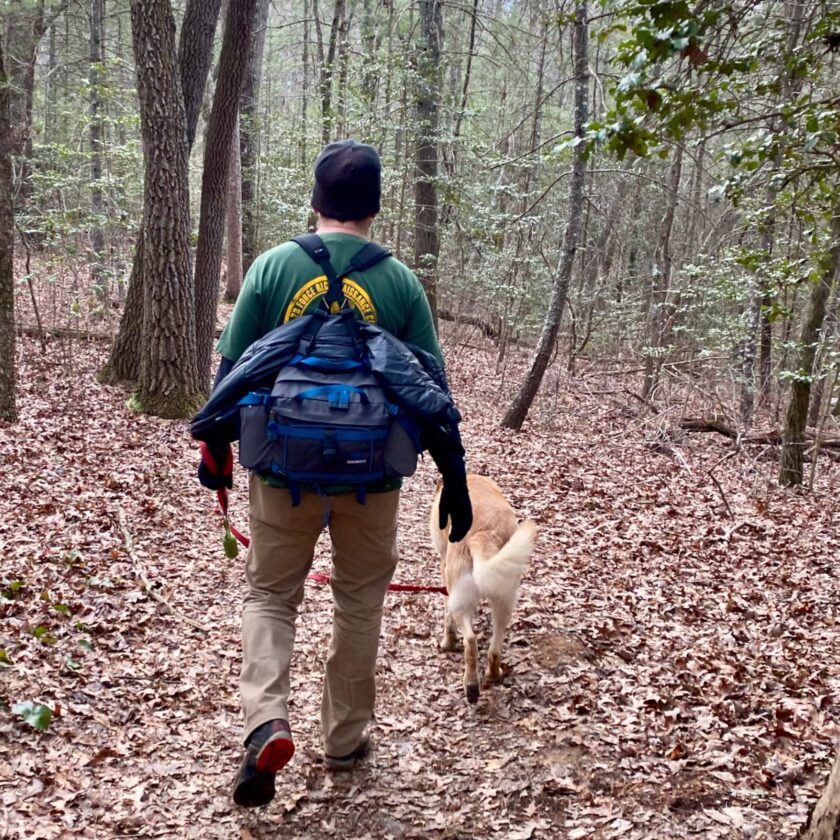
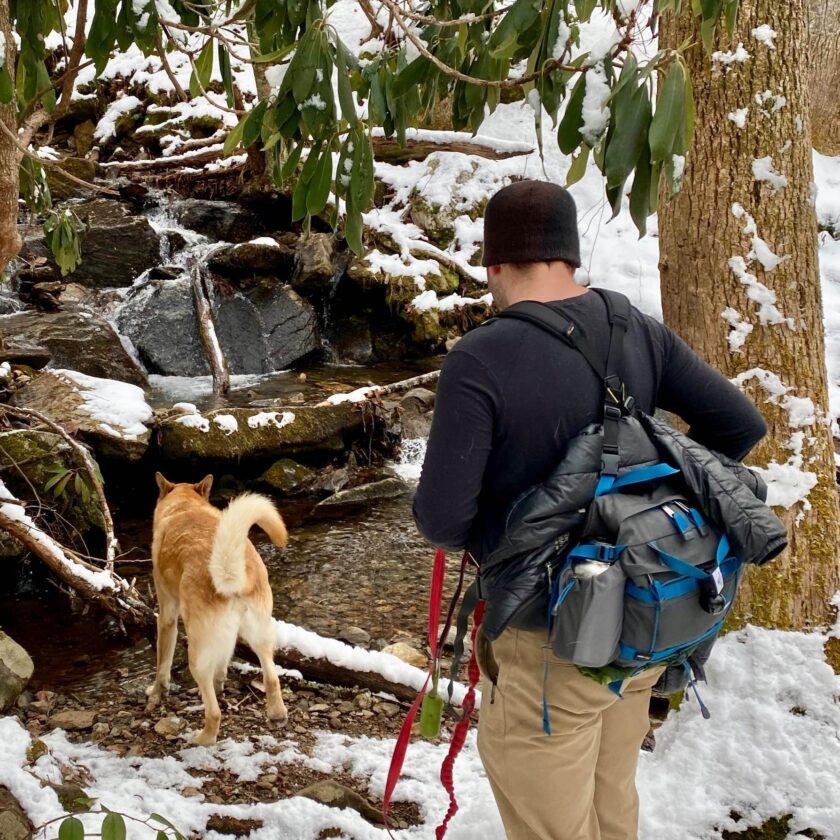
I’m far from the first person to review the Tour lumbar pack, but I was compelled to write about it after a recent hike. The big backpack seemed like overkill due to proximity to civilization (the hike bordered a road), yet the little Helikon didn’t seem like quite enough due to weather (cold with a chance of rain). Ultimately I erred on the side of the backpack, but it got the gears turning. Before we left I asked my girlfriend if we still had the lumbar pack…
And we did. I dug it out the next day and packed it up. It splits a nice difference between the full-blown backpack and the bare-essentials Helikon. It lacks some of the things I’d have in a perfect world, but has room for a a snack, a first aid kit…and maybe a summit beer. I’ve worn this pack on two hikes and have a hike planned for the day this publishes. The first was a 6.7-mile out-and-back over strenuous terrain, half of which was over virgin snow. The second was a 6.9-miler, out-and-back, over easy terrain with no snow. Today’s hike is an easy 6-mile loop, and I have no doubt it will go well.

After walking with the Tour I remembered why it’s my third (fourth if you count the Vibe) Mountainsmith lumbar pack. It is extremely comfortable. Like, really comfortable. I tighten down the waist strap, then relieve any sagging with the strapettes and she carries like a dream. The Tour packs plenty of stuff for longer day-hikes (8 to 12 mile range) in fair weather. To be honest I felt a little under-equipped on my hike considering the temperature (in the 20s) and the snow. If something had gone wrong I would have been really, really cold.
Still, the Mountainsmith Tour is a phenomenal pack. I highly recommend it it if it fits your use-case. I will definitely be using this pack (or some like it) throughout the summer. There are also a couple other lessons learned from hiking with the Tour.
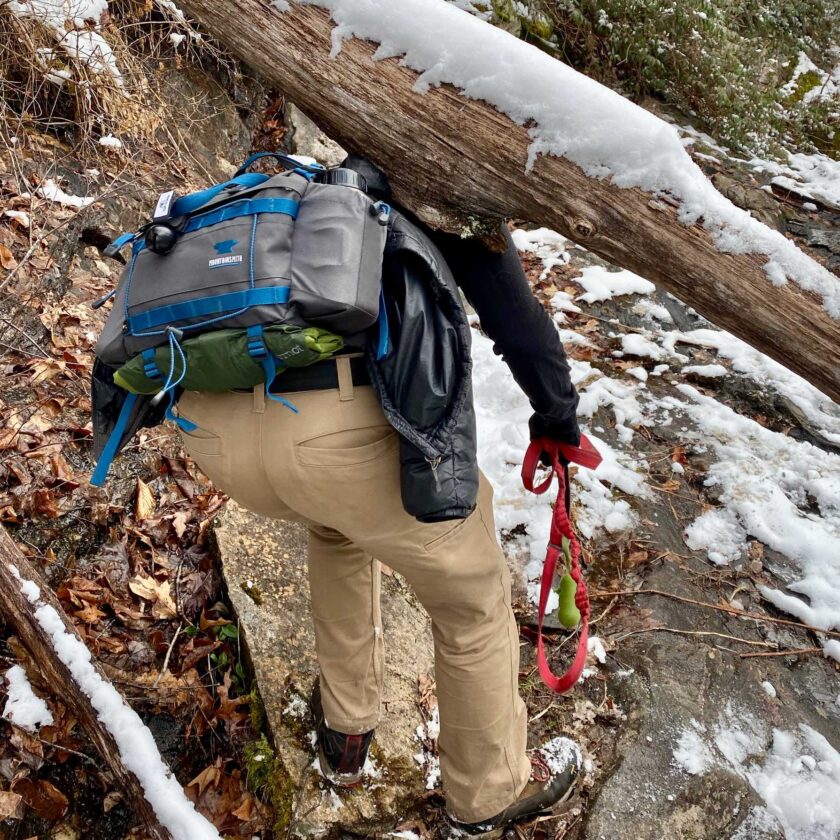
First, you can slide a decent coat between your back and the strapettes. I was adamant about not breaking a sweat on our recent cold-weather hikes. I carefully managed my temperature by openinng my coat, then taking it off as needed. With the coat off I found that I could easily slide it under the back of the strapettes. It kept the coat reasonably secure and it was quite comfortable.
Another one of my favorite features of the lumbar pack is in going under obstacles. Unlike a backpack it doesn’t tend to snag on overhead objects. This isn’t a huge deal but it us pretty common to pass under a downed tree on the hikes we do. It’s frustrating when the top of your pack snags and puts you on your ass. This isn’t a concern at all with the Tour.
Finally, carrying the tour in conjunction with my 1911/Kramer holster was a no-go. The 1911 sat just a little bit low and part of the grip ended up behind the waist belt. This fouled draw attempts unacceptably. In a hurry to find something that would work I dug a revolver out of the safe: my Colt King Cobra/Kramer OWB combo. The revolver rides just a bit higher and presented its grip above the waist band. This will be holster/gun dependent, but and provided me with an acceptable option for self-defense in conjunction with the Tour.
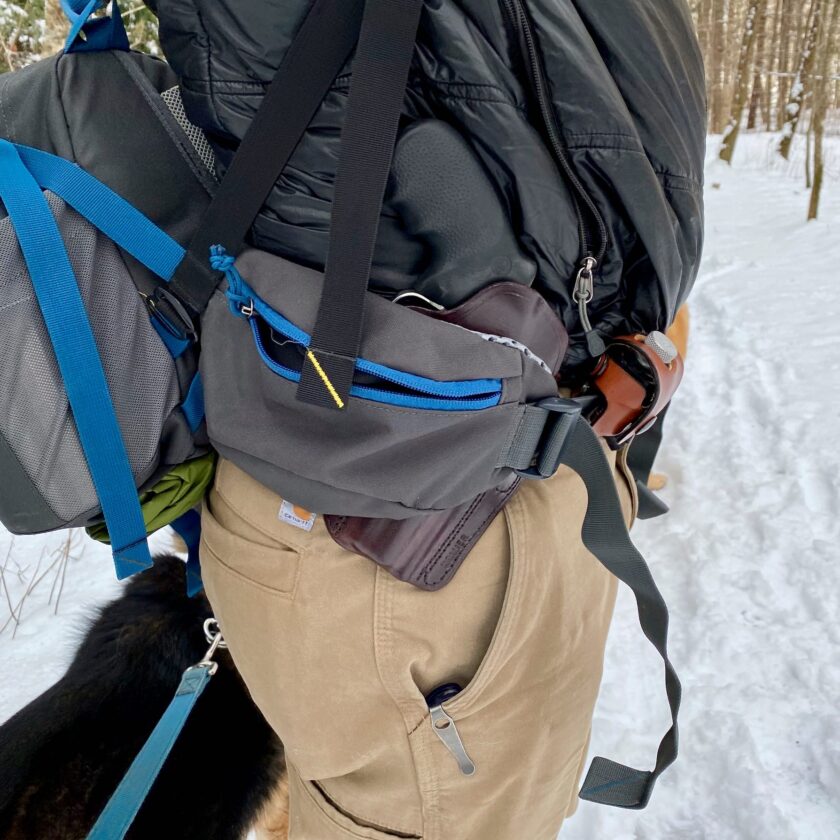
This provided a benefit that I didn’t have the foresight to imagine ahead of time: use with gloves. I wore gloves during the entire hike. The heavy, 10-pound trigger of the Colt revolver requires a very deliberate action to fire, something very desirable when drawing with gloves on. Secondly, the Cobra’s trigger guard is enlarged specifically for use with gloves. Coincidentally, the Tour forced me into a more appropriate option for the conditions.
Tour Accessories
As with most things, I have accessorized my Tour lumbar pack to make it a bit more user-friendly for me. I added (and strongly recommend) the following two accessories. These recommendations apply to any of Mountainsmith’s lumbar packs.
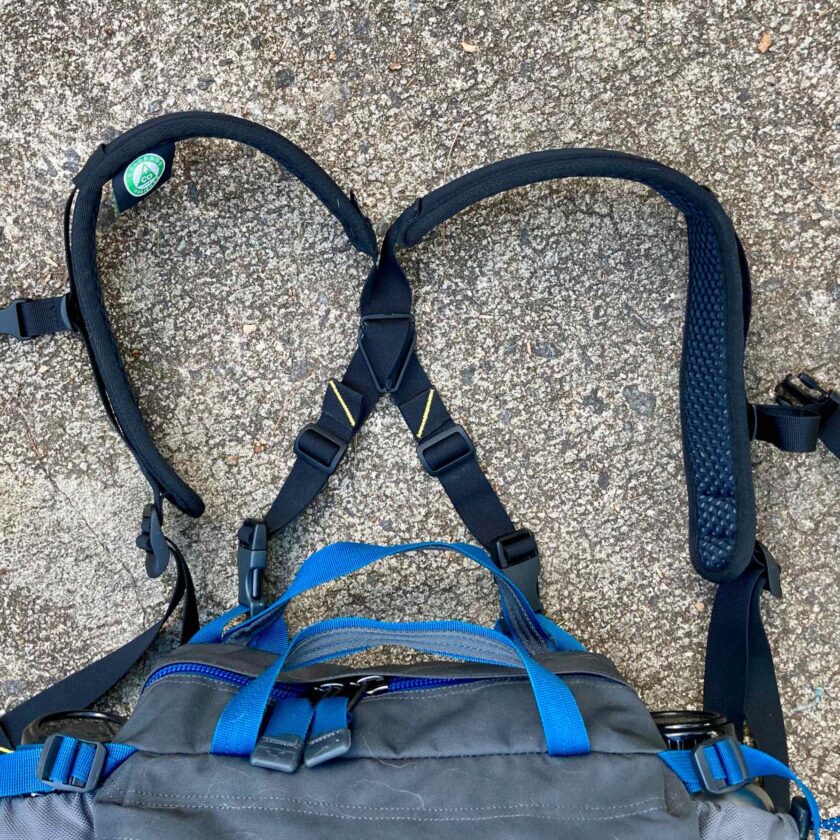
The first are called Strapettes and are the harness-looking straps that go over the wearer’s shoulders. You may be wondering why you would eschew a backpack, yet still desire shoulder straps. Personally, I have never been able to get totally comfortable with the waist strap alone. I do like for it to bear most of the weight, but the pack seems to keep slipping down on my slender hips making my hike and exerise in pulling the bag up and tightening it.
The strapettes are the difference between heaven and hell – with them few packs are more pleasurable for me to carry. They help support the bag and keep it upright. The strapettes are fully adjustable with “permanent” adjustments on the back and quick adjustments on the front. They are nicely padded and come with an adjustable sternum strap. Your mileage may vary; though I recommend trying to pack as-is before spending $30 more on the strapettes I couldn’t imagine using a Mountainsmith lumbar pack without them.
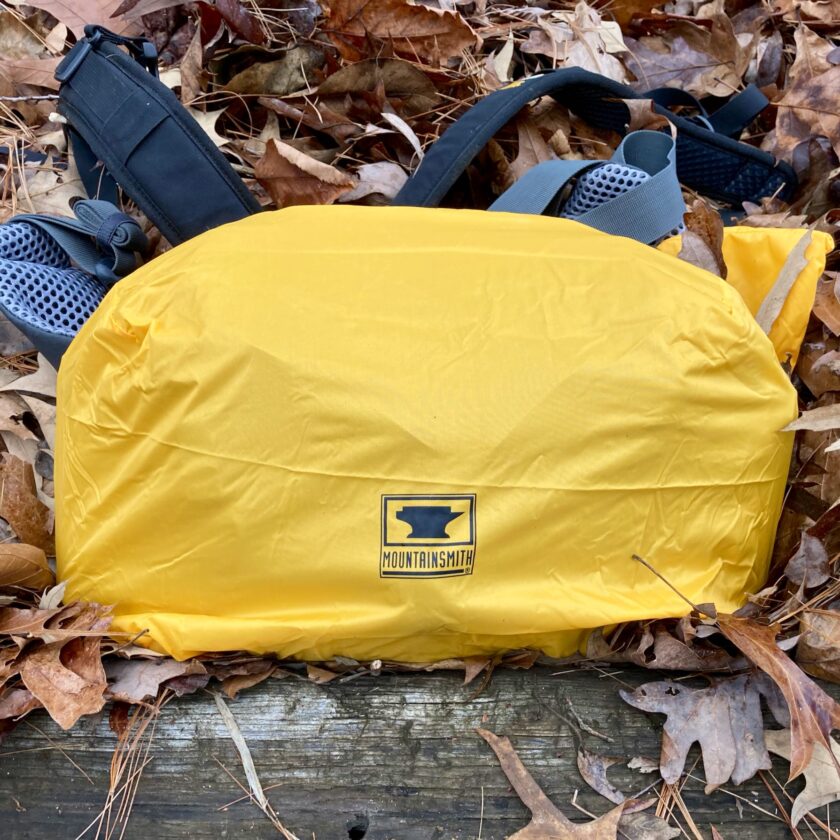
Second – and this one has saved my butt more than once – is a rain cover, and Mountainsmith makes a rain cover specifically for the Tour. I own a rain cover for every pack I own that goes into the wild. When you’re outdoors, it sometimes rains. Wet stuff is heavy stuff. Wet stuff is often ruined or useless stuff until it can be dried out. I like to keep my back dry if at all possible, and rain cover is cheap insurance.
Alternatives to the Tour
If the Tour’s 9-liter capacity isn’t quite large enough – or is too large – there are options. Mountainsmith has been THE name in lumbar packs for a long, long time.
If you want to step up in size the Day lumbar pack is your option at 13 liters. A rain cover is available for the Day and the same strapettes work, as well. I have owned the Day and personally, found it a bit too large for my taste. I’m not a huge guy and found this one big enough so as to get heavily laden. If I need the capacity of the Day I might as well step up to a backpack.
Alternatively if the Tour is too large there are options, as well. The Tour Small is 6 liters, just two-thirds of the Tour’s size, while still retaining the twin, 32-ounce water bottle pockets. Going even smaller is the 5-liter Drift at just over half the size of the Tour. The Drift has water-bottle pockets that will hold bottles up to 24 ounces.
Finally, if you truly demand waterproof rather than merely water resistant, Mountainsmith also makes an IPX7-rated version of the Tour. It is called the Dry Tour. The Dry Tour isn’t a perfect analog to the tour; at 7 liters it’s smaller, and it lacks water bottle pockets. At $180 is almost 3x the price, but it might be worth it if you work or play on/in/near water. The “Dry” line is relatively new and I have no experience with any of these packs.
Closing Thoughts on the Mountainsmith Tour
Lumbar carriage is not radically different than backpack carriage but does have some advantages and disadvantages. Obviously you can’t carry as much stuff. However, you’re lightly laden and more nimble, and this pack could be carried all day without being a burden. The Mountainsmith Tour is absolutely best-in-class in the lumbar pack genre…at least as far as I know.
The size limitation make this less than ideal for cold/wet weather hiking. For fair-weather, three-season hiking the Tour is hard to beat. For the preparedness-minded among you it would also make an excellent emergency “get home bag” to keep in the car, or similar small emergency kit.


†Seriously – it’s an absolute, crying shame that the Mountainsmith Network was discontinued. I could probably write an entire article on how great this bag was – it was perfectly designed. I boarded more than 200 flights with this bag in hand, and unfortunately I don’t think I have a single photo of it (that was in my pre-blogging days…though I did own a couple pretty cool URLs). For some reason I replaced it with another company’s bag and passed it down to my friend, Eddie. I’m not sure why I let my head be turned by another bag. It didn’t end up being half as good as the Network. There’s a lesson in there! There’s also a plea to Mountainsmith: bring back the Network!!!