Wilderness Survival Basics
I was recently asked to teach a wilderness survival class. Though not specifically in my lane of expertise, I jumped at the chance. No guidance was provided other than "wilderness survival basics" and I was given a three-hour block. This article is what I decided to teach. I am making the full content available here to my readers, and to serve as a resource for my students afterward.
This article contains affiliate links.
Of note, I have not taught this class yet. I won't teach it for another month, but I have spent a good deal of time preparing it. I am putting it out here as sort of a pilot. If there is anything gross that I have missed, please let me know! I will update this article as needed and repost it shortly before the class so it can serve as a resource for my students. Thanks for your help!
The Rule of 3s
Wilderness survival is an immense topic and I could have taken any of a dozen different paths or gone down countless rabbit holes. I decided to teach a very broad, very general class touching briefly on the most important aspects of wilderness survival. I used the "Rule of 3s" as a rough outline for the class. In case you're unfamiliar, the Rule of 3s is a simplified way to conceptualize your survival priorities. The Rule of 3s says you can live:
3 Minutes Without Oxygen
There are a lot of different ways you can take this "rule." I generally use it to refer to first aid. I also generally expand on it to say, "3 minutes without oxygen or with uncontrolled bleeding." Those of you who are regular readers of the blog know that I generally support having a robust first aid capability.
3 Hours Without Heat/Shelter
You can perish quickly in environments with extreme temperature conditions - especially extreme cold, especially with a high wind-chill, and especially when you are wet. The ability to shelter and warm yourself is incredibly important.
3 Days Without Water
Though survival kits tend to focus on food, water is a much, much bigger priority. Your body will become depleted quickly with exertion, even in relatively mild climactic conditions. Dehydration will cause your blood to thicken, reduce your body's ability to cool itself, can cause confusion, headache, fatigue, cardiac arrhythmias, and acute conditions like heat stroke.
3 Weeks Without Food
Though it wouldn't be a fun three weeks, your body can last for a while without food. Food can do some good things for us, like help ensure endogenous heat production, maintain energy and high cognitive function, but it's not our immediate priority
3 Months Without Hope
This is my own little add-on (at least I think it is - it is entirely possible that I read it somewhere else). We can't thrive for very long without human contact and ultimately, community and culture. This rule is probably more variable than the rest.
Keep in mind, these are generalities. Under certain conditions you can live for much longer than three minutes without oxygen, and some people can thrive for years with no other human contact. On the other hand, some people die within a day from lack of water, or reach an unrecoverable state after just minutes of being extremely cold and wet. These are a good way to envision the tools and skills one would need to survive, however.
Survival Scenarios
Before we dive into how to satisfy the elements in the Rule of 3s, let's talk about the potential survival scenarios in which you may find yourself. You have a great deal of ability to influence these scenarios with pre-planning and preparation.
Best Case: Don't Get Lost!
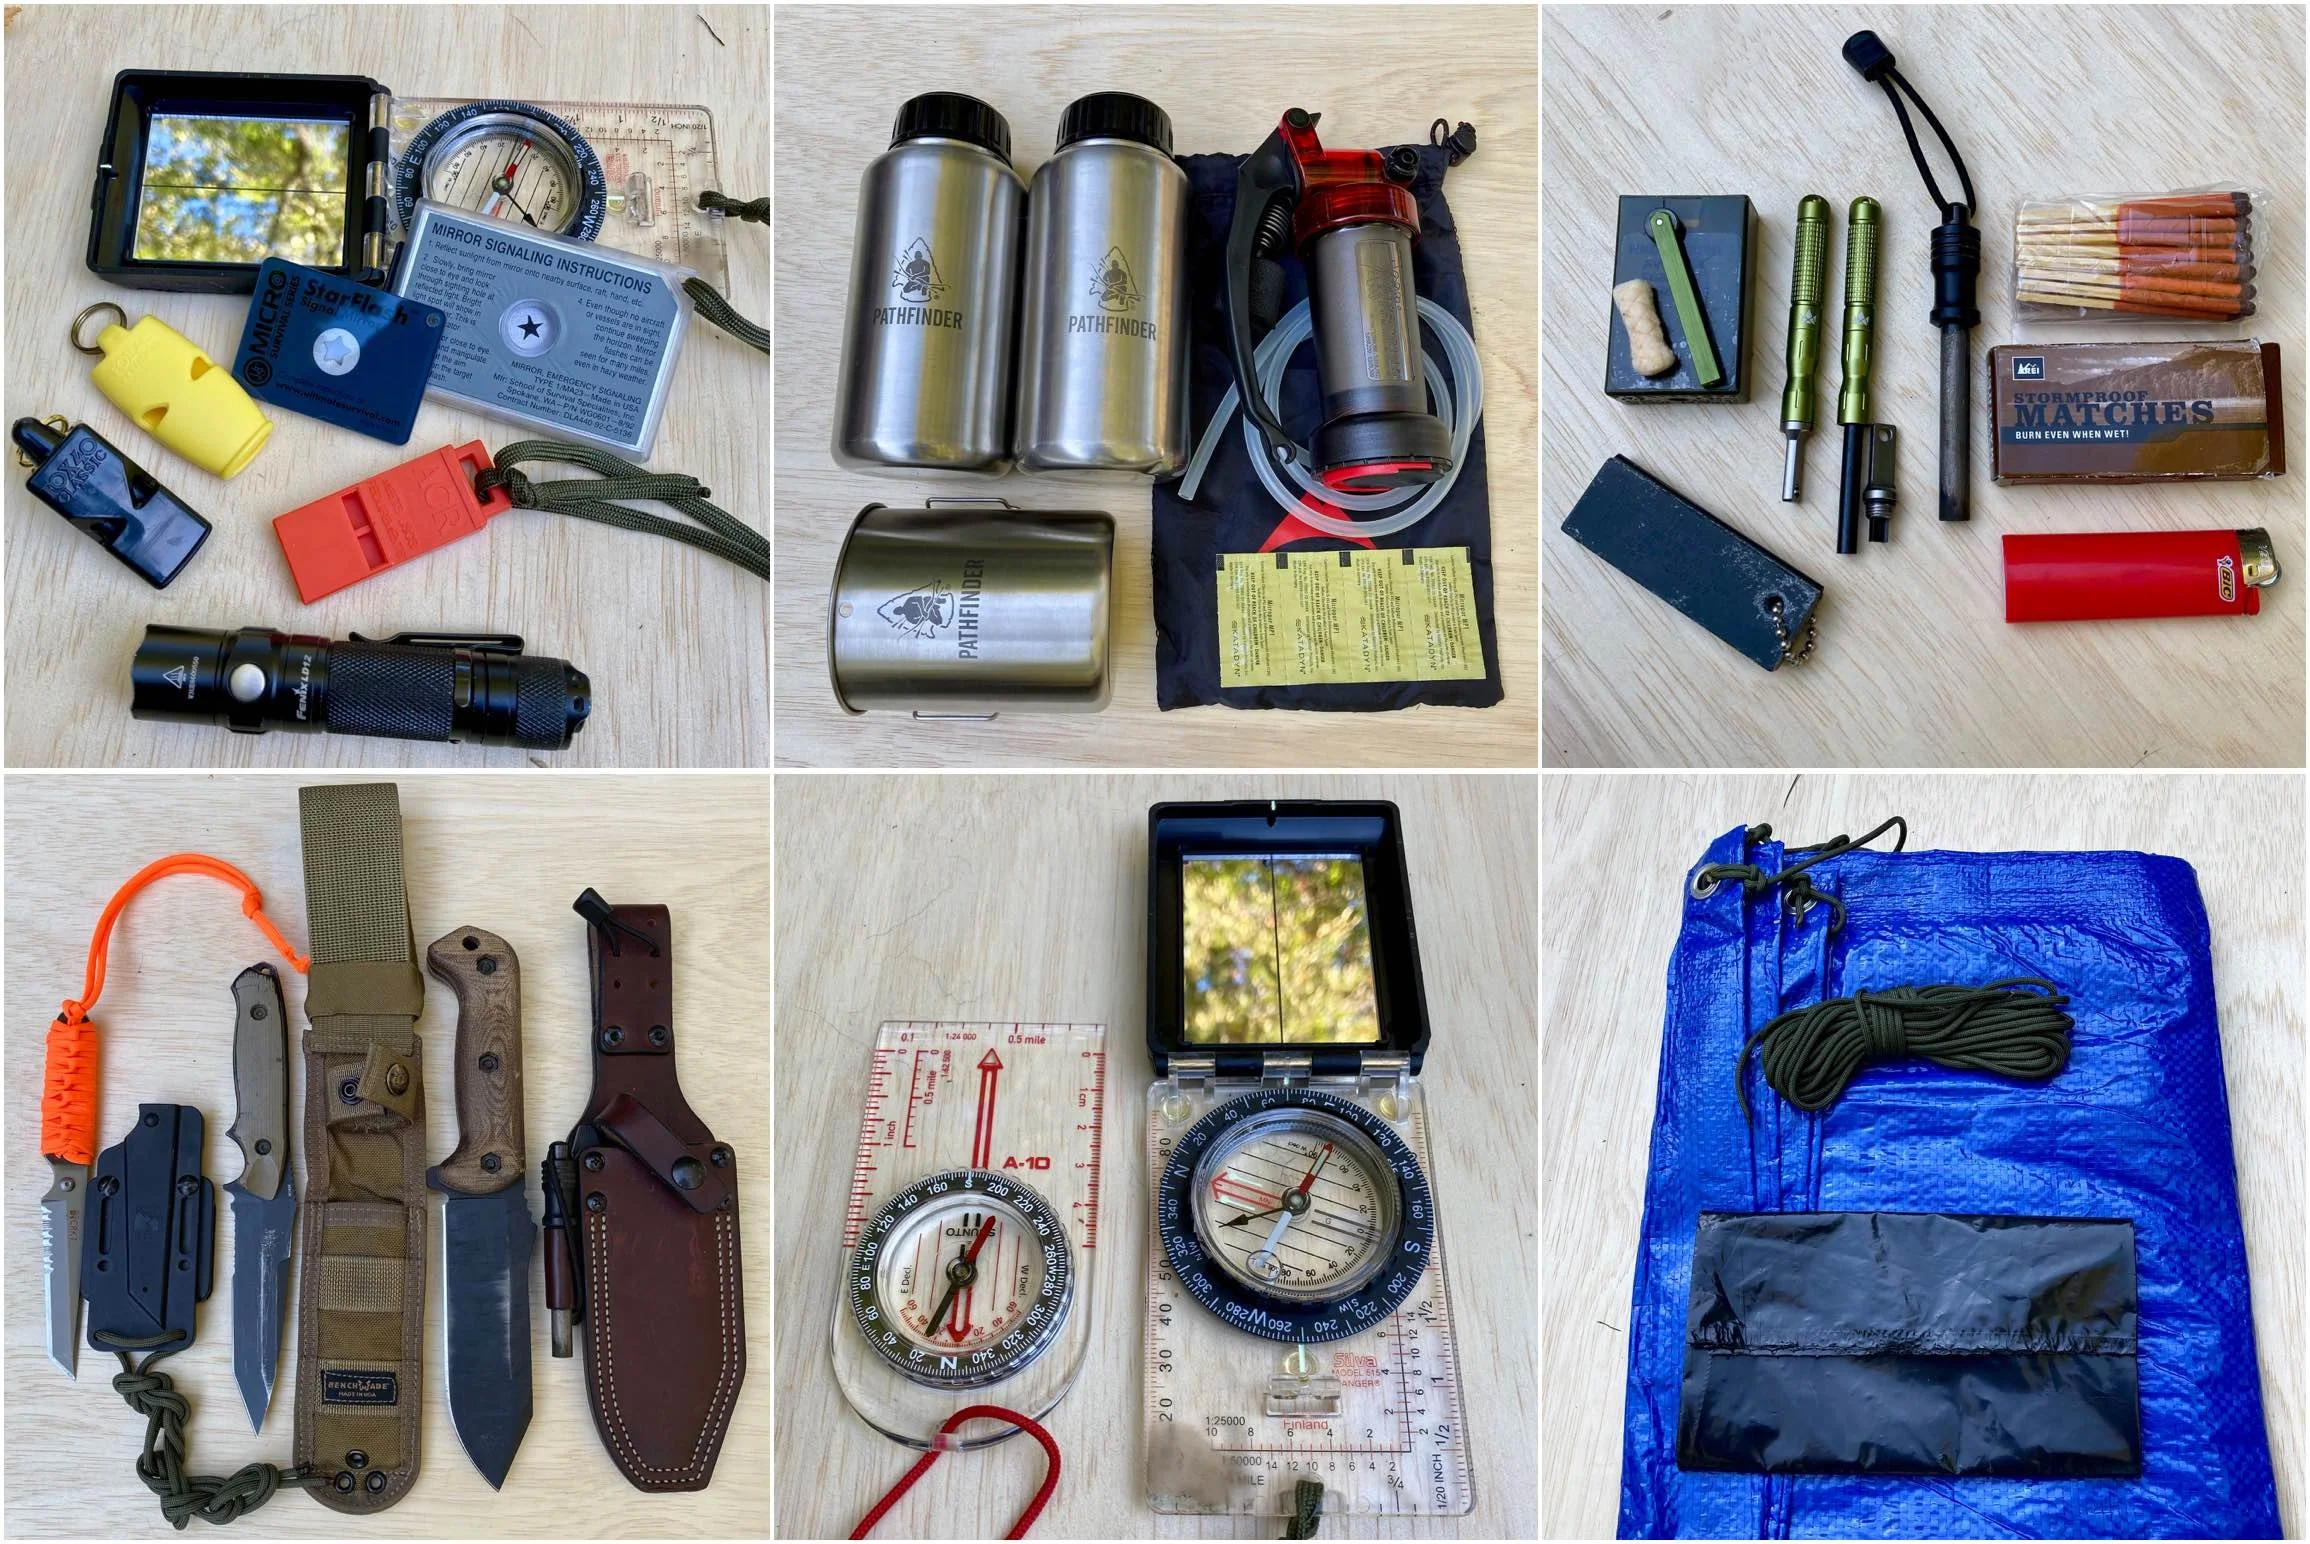
This is absolutely the best case scenario. You get to recreate outdoors, but remain safe, and not put rescuers at risk. You don't even really suffer an inconvenience. How do you do this? Area familiarization will help a lot with this, but isn't always possible. People who may need to survive outdoors are often pursuing the unknown. If you aren't familiar with the area you should have a map and compass, and the skills to use them. Though phone apps and GPSs have become extremely popular, I would still recommend a paper map and a real compass. Batteries die, stuff gets wet/cracked/broken, etc. My personal Silva Ranger is over 15 years old and still going strong.

Second Best: Self Recover Quickly
If you do get lost the second-best scenario would be to sit down, look at the terrain, determine your position, and make your way back to where you're supposed to be. This gets you back to where you need to be before "survival" is necessary, and it prevents rescuers from being deployed for you. At a minimum you should know how to do a little terrain association and shoot a resection ("re is me") with your compass to determine your own location. This one is a bit of a double-edge sword. Be realistic and don't wander around for hours. If you can confidently self-recover, do it. If you're flailing around in the woods, recognize it, stop, and proceed to the next survival scenario.
Third-Best: Signal Well and Get Rescued Quickly
If you do get lost and you can't self-recover quickly, your best bet is a robust signalling capability. The shorter the time you are forced to "do survival," the better. The shorter the time rescuers are on the ground looking for your, the better for their safety. I will discuss signalling tools and techniques in detail but the three main methods are auditory, visual, and radio communication (actual radios, cell phones, locator beacons, etc.).
Getting rescued quickly also includes putting rescue mechanisms in place before you go out. I wrote a detailed article on emergency and recovery protocols recently.
Worst-Case Scenario: Survival During an Extended Recovery Time
If you get lost, cannot self-recover quickly, and cannot signal rescuers, you may be in for an extended recovery time. Though I love the idea of making bushcraft bowls and spoons, this is the last place you want to find yourself. All of the survival tools and skills I discuss will help you in this scenario, but if you should do everything you can to avoid it.
Now let's get into the skills and tools of survival. We will begin by talking about two items that don't fit neatly into the Rule of 3s, but are very important: Signaling and Knives. We will then discuss providing for oxygen, warmth/shelter, water, and food. Then we will discuss another set of items that defy neat categorization: fire.
Wilderness Survival Basics: Signaling
Being able to signal rescue is maybe the most important tool you have. It is truly one of the "wilderness survival basics." The faster you can get rescued/extracted/repatriated/whatever, the less you need the rest of the stuff discussed in this article. Unfortunately signaling gear doesn't fit neatly in the Rule of 3s model, except that in a roundabout way it can handily provide for all of your needs. Signaling is incredibly important, but terribly overlooked - it's just not as cool as knives and fire-starters. But we'll cover it well here. Let's look at the three types of signaling tools we have: auditory, visual, and radio communication.

Auditory Signalling Devices
I have had the good fortune to be involved in several successful search-and-rescue operations. One such operation occurred when a couple and their 9-year-old went for a morning hike, got turned around, and didn't get rescued until early afternoon...the following day. They were found because their son was a Boy Scout and had a whistle on him. I've always slightly discounted the whistle until then; now I totally see their value.

The whistle is the most common auditory signaling device. The shrill noise from a whistle is both louder and carries better than a human voice. It requires no batteries, no "ammunition" like a flare, and is safer than firing a gun. Whistles are cheap, compact, and ultra-lightweight. The gold standard of whistles is the Fox 40. The Fox 40 is pea-less, meaning it doesn't rely on an internal pea which might be lost or frozen to the body of the whistle. The ACR is another good pea-less survival whistle that's a bit smaller than the Fox 40 but also maybe a bit more fragile.

If you don't own a whistle but have a relatively new backpack, examine the sternum strap buckle. Many manufacturers are now integrating whistles here. The photo above shows the sternum strap buckle from my girlfriend's Gregory backpack. It's not as loud as my Fox 40, but it's a lot better than yelling.
Visual Signaling Devices
Visual signaling devices produce signals that can be seen by rescuers and include signal mirrors, flashlights, and fire. I'll cover fire at the end of this article. Signal mirrors are awesome. They require no batteries, are very compact, and can transmit for five or more miles on a sunny day. Unfortunately signal mirrors don't work at night, but they're definitely worth having. If you don't want to carry a dedicated mirror your compass may have a built-in mirror like my Silva Ranger, and many shiny surfaces can be polished into a mirror-like finish. Make sure you practice with your mirror before depending on it.
Flashlights are an excellent visual signalling device, and there are a lot of other reasons to carry a flashlight. I have reviewed quite a few compact, AA-powered lights on this blog (my favorite, and my EDC light, is the Fenix LD12 [my review]). In all my reviews I have criticized strobe functions. However, if getting someone's attention is your goal, the strobe is probably a really good thing to have. The Fenix LD12 has a strobe that is accessed by holding the button on the bezel for two seconds. I have yet to accidentally activate the strobe, and it's nice to know it's there.

Fire as Signalling
Finally, fire is an excellent signaling tool. It works night and day, with light signaling at night and smoke signaling during daylight hours. To get a big, bright fire use dry wood; to get lots of smoke throw damp or green material (like pine needles or leaves) on your fire. Though gathering firewood requires a lot of effort, a fire is a passive signal that you can just "leave on" while you're doing other things. I will discuss fire-starting gear at the end of this article.
I won't cover radio communication devices in detail here, but this includes things like cell phones, handheld radios, and personal locator beacons. It is up to the individual to choose his or her own path with these tools. The one thing I will say: if you have cell service, use it! If you have persons in your party with different cell carriers, have someone with each carrier check his or her signal periodically. Don't count on cell service in the backcountry but use it if it is available to you.
Wilderness Survival Basics: A Knife
The knife is the universal survival tool. It is the most basic of wilderness survival basics. In some way it supports every single one of the Rule of 3s in some form or fashion, so it is treated separately. I am convinced that you should not be without one anytime the carry of a knife is legal and practical. This is especially true if you are venturing into the woods. I'm not a "knife guy" - I can't tell you about different blade steels and that sort of stuff, but I will throw out a couple of considerations here.
Folding Knives
Folding knives are generally much more convenient to carry. You can put them in a pocket and many come equipped with a pocket clip. The handle of the knife usually protects the blade, eliminating the need for a sheath. Folding knives are much more socially acceptable to have on one's person than fixed-blade knives. However, folding knives are almost always less robust than a fixed-blade of comparable quality.

Folding Knife Recommendations
As with most things, you get what you pay for, at least up to a point. Spending $100 to $150 will get you an excellent folding knife. Spending much more than that will probably be an exercise in diminishing returns. Here are a couple of folding knife recommendations.
- I carry the Spyderco Paramilitary 2, the blue version, which is a bit more expensive because of the steel used in its blade. This knife is recommended with zero reservation. It has an excellent handle size, is lightweight, and a nice, non-threatening look. It's made in the USA and along with the Spyderco Sharpmaker (my review) it stays razor sharp. If you're on a tighter budget the Spyderco Tenacious is also an outstanding knife, though it has a weaker liner lock, cheaper blade steel, and is made in China. Still, with care it would probably last a lifetime.
- The Benchmade Griptilian is a classic "survival" folder. It is an extremely well-known and well-designed knife with a good grip area, cutting edge, and Benchmade's patented AXIS lock. The Griptilian comes in a ton of handle colors and blade styles (and finishes). I have a Griptilian (somewhere) and though it has never been my primary knife I have always really liked it.
Fixed-Blade Knives
Fixed-blades have some huge advantages over folders. They are way more robust. There are no moving parts to give out, wear out, or flat-out break. Fixed blade knives can tackle bigger chores, more reliably. Unfortunately they require a sheath to carry, are usually larger and heavier than folders, and are far less socially acceptable.
There are a few features I would look for in a fixed-blade knife. The first is size; the larger the knife, the more stuff it can do. The Becker BK10 below (far right) is an outstanding chopper; you can baton firewood with it, you can chop down small trees, and other medium-duty tasks. The other two knives probably wouldn't fare super well. However, the BK10 is also bulky and heavy, so there is a balance here. Another feature is the blade shape. Look at the knife in the middle, the Benchmade Nimvarus; it has a very narrow, "stabby" tip, which could be easily broken. It is not an ideal knife for wilderness survival.

The only feature I absolutely demand in a fixed-blade knife is a full tang. This means that the knife is basically one long, solid piece of metal with some material slapped on the sides to serve as handle. All three of the knives below are full-tang knives. This greatly reduces the chances of the knife breaking and is a pretty common feature. You don't run into many non-full-tang knives, but they are out there. Some specific fixed-blade recommendations:

Fixed-Blade Recommendations
- Large Knives: The Becker BK10 is an excellent outdoor knife. I got mine for free and upgraded the handles and sheath, and I told that story here. For about twice the price (give or take) the ESEE-5 is the gold standard of survival knives. It is probably a little bit more rugged and has a much better warranty. I don't own one but I did buy one as a gift for a friend and was super impressed with it.
- Medium Knives: If you want to step down in size/weight (but also in capability) you may consider a smaller knife. The ESEE-4 is probably the flagship example of this class of knife. It's large enough to get some work done without weighing you down. Again, I don't own one but this is one of the most widely reviewed survival knives on Earth.
This list barely scratches the surface. There are plenty of other excellent folding and fixed-blade knives out there. But if you want to buy a knife without really thinking about it, any of these would serve you well.
3 Minutes Without Oxygen
This is the most "squishy" of the Rule of 3s. This one is sometimes interpreted to mean different things. Commonly I see it interpreted to mean having dust masks so you can breath in a disaster. That's a good idea for sure, but I don't think it's nearly as immediate as maintaining an airway and stopping life-threatening bleeding, which is how I choose to interpret this rule. Whenever setting foot...well, anywhere really, I have a pretty robust first aid capability.
Advanced First Aid Kit
My first aid kit is based on Tactical Combat Casualty Care (TCCC) and the TCCC "MARCH" algorithm. MARCH stands for Massive hemorrhage, Airway, Respirations, Circulation, and Hypothermia prevention. It is equipped with pressure bandages, tourniquets, a hemostatic agent, and compressed gauze to control Massive hemorrhage. A naso-pharyngeal airway (NPA) supports Airway, and two HyFin chest seals and a decompression needle support Respiration. I have no capability to treat the Circulation component because it typically requires intraosseous fluid resuscitation, but Hypothermia is covered by a reflective space blanket. I have a very detailed write-up on my personal first aid kit here.

One other thing I strongly recommend keeping in your medical kit is a triangular bandage or three. These are sometimes called a cravat. The cravat is the multi-tool of bandages. If you absolutely have to create an improvised tourniquet it is probably the best tool for the job. It can be used to create a sling. Two of them can create a sling and swath. It can dress a wound in a pinch, can be used as a dust mask or head covering, or to filter large particulates out of water. I keep several in my pack. North American Rescue sells the best, in my opinion.
The Basic First Aid Kit
You don't have to go all-out with your first aid kit. Even some very basic supplies will go along way, and cover the situations you're most likely to run into. The basic first aid kit should consist of gloves, some 4x4 bandages, rolls of gauze, and a triangular bandage. You can make miracles happen with such minimal gear. I wrote a full article on the basic first aid kit here.

There are a few other little items in my first aid kit that support other survival priorities. I will point these out as they become applicable.
There are no affiliate links in the medical section. Counterfeit tourniquets and other medical supplies are rampant on Amazon and I simply won't risk your life by linking to a medical product there. I recommend purchasing from North American Rescue or Chinook Medical Gear, and all the links in this section are from those companies. I have spent several hundred dollars with each over the past two years and have been nothing but satisfied.
3 Hours Without Shelter
You can become hypothermic very quickly, even in what we typically consider "warm" weather. Sixty degrees doesn't seem that cold to most of us. When you are outdoors, sitting on cold, damp ground, perhaps slightly damp yourself with sweat, residual moisture from vegetation, or rain, and a light breeze is stirring, sixty degrees can feel much, much colder. And it can in fact be life-threatening. And the temperature may be much colder than 60.
Alternatively, depending on factors like your environment and time of year, extreme heat may be an issue. The best solution for extreme heat is water intake which will be covered in the next section, so I'm not going to spend a ton of time on that. The next best thing is to get out of the sun. In both cases the ability to create shelter is really important.
For me, "shelter" begins with waterproofing my pack. If the things in your pack become soaking wet they are going to do a much poorer job of keeping you warm. I recently wrote a detailed article about waterproofing a backpack. If you haven't read it I strongly recommend checking it out.
Your "Micro-Shelter": Clothing
Shelter really begins with clothing that provides appropriate protection from the expected weather conditions. I'm not going to tell you how to dress, but if you're expecting cold weather, have warm clothing. I really like Merino wool long underwear (and keep tops and bottoms in my pack). Wool keeps you warm, even when it is wet. I also keep a warm hat and a pair of gloves in my pack, fall through spring. If the potential for wet weather exists, you will want some sort of rain shell. I keep a rain jacket in my pack year round. It's not a uber-high-speed, ultra-lightweight, expensive coat - it's my old rain jacket, but it still does a pretty good job.
Building Shelter
Finally, we are into shelter construction, or creating some sort of roof over our heads. There are several routes you can go here. You can purchase a minimalist "tube tent" type shelter for under $20. These are easy to put up, but not terribly robust; I'm not sure how one would hold up in in heavy winds. There are also some lightweight, purpose-built tarps for shelter-building. I really dig the tents meant to be used with a hiking pole, though I don't have one.

I keep a couple things in my pack: a 6-foot by 8-foot, light-duty tarp and a contractor trash bag. The tarp cost $5 from REI. It is light duty but still more robust than a lot of emergency shelter material. On each corner and on the center of each side I tied a pre-cut, 4-foot section of 550-cord to make stringing it up easier. This is my go-to shelter. I also keep a 2-mil contractor trashbag. it folds flat and takes up almost no room. It wouldn't be my first choice as a shelter material, but it could supplement the tarp, be a dry ground-cloth, or an improvised sleeping bag. Along with some sort of material to put up over your head, I would strongly recommend a good amount of 550-cord with which to hang it.
Sheltering Pro-Tip
If you do want to use a trash bag, plastic sheeting, or a space blanket as a tarp, you will want to know how to string it up with 550 cord. I like to use a small rock to create a button. Simply wrap the rock in the material, where you want a piece of 550 cord to originate from.

Next, wrap the material around the stone, as shown below. Use the stone as a button and tie your cordage around it. This will distribute the surface area of the cord over a fairly large area, preventing the plastic from tearing.

3 Days Without Water
There is no ambiguity in the meaning of this rule: you cannot live very long without water. You should have water inside your body, the ability to carry water in your pack, and the ability to procure more water safely. There are a variety of ways of doing the latter, but first let's briefly address the former.
Hydration
The best container for water is your body. Hopefully you will be starting a survival event well-hydrated. Many Americans are chronically dehydrated, so you might have to work on this. If you work in emergency services, military, etc. this might mean slamming a quart (or more) of water right before mission kickoff to get caught up and maybe a little ahead of the curve.
As you are hiking/moving/working/whatever, you want to keep putting water into your body. It does no good in water bottles on your back if your body needs it. I don't mean drink until you eyeballs are swimming, but stay ahead of the curve. Drink before you get thirsty. If your urine starts to smell or becomes dark, catch up before it becomes a (bigger) problem. This also means that when you find a viable source of water, you may want to spend enough time there to produce enough water to fill your body, then some more to fill your containers.
Water Containers
The next best solution is carrying actual water. The problem is that water is bulky and at 8.3 pounds per gallon, it's heavy. Again, we're doing a balancing act of carrying enough without overloading ourselves. I like to carry half a gallon of water in two, 1-quart containers. This is a good amount of water and even if I am coming from a pretty serious hydration deficit, this should get me caught back up. In my area carrying a half-gallon of water is plenty adequate because there are creeks and streams everywhere. In arid environments this might be irresponsibly light.
I have written about this several times before but I am very picky about my water bottles. I like wide-mouth, single walled, 32-ounce bottles, for very specific reasons. Mine are from Pathfinder and I have nothing but good things to say about them. First, I like the wide mouth because it is easiest to fill from shallow streams. I also like it because it fits most common outdoor water filters. I like the single, non-insulated wall because it allows me to boil water right in my water bottle should I need to. Finally the 32-ounce size works with just about every water-purification tablet on the market. Hydration bladders are neat but they offer none of these advantages.

Water Procurement
Finally, there is water procurement. Water procurement depends on your ability to find a source of water. In some areas this is fairly easy; in others it is extremely difficult. Once you have found water you have to render it potable. There are several mechanisms you can use to make this happen. They are filtering, water purification tablets, and boiling. There are also a few other, esoteric methods like solar stills, but they are beyond the scope of this article. Water purification is a somewhat difficult subject and no method is perfect, so take this as a broad brush primer.

Filtration
Water filters are sort of the crème de la crème when it comes to water purification. They have some huge advantages over water purification tablets or boiling. Namely, they can get a bunch of sediment, harmful chemicals, and heavy metals out of the water, too. Boiling and purification tablets will kill living organisms like viruses, protozoa, and bacteria, but they won't do crap for fertilizer or pesticide runoff. Filters will. Filters are also faster than waiting on tablets. My MSR filter can produce a liter of clean water in 1-2 minutes. Filters have some big problems, too. They are bulk and heavy, and relatively expensive.
They also don't filter out absolutely everything. While effective against bacteria and protozoa, many - like my personal MSR MiniWorks EX - are not effective against viruses. And their elements get clogged and require cleaning. This happens pretty quickly in dirty water. But personally, I wouldn't want to find myself in need of water without a filter. Since filters don't get absolutely everything, it's a good idea to also have a secondary method of purification, like purification tablets or boiling. Let's talk about them.
Water Purification Tablets
Chemical tables have a couple huge things going for them. They are inexpensive, lightweight, take up almost no space whatsoever, and very difficult to destroy. I have used quite a few water purification tablets and Katadyn Micropur MP1 are my favorite. They do leave a slight chlorine taste but it is very mild and far less offensive than iodine. These tablets are indivually packaged so each one is protected. Just drop one in a quart of water, wait 30 minutes (4 hours if the water is cold or very dirty) and you're good to go. Twenty of these bad boys weighs less than an ounce. As you can see from the photo above it's time for me to replenish.
Finally, there's boiling. Boiling is sort of the end-all/be-all of killing pathogens. Boiling is not that difficult and requires no special equipment - just a fire and a fire-worthy container. A hard, rolling boil for 1 minute (or 3 minutes above 6,000 feet of elevation). Of note, boiling won't remove chemicals, heavy metals, sediment, or that sort of thing. In fact, boiling actually concentrates them because they all stay in the pot while you boil off some of the water.

Again, water treatment is a complex topic. Everyone - me included - wants a one-and-done solution but it's rarely that simple. If I'm drinking water in the mountainous backcountry I'm probably OK just dropping a MP1 in it for a couple hours and calling it good. If I'm in lowland where agricultural or industrial runoff is possible or in a true urban environment, I will filter AND boil or treat with tablets.
3 Weeks Without Food
This one is pretty low on our list of priorities. If we're doing everything right we shouldn't get lost and if we do, we should be recovered withing 24-48 hours. Still, shit happens, and we don't want to be miserable for 24-48 hours. Food also aids in endogenous heat production, keeps energy levels high, and keeps us functioning at a high cognitive level. Put another way, it keeps you warmer, stronger, and smarter, all of which are really desirable.
Keep in mind that good intake necessitates water intake; the more you eat the more water your body needs to process that food. If water is very scarce it's probably a good idea to forgo eating or to eat only minimally in a short-term survival situation. Make sure you have water and the means to procure more before you dig into your food pack.
I'm not going to spend a lot of time here, but I will tell you what I like. First, I have several mint tea bags in my kit. Mint is personal preference, and personally I like Bigelow's Plantation Mint because it has a bit of black tea, and hence caffeine. I very much like a concept that I read years ago that says, if you get lost stop and brew tea. It will force you to slow down and take in your surroundings. It will also get a some water and warmth into your body. And if you're like me and need your caffeine every morning you're not going to do without just because you're lost in the woods.
My food is a 1-gallon Ziploc bag filled with energy-dense stuff. I have several packs of beef jerky, individual packages of peanuts, some candy (I really like the Japanese Hi-Chew candy) and some granola bars. Nothing requires preparation and everything is individually wrapped (and thus waterproof). Choose foods that you like and change them out occasionally.
Wilderness Survival Basics: Fire
You may have noticed that fire factored in to nearly all of the above categories. Fire provides light and heat and the ability to dry wet clothing. It provides a sense of security and perhaps some actual security. Fire provides entertainment - it is the "Ranger TV" - and companionship. Obviously it can be used to cook, importantly it can boil water, and perhaps most important of all it is an excellent signaling tool in both daylight and dark. Fire satisfies a whole lot of survival priorities.
IMPORTANT NOTE: Please see my COMPREHENSIVE: HOW TO BUILD A FIRE article. With over 13,000 words and 70 photos, it goes far more in-depth into starting a fire.
Building a fire isn't that complicated but it can be difficult, especially when you have minimal tools and the weather isn't cooperating, and when your body is tired and cold. I'm not going to focus on how to build a fire here - I just don't have time to deep-dive that. Instead I'm going to focus on some tools and expendables that can make building a fire massively easier. Let's look at fire-starting tools first. I like to break them into two categories: consumable tools and durable tools.
Fire-Starting Tools: Matches & Lighters
Consumable fire-starting tools are those tools that provide you with only a limited number of lights/strikes. This category basically consists of matches and lighters. Don't discount these, though. When it comes to building a fire, simple and easy is usually best. Though those of us that really dig into wilderness survival love to practice bow drills and flint-and-steel, if we really needed a fire and we had a Bic lighter, we'd use the Bic lighter. I strongly recommend having something like this in your kit. These tools are very easy to use and probably the fastest way to get a fire going.

The problem with them is that they are very breakable and/or provide only a limited supply. Bic lighters are awesome but they are very fragile. There are Bic lighter covers that protect the lighter and I don't own one but they seem like a really good idea (and ExoTAC makes really good stuff, so it probably is a good productA). For matches I really like the UCO Stormproof matches. They burn even high wind and will even keep burning if completely submerged (not recommended, but they'll light even in heavy rain).

If you're really having trouble getting a fire going you can lay four or five of these as your tinder and light them directly - you should definitely be able to get some small kindling going off of that. These do get banged up over time, so a ruggedized match case isn't a bad idea, and I'll definitely get one when I replace my aging matches. Of course you can also use regular matches, but they burn out much more quickly. They can be waterproofed (and sort of create their own tinder) but dipping them in paraffin wax (I got in trouble as a kid for dripping wax all over the kitchen table doing this).
Sparking Fire-Starting Tools
Durable fire-starting tools don't last forever but generally last for thousands to tens-of-thousands of strikes. Tools in this category generally produce sparks. They last longer, are usually more durable, but they also more difficult to use successfully. I recommend having a tool like this and pairing it with matches or a lighter. If the matches or lighter run out, or you have the luxury of preserving them, use the sparking device. If you need a fire in a hurry use the consumable tool. There are several tools in this category that are worth mentioning specifically.

The ferrocerium rod is probably the most prominent example of a durable fire-starting tool. Striking them with steel throws off a shower of sparks. Ferro rods come in a variety of shapes and sizes. The photo above shows two different sizes: a large on that affixes to my knife sheath, and smaller ones that are designed to be carried on a keychain. I recommend carrying a fairly large one; the smaller they are, the harder they are to use. I have carried small, pocket-sized one on my person for at least a decade now. They're hard to use but it can be done.
The magnesium block is a neat example of such a tool. These consist of a ferro rod embedded into the top of a block of magnesium (one is show lower left in the fire-starter photo above). Some magnesium is scraped off the block with a knife or file (as might be found on a multi-tool), the the ferro rod is use to spray sparks into the magnesium shavings. The shavings light and serve as their own tinder. For decades the trusted brand as been the Doan Magnesium Block but there are some from Friendly Swede that look neat. I haven't tried them yet so I don't recommend them but I am interested enough to give them a shot. Stay away from Coghlan's-brand mag blocks because the ferrocerium rod is known to separate from the magnesium block.
One of my favorite fire-starters is the Spark-Lite. The Spark-Lite consists of a striking wheel and flint, similar to the striking mechanism found in a cigarette lighter. I like the metal models that have replaceable flints (Zippo flints work). These typically come in a small box that is loaded with commercial tinder (I also throw in the Allen wrench necessary to change flints, and some extra flints). I find this type of starter super easy for me to use.

Tinder
Having a fire-starer is only half the battle. The other half is having something that will catch a spark or a flame. This element of fire-building is known as tinder. I'm assuming most of you know how to start a fire, but if you haven't built one in a while it's always good to think about tinder. Tinder is the most finicky, difficult part of starting a fire.
You can either bring tinder with you or procure it from the environment. The ability to procure tinder on-location is good because, in theory at least, you should always be able to get tinder. In reality it's a little more difficult than that. Weather (like heavy rain) and your specific environment can play a huge role in your ability to procure tinder, even if you are an accomplished fire builder. So, it's a really good idea to bring at least a little bit of tinder with you.

There are all kinds of things you can use as tinder. You can purchase store-bought tinder products. You can use dryer lint, gauze, and other light, fluffy materials. If you are willing to prepare ahead of time, one of the most effective forms of tinder is a cotton ball that has been impregnated with petroleum jelly - it lights easily and will burn for several minutes.
Don't forget what you have on you. If your first aid kit contains gauze (it probably should, after all) you have some readily available tinder. You can make many common materials like gauze burn longer by adding hand sanitizer (70% alcohol or greater) to it. Though hand sanitizer will sometimes burn on its own, it tends to work better with something like gauze as a wick. Alcohol preps will also burn, and burn relatively slow.
Below are the results of three tinders burning simultaneously. At right is a gauze 2x2 with 1 ounce of hand sanitizer. The one in the middle is a Tinder-Quick tab, and the one on the left is a petroleum jelly cotton ball. At 30 seconds all appear to be burning with about equal intensity.

At three minutes the Tinder-Quik is long gone. The gauze is still holding a weak flame, but the petroleum cotton ball is still rocking and rolling. A small stash of these in a old medication bottle would be a really, really good thing to have with you.

Closing Thoughts
I have just a few key points here. First, survival is a huge topic and this article has only scratched the surface. There is a ton to learn, and like the class this article accompanies, this is only a crash course. Secondly, this knowledge is massively more useful to you if you get out and practice these skills. You don't have to take a month off and move to the backcountry to practice. Fire-building can be practiced in your grill at home. You can practice land navigation in a public park. You can filter water out of a shallow mud puddle. The bottom line is: do something!
Finally, prepare to survive. If you get into preparing your fire-starters, water procurement tools, shelter items, etc., you'll be well ahead of the curve if you do get lost. There is a paradox at play here, though. The more you prepare to survive, the less you will probably need those preparations. It seems that those of us that really prepare also start to see the need for things like area familiarization, route planning, maps, and letting others know where we're going. Whatever you do, don't find yourself lost (get it?) in the backcountry wishing you'd done more. Prepare now and learn some wilderness survival basics!

